
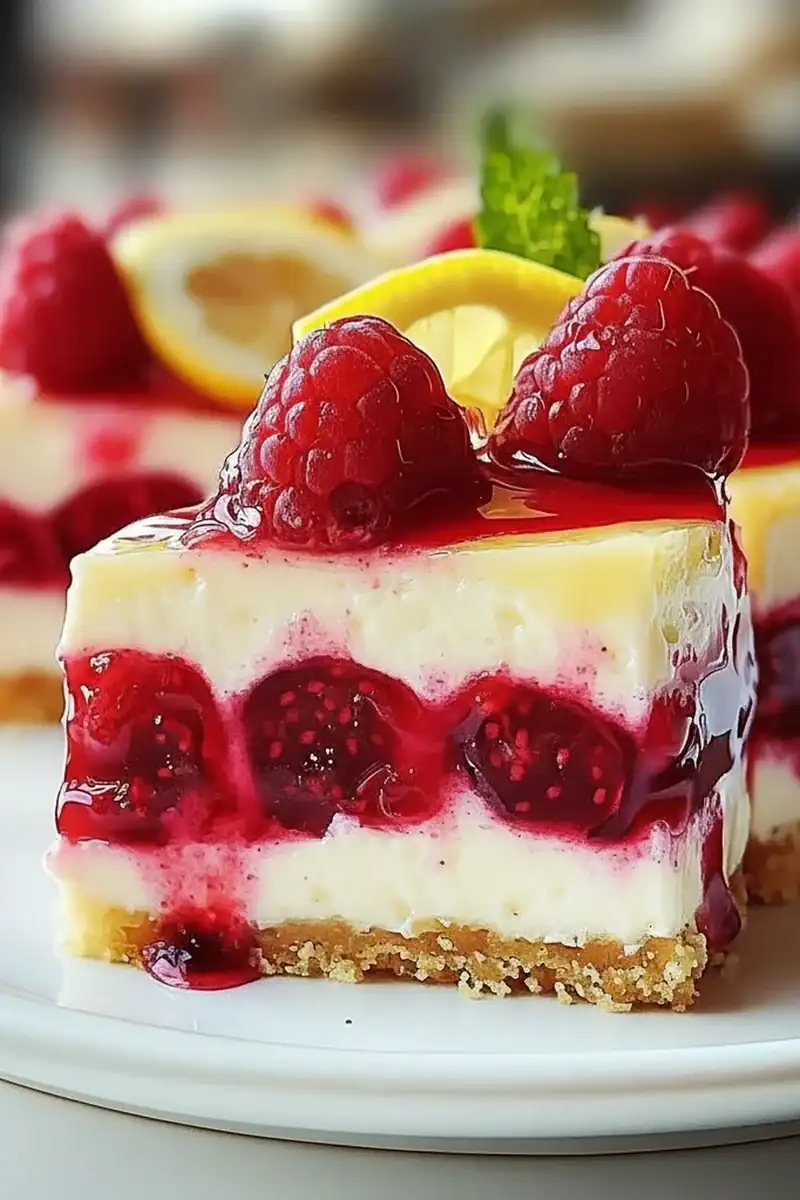
Lemon Raspberry Swirl Cheesecake Recipe
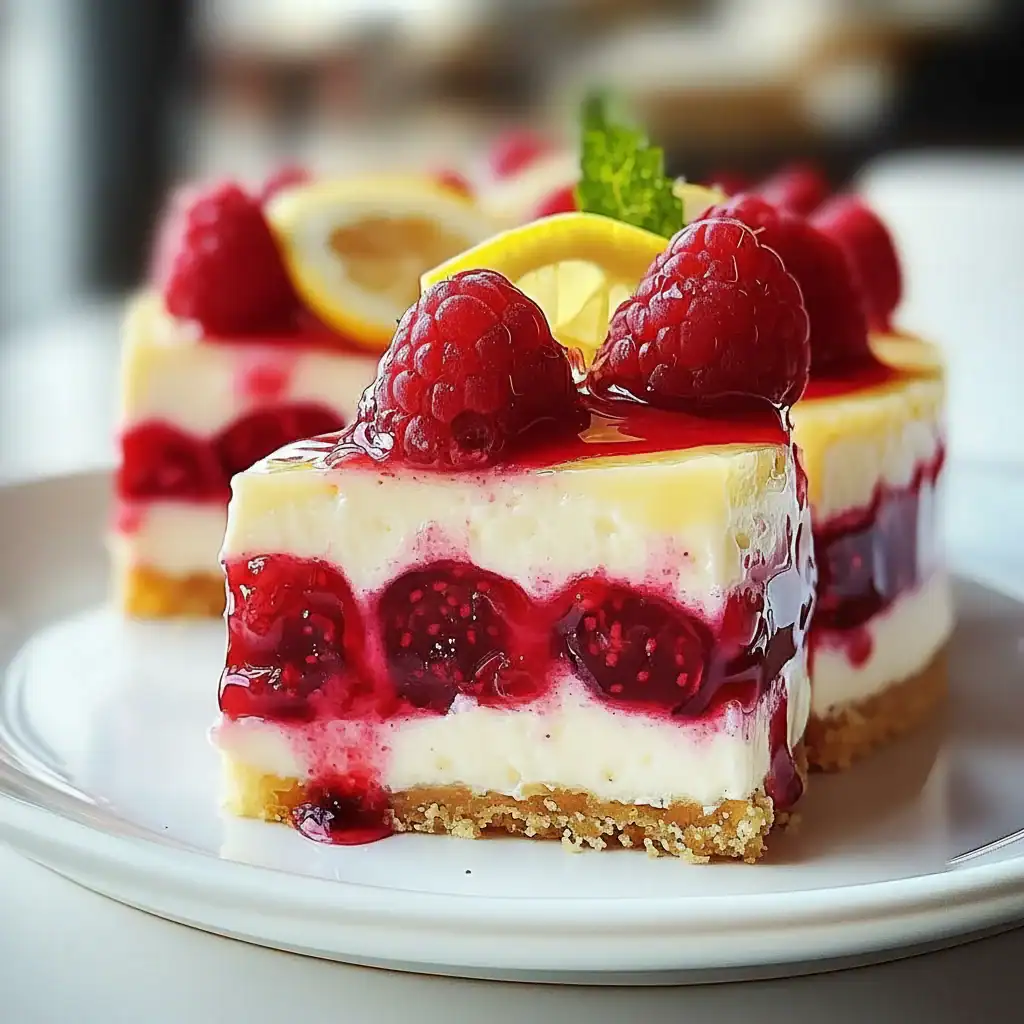
There are certain flavour pairings that just feel like they were meant to be, and for me, the combination of zesty lemon and sweet, sharp raspberries is right at the top of that list. This Lemon Raspberry Swirl Cheesecake Recipe is the result of many weekends spent in the kitchen, tweaking and testing until I landed on what I believe is the perfect balance. We’re talking about a rich, creamy lemon cheesecake filling, a buttery biscuit base that provides the perfect crunch, and a vibrant raspberry sauce swirled through the top, creating a beautiful marbled effect that looks as incredible as it tastes.
I stumbled upon this combination by accident, trying to use up a punnet of raspberries and a few lemons, and it’s been a hit ever since. It’s a dessert that feels both elegant and comforting, a real centrepiece for a special meal but straightforward enough to make just because you fancy a treat. It works beautifully for a summer garden party when berries are at their peak, but honestly, we enjoy it all year round. The bright flavours are a welcome lift on a grey winter’s day, too.
This recipe guides you through creating a baked cheesecake that is dense, creamy, and completely free of cracks. We’ll use a simple water bath technique that steams the cheesecake as it bakes, guaranteeing a smooth, luscious texture every single time. It’s a method that might sound intimidating, but I promise it’s a game-changer for achieving that professional-quality finish at home.
Recipe Overview
This lemon raspberry swirl cheesecake strikes a beautiful balance between tangy and sweet. The filling is dense and velvety, with a bright citrus flavour from fresh lemon zest and juice, which cuts through the richness of the cream cheese. The homemade raspberry swirl adds a burst of fruitiness and a stunning visual appeal. I once tried to rush the chilling process, and the texture just wasn’t the same. It really pays to be patient and let it set properly for that perfect slice.
- Prep Time: 30 minutes
- Cook Time: 60-70 minutes
- Chilling Time: 6 hours (or overnight)
- Total Time: 7 hours 40 minutes
- Servings: 10-12 people
- Difficulty: Medium
Why You’ll Love This Lemon Raspberry Swirl Cheesecake Recipe
- A Perfect Flavour Pairing: The sharp, zesty lemon cheesecake filling is beautifully complemented by the sweet and slightly tart raspberry coulis. It’s a classic combination that delivers a refreshing yet indulgent dessert.
- Stunning Presentation: The marbled swirl effect is surprisingly simple to create but looks incredibly impressive. It’s the kind of dessert that gets audible gasps when you bring it to the table.
- Amazingly Creamy Texture: Following our steps, particularly using a water bath, results in a cheesecake that is unbelievably smooth and creamy, with no cracks in sight.
- Ideal for Making Ahead: This cheesecake actually improves with time. It needs to be made at least 6 hours ahead, but it’s even better the next day, making it a brilliant choice for stress-free entertaining.
- Family Tested: My kids absolutely devour this every time I make it. They love the bright pink swirls and the crunchy biscuit base, and it always gets compliments from friends and family.
Ingredients You’ll Need
For the best results, I always recommend using full-fat ingredients, especially for the cream cheese and soured cream. It makes a world of difference to the final texture. I find that Philadelphia Original Full Fat Cream Cheese gives the most consistent, creamy results. Ensure your cold ingredients are at room temperature before you begin.
- For the Biscuit Base:
- 250g digestive biscuits
- 125g unsalted butter, melted
- 1 tbsp caster sugar
- For the Raspberry Swirl:
- 200g fresh or frozen raspberries
- 50g caster sugar
- 1 tbsp lemon juice
- For the Lemon Cheesecake Filling:
- 700g full-fat cream cheese, at room temperature
- 200g caster sugar
- 200ml soured cream, at room temperature
- 3 large eggs, plus 1 egg yolk, at room temperature
- 1 tsp vanilla extract
- Zest of 2 large lemons
- 60ml fresh lemon juice (from 1-2 lemons)
Adam’s Tip: Don’t skip bringing your cream cheese, soured cream, and eggs to room temperature. This is the single most important step for a smooth, lump-free cheesecake filling. I usually take them out of the fridge an hour or two before I start.
How to Make Lemon Raspberry Swirl Cheesecake
The process is broken down into three main parts: making the base, preparing the raspberry swirl, and mixing the cheesecake filling. It’s a methodical recipe, but each step is straightforward. We’ll bake it low and slow to ensure that perfect texture.
- Prepare the Tin and Base: Preheat your oven to 180°C (160°C fan). Grease and line the base of a 23cm springform cake tin with baking parchment. To make the base, crush the digestive biscuits into fine crumbs using a food processor, or place them in a bag and bash with a rolling pin. Mix the crumbs with the caster sugar and melted butter until it resembles wet sand. Tip into the prepared tin and press down firmly and evenly with the back of a spoon. Bake for 10 minutes, then set aside to cool.
- Make the Raspberry Swirl: While the base cools, place the raspberries, 50g of sugar, and 1 tbsp of lemon juice into a small saucepan. Heat over a medium heat for 5-7 minutes, stirring occasionally, until the raspberries have broken down and the sauce has thickened slightly. For a smooth sauce, you can push it through a fine-mesh sieve to remove the seeds. I personally like the texture of the seeds, so I often leave them in. Set aside to cool completely.
- Start the Cheesecake Filling: Reduce the oven temperature to 160°C (140°C fan). In a large bowl using a stand mixer or electric hand mixer, beat the room-temperature cream cheese on a low speed until smooth and creamy. Scrape down the sides of the bowl, then gradually add the 200g of caster sugar, beating until just combined. Don’t over-mix here; we want to avoid incorporating too much air.
- Add Wet Ingredients: Add the soured cream, vanilla extract, lemon zest, and lemon juice, and mix on low speed until just incorporated. Add the eggs and the extra yolk one at a time, mixing on the lowest speed until each one is just blended in. Scrape the bowl down well to ensure everything is combined. The final mixture should be smooth and velvety.
- Assemble and Swirl: Pour the cheesecake filling over the cooled biscuit base. Dollop spoonfuls of the cooled raspberry sauce over the top of the filling. What works best for me when swirling is to use a skewer or the tip of a knife to gently drag the sauce through the batter in a figure-eight motion. Be careful not to overdo it, or you’ll lose the distinct marbled pattern.
- Prepare the Water Bath and Bake: Wrap the outside of your springform tin in a double layer of heavy-duty aluminium foil, ensuring it’s watertight. Place the tin inside a larger roasting tray. Pour the cheesecake batter into the tin. Carefully pour boiling water into the roasting tray until it comes halfway up the sides of the cheesecake tin. This is called a bain-marie or water bath, and it’s key to preventing cracks.
- Bake and Cool Slowly: Carefully transfer to the preheated oven and bake for 60-70 minutes. The cheesecake is done when the edges are set, but the centre still has a slight wobble. Turn off the oven, prop the door open with a wooden spoon, and leave the cheesecake to cool completely in the oven for at least an hour. This gradual cooling process is another secret to a crack-free surface.
- Chill Thoroughly: Once completely cool, remove the cheesecake from the water bath and the foil. Cover loosely with cling film and transfer to the refrigerator to chill for at least 6 hours, but preferably overnight. This step is non-negotiable for the perfect firm, sliceable texture. To serve, run a thin knife around the edge before releasing the springform tin.
Tips From My Kitchen
- Room Temperature is Key: I can’t stress this enough. Cold cream cheese will result in a lumpy batter that’s impossible to smooth out. Taking that extra hour for ingredients to come to room temperature is well worth it.
- The Secret is a Water Bath: Don’t be tempted to skip the water bath. The steam it creates in the oven ensures the cheesecake bakes gently and evenly, which is what gives it that ultra-creamy texture and prevents the surface from cracking as it cools.
- Make-Ahead Magic: This is the ideal dessert to prepare in advance. The flavour and texture actually improve after a night in the fridge, as it gives the cheesecake time to fully set and the flavours to meld together.
- Storage: Store any leftover cheesecake covered in the refrigerator. It will keep well for up to 5 days. I find it’s best to keep it in the springform tin base to protect it. It is not suitable for freezing, as the texture can become watery upon thawing.
Equipment You’ll Need
- 23cm (9-inch) springform cake tin
- Large roasting tin (for the water bath)
- Stand mixer or electric hand mixer
- Food processor (or a bag and rolling pin)
- Heavy-duty aluminium foil
- Small saucepan
- Wire cooling rack
Common Mistakes to Avoid
- Over-mixing the Batter: Beating the filling on a high speed incorporates too much air. These air bubbles rise during baking and can cause the cheesecake to puff up and then crack as it cools. Mix on low speed and only until the ingredients are just combined.
- Sudden Temperature Changes: Taking a cheesecake from a hot oven straight into a cool room is a recipe for a cracked top. The slow cooling process—first in the turned-off oven, then at room temperature—is vital for a flawless finish.
- Not Chilling it Long Enough: A cheesecake needs time to set fully. If you try to slice it too early, you’ll be met with a soft, messy centre. An overnight chill is always best for clean, beautiful slices.
Delicious Variations to Try
Once you’ve mastered this lemon raspberry swirl cheesecake, feel free to experiment! It’s a wonderfully adaptable recipe.
- Lime and Blueberry Swirl: Swap the lemons for limes and the raspberries for blueberries for a different, equally delicious fruit combination.
- White Chocolate Raspberry: For extra indulgence, gently fold 100g of melted and cooled white chocolate into the cheesecake batter just before pouring it into the base.
- Gingernut Crust: Instead of digestive biscuits, use gingernut biscuits for the base. The warm, spicy notes of ginger are a fantastic contrast to the sharp lemon and raspberry.
What to Serve With This Fruit Swirl Cheesecake
This dessert is a star on its own, but a few simple accompaniments can enhance it even further. It’s a fantastic dessert to follow a savoury main course, like my Garlic Parmesan Chicken Pasta, as its brightness cuts through any richness.
- Fresh Berries: A small handful of fresh raspberries on the side of each slice looks beautiful and adds a fresh texture.
- Crème Fraîche: A dollop of crème fraîche or a light, unsweetened whipped cream can balance the sweetness and add another layer of creamy texture.
- Mint Garnish: A few fresh mint leaves provide a lovely splash of green and a hint of fresh aroma.
Frequently Asked Questions
Lemon Raspberry Swirl Cheesecake
Ingredients
Method
- Prepare the Tin and Base: Preheat your oven to 180°C (160°C fan). Grease and line the base of a 23cm springform cake tin with baking parchment. To make the base, crush the digestive biscuits into fine crumbs using a food processor, or place them in a bag and bash with a rolling pin. Mix the crumbs with the caster sugar and melted butter until it resembles wet sand. Tip into the prepared tin and press down firmly and evenly with the back of a spoon. Bake for 10 minutes, then set aside to cool.
- Make the Raspberry Swirl: While the base cools, place the raspberries, 50g of sugar, and 1 tbsp of lemon juice into a small saucepan. Heat over a medium heat for 5-7 minutes, stirring occasionally, until the raspberries have broken down and the sauce has thickened slightly. For a smooth sauce, you can push it through a fine-mesh sieve to remove the seeds. I personally like the texture of the seeds, so I often leave them in. Set aside to cool completely.
- Start the Cheesecake Filling: Reduce the oven temperature to 160°C (140°C fan). In a large bowl using a stand mixer or electric hand mixer, beat the room-temperature cream cheese on a low speed until smooth and creamy. Scrape down the sides of the bowl, then gradually add the 200g of caster sugar, beating until just combined. Don't over-mix here; we want to avoid incorporating too much air.
- Add Wet Ingredients: Add the soured cream, vanilla extract, lemon zest, and lemon juice, and mix on low speed until just incorporated. Add the eggs and the extra yolk one at a time, mixing on the lowest speed until each one is just blended in. Scrape the bowl down well to ensure everything is combined. The final mixture should be smooth and velvety.
- Assemble and Swirl: Pour the cheesecake filling over the cooled biscuit base. Dollop spoonfuls of the cooled raspberry sauce over the top of the filling. What works best for me when swirling is to use a skewer or the tip of a knife to gently drag the sauce through the batter in a figure-eight motion. Be careful not to overdo it, or you'll lose the distinct marbled pattern.
- Prepare the Water Bath and Bake: Wrap the outside of your springform tin in a double layer of heavy-duty aluminium foil, ensuring it's watertight. Place the tin inside a larger roasting tray. Pour the cheesecake batter into the tin. Carefully pour boiling water into the roasting tray until it comes halfway up the sides of the cheesecake tin. This is called a bain-marie or water bath, and it's key to preventing cracks.
- Bake and Cool Slowly: Carefully transfer to the preheated oven and bake for 60-70 minutes. The cheesecake is done when the edges are set, but the centre still has a slight wobble. Turn off the oven, prop the door open with a wooden spoon, and leave the cheesecake to cool completely in the oven for at least an hour. This gradual cooling process is another secret to a crack-free surface.
- Chill Thoroughly: Once completely cool, remove the cheesecake from the water bath and the foil. Cover loosely with cling film and transfer to the refrigerator to chill for at least 6 hours, but preferably overnight. This step is non-negotiable for the perfect firm, sliceable texture. To serve, run a thin knife around the edge before releasing the springform tin.
Notes
I really hope you enjoy making this Lemon Raspberry Swirl Cheesecake. It’s one of my all-time favourite desserts to make, and watching the swirls come to life is always so satisfying. It’s a recipe that never fails to impress and always disappears quickly whenever I serve it. If you give it a try, I’d love to hear how it turned out for you in the comments below!
Happy baking,
Adam


