
Flaky Apple Hand Pies Recipe Dessert
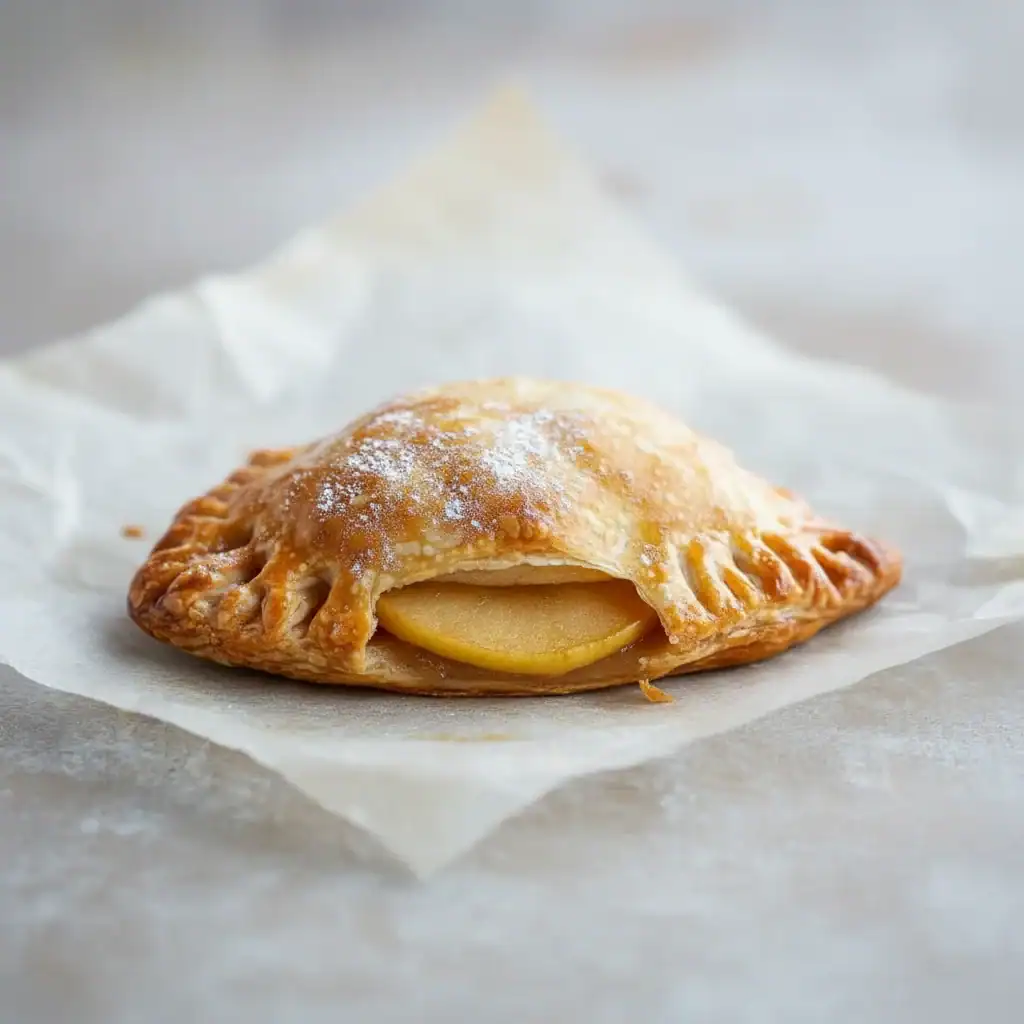
There is a particular magic in baking on a crisp autumn afternoon, when the air outside has a slight chill and the kitchen feels like the warmest, most welcoming place on earth. For me, that magic is often captured in this Flaky Apple Hand Pies Recipe. The scent of sweet apples and warm cinnamon bubbling away inside a buttery, shattering pastry case is pure joy. It’s a recipe I’ve been making for over 8 years, and it never disappoints, delivering that classic apple pie experience in a neat, individual portion you can eat with your hands.
What makes these mini apple pies so special is the contrast in textures. We achieve an incredibly light, flaky puff pastry shell that gives way to a soft, fragrant filling. We use tart Bramley apples, which break down beautifully when cooked, creating a jammy consistency that isn’t overly sweet. This isn’t just a dessert; it’s a portable piece of comfort, ideal for tucking into lunchboxes, taking on a weekend walk, or simply enjoying with a hot cup of tea by the fire.
This fall dessert is one that everyone seems to love, from the youngest to the oldest at our table. It’s a straightforward recipe that relies on good ingredients and a couple of simple techniques to create something truly memorable. Whether you’re an experienced baker or just starting, you’ll find a lot to love about making (and eating) these fruit hand pies.
Recipe Overview
This Flaky Apple Hand Pies Recipe delivers individual pastries with a crisp, golden-brown crust and a warm, spiced apple filling. The flavour is a perfect balance of tart apple, sweet brown sugar, and a gentle warmth from cinnamon and nutmeg. I’ve tested this with both all-butter and standard ready-rolled puff pastry, and while all-butter is sublime, the standard version still produces a wonderfully crisp result. Expect a dessert that feels both rustic and refined.
- Prep Time: 25 minutes
- Cook Time: 25 minutes
- Total Time: 50 minutes
- Servings: 8 hand pies
- Difficulty: Easy
Why You’ll Love This Flaky Apple Hand Pies Recipe Dessert
- Genuine Flavour: The filling isn’t just sweet; it has a wonderful tartness from the Bramley apples, which are cooked down with brown sugar until they are soft and jammy, perfectly complemented by the warm spice notes.
- Ready in Under an Hour: From starting the filling to pulling the golden pies from the oven, this entire recipe comes together in about 50 minutes, making it a great option for a weekend baking project.
- Flexible Recipe: You can easily swap the apples for firm pears or even a mix of berries in the summer. For an extra touch of decadence, a few chopped walnuts or a spoonful of salted caramel in the filling works beautifully.
- Great for On-the-Go Treats: Because they’re self-contained, these mini apple pies are brilliant for picnics, school lunchboxes, or as a bake-sale contribution that always gets compliments.
- Family Tested: My kids adore these, especially when they’re still slightly warm from the oven. They’re a fantastic way to get them involved in the kitchen, as sealing the edges is a fun job for little hands.
Ingredients You’ll Need
We’re using ready-rolled puff pastry here for convenience, but the results are still bakery-quality. I recommend using an all-butter puff pastry if you can find it, as the flavour is noticeably richer. For this flaky apple hand pies recipe, Jus-Rol is a reliable brand that I use often.
- For the Apple Filling:
- 450g Bramley apples (about 2 large), peeled, cored, and diced into 1cm cubes
- 1 tbsp lemon juice
- 75g light brown soft sugar
- 1 tbsp plain flour
- 1 tsp ground cinnamon
- ¼ tsp ground nutmeg
- 25g unsalted butter
- 1 tbsp water
- For Assembly:
- 500g block or 2 x 320g sheets of ready-rolled all-butter puff pastry
- 1 medium free-range egg, beaten with 1 tbsp of milk (for the egg wash)
- 2 tbsp demerara sugar, for sprinkling
Adam’s Tip: If your kitchen is warm, pop the cut pastry squares back in the fridge for 10 minutes before you fill them. Cold pastry is the key to getting that fantastic, flaky puff in the oven. It makes all the difference.
How to Make Flaky Apple Hand Pies
The process for these fruit hand pies is quite straightforward. We’ll first make the simple stovetop filling, let it cool slightly, then assemble our pies and bake them until they are perfectly golden and puffed.
- Prepare the Apples: In a medium bowl, toss the diced apples with the lemon juice. This prevents them from browning.
- Make the Filling: In a medium saucepan, combine the apples, light brown sugar, plain flour, cinnamon, and nutmeg. Stir to coat everything evenly. Add the unsalted butter and water.
- Cook the Filling: Place the saucepan over a medium heat. Cook, stirring occasionally, for 8-10 minutes. The apples should soften but still hold their shape, and the mixture will thicken into a syrupy consistency. Remove from the heat and set aside to cool completely. This is crucial – a warm filling will melt the pastry butter.
- Prepare the Pastry: Preheat your oven to 200°C (180°C fan) and line two large baking trays with parchment paper. Unroll your puff pastry sheets. If using a block, roll it out on a lightly floured surface to about the thickness of a £1 coin. Cut the pastry into 8 equal rectangles (approximately 10cm x 15cm each).
- Fill the Pies: Spoon about 2 tablespoons of the cooled apple filling onto one half of each pastry rectangle, leaving a 1cm border around the edges. What works best for me is not to overfill them, as tempting as it is! Too much filling will bubble out during baking.
- Seal and Crimp: Brush the borders of the pastry with a little of the egg wash. Fold the empty half of the pastry over the filling to create a parcel. Gently press the edges together with your fingers, then use the tines of a fork to crimp and seal the edges firmly.
- Chill and Finish: Place the assembled hand pies onto the prepared baking trays. If you have time, pop them into the fridge for 15 minutes to chill. This helps them become extra flaky. Just before baking, brush the tops with the remaining egg wash, then make two small slits in the top of each pie with a sharp knife to allow steam to escape. Sprinkle generously with demerara sugar.
- Bake to Perfection: Bake for 20-25 minutes, or until the pastry is deeply golden brown, puffed up, and the filling is just starting to bubble through the vents.
- Cool: Let the hand pies cool on the baking tray for 5 minutes before carefully transferring them to a wire rack to cool further. They can be enjoyed warm or at room temperature.
Tips From My Kitchen
- Temperature Control: The golden rule of puff pastry is to keep it cold. A hot oven hitting cold, butter-layered pastry creates the steam that makes it puff up. Don’t skip the chilling step before baking if you can help it.
- The Secret Step: The sprinkle of demerara sugar before baking is more than just decoration. It creates a wonderfully crunchy, caramelised top that contrasts beautifully with the flaky pastry. I learned that adding that tiny splash of milk to the egg wash helps it brush on more evenly for a consistent golden finish.
- Make-Ahead: The apple filling can be made up to 2 days in advance and stored in an airtight container in the fridge. You can also assemble the pies, place them on the baking tray, cover, and refrigerate for up to 4 hours before baking. Just add the egg wash and sugar right before they go in the oven.
- Storage: These hand pies are best eaten on the day they are made. However, any leftovers can be stored in an airtight container at room temperature for up to 2 days. You can refresh them in a warm oven for 5 minutes to bring back some of their crispness.
Equipment You’ll Need
You don’t need much in the way of specialist kit for this apple hand pies recipe, just some standard kitchen tools.
- Medium saucepan
- Baking trays
- Parchment paper
- Pastry brush
- Wire cooling rack
Common Mistakes to Avoid
- Overfilling the Pastry: It’s easy to get carried away, but too much filling will inevitably leak out, creating a sticky mess and preventing the pastry from sealing and puffing properly. Stick to about two tablespoons per pie.
- The Oven Isn’t Hot Enough: Puff pastry needs a blast of high heat to create steam from the butter layers, which is what makes it rise. An oven that’s too cool will result in flat, slightly greasy pies. Ensure your oven is fully preheated to 200°C (180°C fan).
- Skipping the Chill Time: Chilling the assembled pies before they go into the oven solidifies the butter. This ensures that when they hit the hot oven, the butter melts and creates steam in distinct layers, leading to a much flakier, higher-rising pastry.
What to Serve With Flaky Apple Hand Pies
While these are delightful on their own, a few simple accompaniments can elevate them further. It’s a wonderful dessert to follow a hearty main like my Garlic Parmesan Chicken Pasta.
- Clotted Cream or Vanilla Ice Cream: A scoop of good-quality vanilla bean ice cream melting over a warm hand pie is a classic pairing that just works. Alternatively, a dollop of thick clotted cream adds a lovely richness.
- Salted Caramel Sauce: For an extra-indulgent treat, a drizzle of warm salted caramel sauce over the top is absolutely divine.
- A Good Cup of Tea: A simple cup of strong English breakfast tea or a fragrant Earl Grey is the perfect partner for these buttery pastries.
Frequently Asked Questions
Flaky Apple Hand Pies Recipe Dessert
Ingredients
Method
- Prepare the Apples: In a medium bowl, toss the diced apples with the lemon juice. This prevents them from browning.
- Make the Filling: In a medium saucepan, combine the apples, light brown sugar, plain flour, cinnamon, and nutmeg. Stir to coat everything evenly. Add the unsalted butter and water.
- Cook the Filling: Place the saucepan over a medium heat. Cook, stirring occasionally, for 8-10 minutes. The apples should soften but still hold their shape, and the mixture will thicken into a syrupy consistency. Remove from the heat and set aside to cool completely. This is crucial – a warm filling will melt the pastry butter.
- Prepare the Pastry: Preheat your oven to 200°C (180°C fan) and line two large baking trays with parchment paper. Unroll your puff pastry sheets. If using a block, roll it out on a lightly floured surface to about the thickness of a £1 coin. Cut the pastry into 8 equal rectangles (approximately 10cm x 15cm each).
- Fill the Pies: Spoon about 2 tablespoons of the cooled apple filling onto one half of each pastry rectangle, leaving a 1cm border around the edges. What works best for me is not to overfill them, as tempting as it is! Too much filling will bubble out during baking.
- Seal and Crimp: Brush the borders of the pastry with a little of the egg wash. Fold the empty half of the pastry over the filling to create a parcel. Gently press the edges together with your fingers, then use the tines of a fork to crimp and seal the edges firmly.
- Chill and Finish: Place the assembled hand pies onto the prepared baking trays. If you have time, pop them into the fridge for 15 minutes to chill. This helps them become extra flaky. Just before baking, brush the tops with the remaining egg wash, then make two small slits in the top of each pie with a sharp knife to allow steam to escape. Sprinkle generously with demerara sugar.
- Bake to Perfection: Bake for 20-25 minutes, or until the pastry is deeply golden brown, puffed up, and the filling is just starting to bubble through the vents.
- Cool: Let the hand pies cool on the baking tray for 5 minutes before carefully transferring them to a wire rack to cool further. They can be enjoyed warm or at room temperature.
Notes
I really hope you give this Flaky Apple Hand Pies Recipe a try. It’s one of those bakes that feels special but is built on simple, comforting flavours. There’s nothing quite like pulling a tray of these golden, puffed-up beauties from the oven. Let me know how you get on in the comments below – I’d love to hear about it!
Happy baking,
Adam Henderson


