
Homemade Ferrero Rocher Recipe Chocolate
There’s something wonderfully satisfying about recreating an iconic treat at home. We’ve all reached for that golden-wrapped sphere of chocolatey, nutty goodness at a gathering or during a quiet moment of indulgence. For me, the combination of crisp wafer, creamy hazelnut, and rich chocolate is simply sublime. This homemade Ferrero Rocher recipe chocolate is the result of many happy hours spent in my kitchen, tweaking and tasting, to get that signature texture and flavour just right. Friends always ask me for this recipe after trying it at dinner parties, and I’m thrilled to finally share it with all of you.
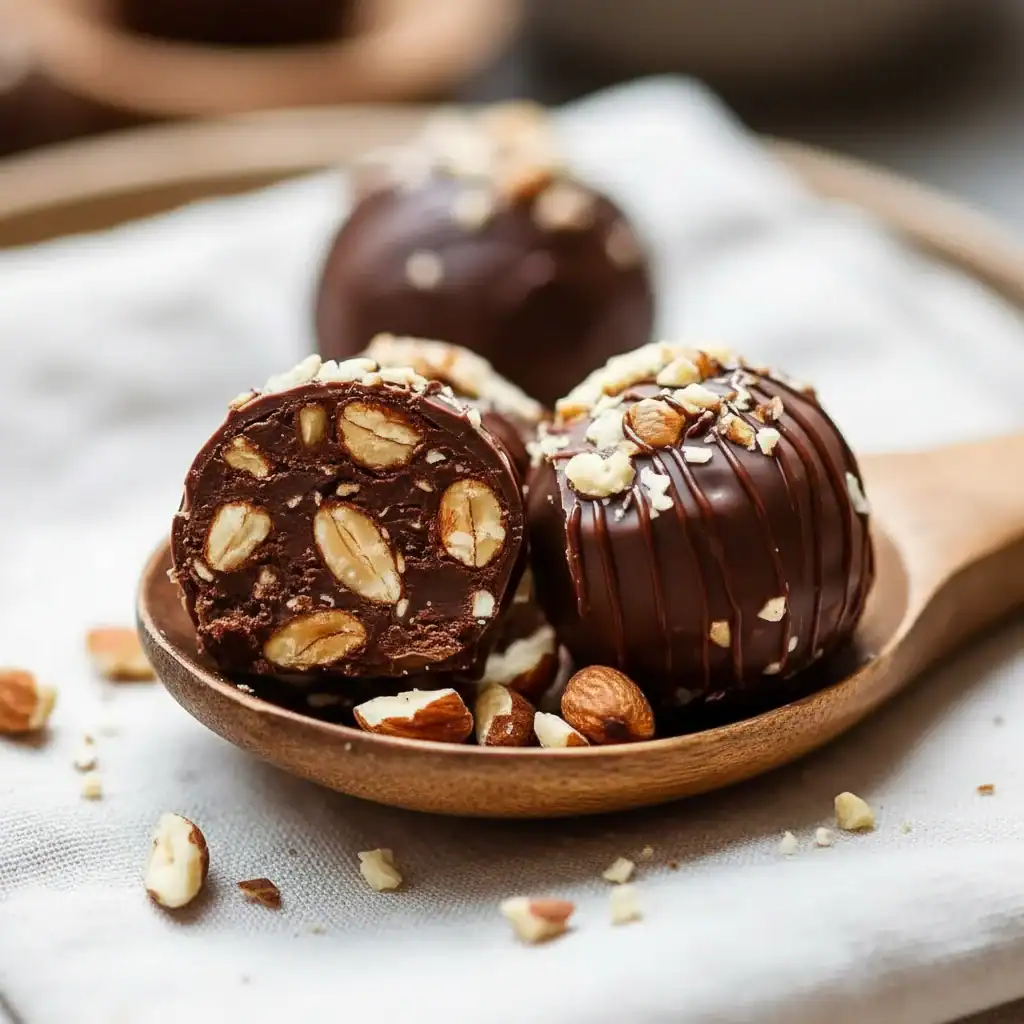
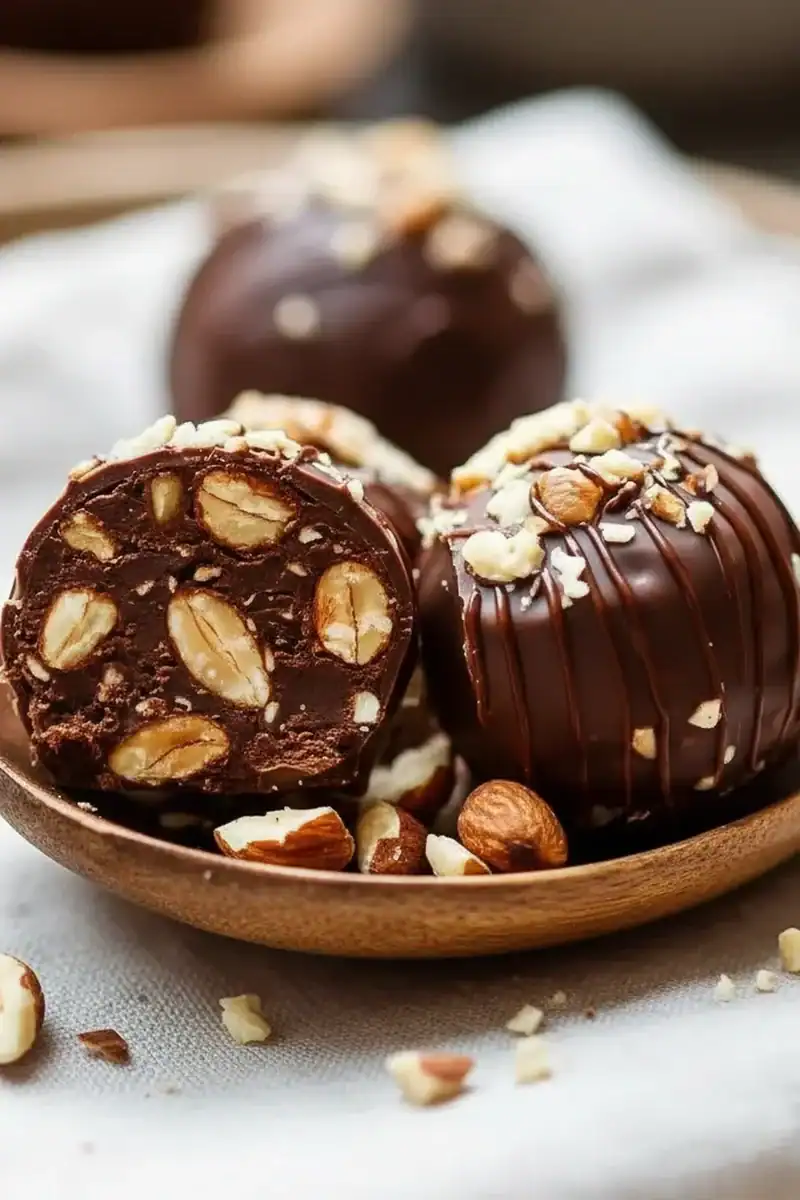
What we’re making today isn’t just a copy; it’s an homage. We’re using quality ingredients to build those distinct layers: a whole roasted hazelnut at the heart, enveloped in a smooth, rich chocolate-hazelnut cream, all encased in a delicate wafer shell, and finally dipped in luscious milk chocolate studded with more chopped hazelnuts. It’s a bit of a project, but a truly rewarding one.
This recipe is ideal when you want to create a special, edible gift for the holidays, a birthday, or just to show someone you care. They also make a fantastic centrepiece for a dessert platter. It’s a brilliant way to spend an afternoon, and the result is a batch of exquisite chocolate hazelnut truffles that taste even better because you made them yourself.
Recipe Overview
This recipe guides you through creating luxurious, multi-layered chocolate and hazelnut truffles that mimic the famous golden-wrapped sweet. You’ll achieve that classic crunchy-creamy texture by building the truffle from the inside out. After a few attempts, I found that using a mix of high-quality milk and dark chocolate for the final coating gives it a much richer, less cloying taste that balances the sweetness of the filling perfectly. Expect a delightful project that yields about two dozen impressive treats.
- Prep Time: 45 minutes
- Cook Time: 5 minutes
- Total Time: 50 minutes (+ 1 hour chilling time)
- Servings: Makes 20-24 truffles
- Difficulty: Medium
Why You’ll Love This Homemade Ferrero Rocher Recipe Chocolate
- Authentic Flavour & Texture: This isn’t just a simple truffle. We recreate the full experience: the snap of the chocolate shell, the crunch of the wafer and nuts, the velvety smooth filling, and the whole roasted hazelnut surprise in the centre.
- Comes Together in Under an Hour: Excluding chilling time, the active preparation for these DIY candy treats is less than an hour. It’s a focused but straightforward process.
- A Truly Flexible Recipe: You can easily switch things up. Use all dark chocolate for a more intense flavour, or add a pinch of sea salt to the coating to cut through the richness. You can even use almonds or macadamia nuts for a different twist.
- Works Wonderfully for Gifting: Packaged in a small box with some ribbon, these homemade Ferrero Rocher make a thoughtful and delicious gift idea for Christmas, Valentine’s Day, or as a thank you.
- My Family’s Favourite: My kids adore helping with the rolling and dipping steps (it gets messy, but it’s great fun!), and my wife says they’re better than the shop-bought version. That’s the highest praise I can get!
Ingredients You’ll Need
For the best results, I recommend using good quality chocolate – it makes a world of difference to the final taste. For the chocolate hazelnut spread, Nutella is the classic choice and works brilliantly, but any similar high-quality spread will do. The secret to the crunch is using very crisp, thin wafer biscuits.
- 30-35 whole blanched hazelnuts
- 150g plain wafer biscuits (ice cream cones or thin wafer sheets work well)
- 250g chocolate hazelnut spread (like Nutella)
- 1 tbsp unsweetened cocoa powder
- 200g good quality milk chocolate, chopped
- 100g good quality dark chocolate (50-70% cocoa), chopped
- 1 tsp vegetable or coconut oil (optional, helps create a smoother coating)
Adam’s Tip: Toasting the hazelnuts is a non-negotiable step! It deepens their nutty flavour and makes them much crunchier. Don’t be tempted to skip it; the aroma alone is worth the extra five minutes.
How to Make Homemade Ferrero Rocher Recipe Chocolate
We’ll build these hazelnut dessert truffles in stages: toasting the nuts, making the filling, shaping the centres, and finally, creating that iconic crunchy coating. Let’s get started.
- Toast the Hazelnuts: Preheat your oven to 180°C (160°C fan). Spread the whole blanched hazelnuts on a baking tray in a single layer. Toast for 8-10 minutes, or until they are lightly golden and fragrant. Give the tray a shake halfway through to ensure they toast evenly. Let them cool completely. Select 20-24 of the best-looking nuts for the centres and finely chop the rest.
- Prepare the Wafer and Filling: Place the wafer biscuits in a plastic bag and gently crush them with a rolling pin until you have a coarse crumb texture. You don’t want a fine powder. In a medium bowl, combine the chocolate hazelnut spread, cocoa powder, and about two-thirds of the crushed wafers. Mix until well combined.
- Shape the Truffle Centres: Line a small baking tray with baking parchment. Take about a tablespoon of the hazelnut mixture and flatten it in your palm. Place one whole toasted hazelnut in the centre and carefully roll the mixture around it to form a neat ball. Place the ball on the prepared tray. Repeat with the remaining mixture and hazelnuts.
- Chill for Firmness: Place the tray of truffle centres into the freezer for 20-30 minutes. This step is crucial as it makes them firm enough to handle during the dipping stage and prevents them from melting into the warm chocolate.
- Prepare the Coating: While the centres are chilling, prepare the outer layer. In a microwave-safe bowl, combine the chopped milk and dark chocolate. Microwave in 30-second bursts, stirring in between, until the chocolate is almost fully melted. Stir until smooth. If the chocolate seems too thick, stir in the teaspoon of oil. Now, stir in the remaining crushed wafers and the chopped toasted hazelnuts.
- Dip and Coat: Remove the chilled truffle centres from the freezer. Working one at a time, drop a ball into the melted chocolate mixture. What works best for me is using two forks to roll it around until it’s fully coated, then lifting it out and letting any excess chocolate drip off.
- Final Set: Place the coated truffle back onto the parchment-lined tray. Repeat with all the centres. If the chocolate coating starts to thicken too much, you can gently reheat it in the microwave for 10-15 seconds.
- Chill to Perfection: Place the finished truffles in the fridge for at least 30 minutes, or until the chocolate shell is completely firm and set. Once set, they are ready to be enjoyed!
Tips From My Kitchen
- Temperature Control is Key: When melting your chocolate, do it slowly. Overheated chocolate can become grainy or “seize.” If you prefer, you can use a double boiler (a heatproof bowl set over a pan of simmering water). For a professional finish, you can learn how to temper chocolate, which gives it a beautiful shine and a crisp snap.
- The Secret Step: Don’t skip the freezing step for the centres (Step 4). I learned that trying to dip room-temperature fillings is a messy disaster. A firm, cold centre ensures the hot chocolate coating sets quickly around it, creating a much neater and more stable truffle.
- Make-Ahead: You can make the truffle centres (up to the end of Step 4) up to two days in advance. Just keep them in an airtight container in the freezer. When you’re ready, simply prepare the coating and dip them straight from frozen.
- Storage: Store your finished homemade Ferrero Rocher in an airtight container in the fridge for up to one week. Take them out about 15 minutes before serving to allow them to come to room temperature for the best flavour and texture.
Equipment You’ll Need
- Baking tray
- Parchment paper
- Mixing bowls (one medium, one small)
- Microwave or a small saucepan and heatproof bowl (for a double boiler)
- Spatula or wooden spoon
- Two forks (for dipping)
Common Mistakes to Avoid
- Using Untoasted Nuts: Raw hazelnuts lack the deep, rich flavour that defines this treat. Toasting is essential to unlock their aromatic oils and provide a satisfying crunch.
- Over-crushing the Wafers: If you turn the wafers into a fine dust, you’ll lose that light, crispy texture. Aim for small, flaky crumbs that will add structure and crunch to both the filling and the coating.
- Skipping the Chilling Time: As mentioned in my tips, this is the most common pitfall. A soft filling will fall apart in the warm chocolate. A properly chilled centre is the foundation for a perfectly formed truffle.
Delicious Variations to Try
Once you’ve mastered the classic version, feel free to get creative. This recipe is a fantastic base for experimentation.
- White Chocolate Dream: Swap the milk and dark chocolate for good quality white chocolate. Use almonds instead of hazelnuts for a Raffaello-inspired treat, and roll the finished truffles in desiccated coconut before the chocolate fully sets.
- A Touch of Salted Caramel: Place a tiny dollop of thick, store-bought salted caramel sauce on the whole hazelnut before enclosing it in the filling. The hint of salt and caramel is a wonderful surprise.
- Coffee Kick: Add a teaspoon of instant espresso powder to the chocolate hazelnut filling mixture. The coffee enhances the deep flavour of the chocolate beautifully. It’s a great combination, similar to what I do in my Chocolate Peanut Butter Banana Bread.
What to Serve With Homemade Ferrero Rocher
These chocolate hazelnut truffles are a fantastic treat on their own, but they also pair beautifully with other items for a more complete dessert experience.
- A Good Coffee: A freshly brewed espresso or a rich Americano provides the perfect bitter counterpoint to the sweet, nutty chocolate.
- After a Savoury Meal: They are an ideal little bite to finish a lovely dinner. I often serve them after a satisfying main course like my Garlic Parmesan Chicken Pasta.
- Dessert Wine: A small glass of a sweet dessert wine, like a Tawny Port or a Vin Santo, complements the rich chocolate and hazelnut notes wonderfully.
Frequently Asked Questions
Homemade Ferrero Rocher Recipe Chocolate
Ingredients
Method
- Toast the Hazelnuts: Preheat your oven to 180°C (160°C fan). Spread the whole blanched hazelnuts on a baking tray in a single layer. Toast for 8-10 minutes, or until they are lightly golden and fragrant. Give the tray a shake halfway through to ensure they toast evenly. Let them cool completely. Select 20-24 of the best-looking nuts for the centres and finely chop the rest.
- Prepare the Wafer and Filling: Place the wafer biscuits in a plastic bag and gently crush them with a rolling pin until you have a coarse crumb texture. You don't want a fine powder. In a medium bowl, combine the chocolate hazelnut spread, cocoa powder, and about two-thirds of the crushed wafers. Mix until well combined.
- Shape the Truffle Centres: Line a small baking tray with baking parchment. Take about a tablespoon of the hazelnut mixture and flatten it in your palm. Place one whole toasted hazelnut in the centre and carefully roll the mixture around it to form a neat ball. Place the ball on the prepared tray. Repeat with the remaining mixture and hazelnuts.
- Chill for Firmness: Place the tray of truffle centres into the freezer for 20-30 minutes. This step is crucial as it makes them firm enough to handle during the dipping stage and prevents them from melting into the warm chocolate.
- Prepare the Coating: While the centres are chilling, prepare the outer layer. In a microwave-safe bowl, combine the chopped milk and dark chocolate. Microwave in 30-second bursts, stirring in between, until the chocolate is almost fully melted. Stir until smooth. If the chocolate seems too thick, stir in the teaspoon of oil. Now, stir in the remaining crushed wafers and the chopped toasted hazelnuts.
- Dip and Coat: Remove the chilled truffle centres from the freezer. Working one at a time, drop a ball into the melted chocolate mixture. What works best for me is using two forks to roll it around until it's fully coated, then lifting it out and letting any excess chocolate drip off.
- Final Set: Place the coated truffle back onto the parchment-lined tray. Repeat with all the centres. If the chocolate coating starts to thicken too much, you can gently reheat it in the microwave for 10-15 seconds.
- Chill to Perfection: Place the finished truffles in the fridge for at least 30 minutes, or until the chocolate shell is completely firm and set. Once set, they are ready to be enjoyed!
Notes
I really hope you enjoy making this homemade Ferrero Rocher recipe. It’s a truly special treat that brings a lot of joy, both in the making and the eating. There’s nothing quite like seeing the delighted faces of friends and family when they bite into one. Let me know how you get on in the comments below – I’d love to hear about your experience!
All the best,
Adam Henderson


