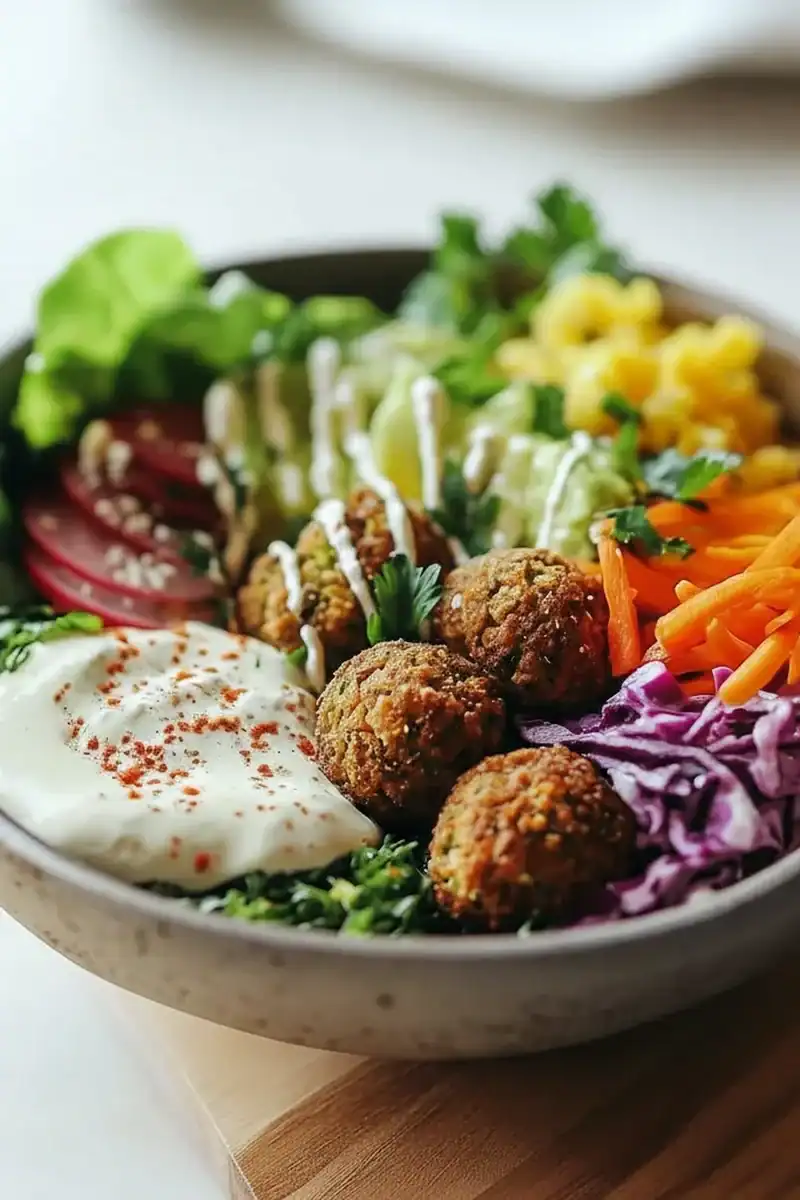
Healthy Colorful Falafel Bowl Recipe
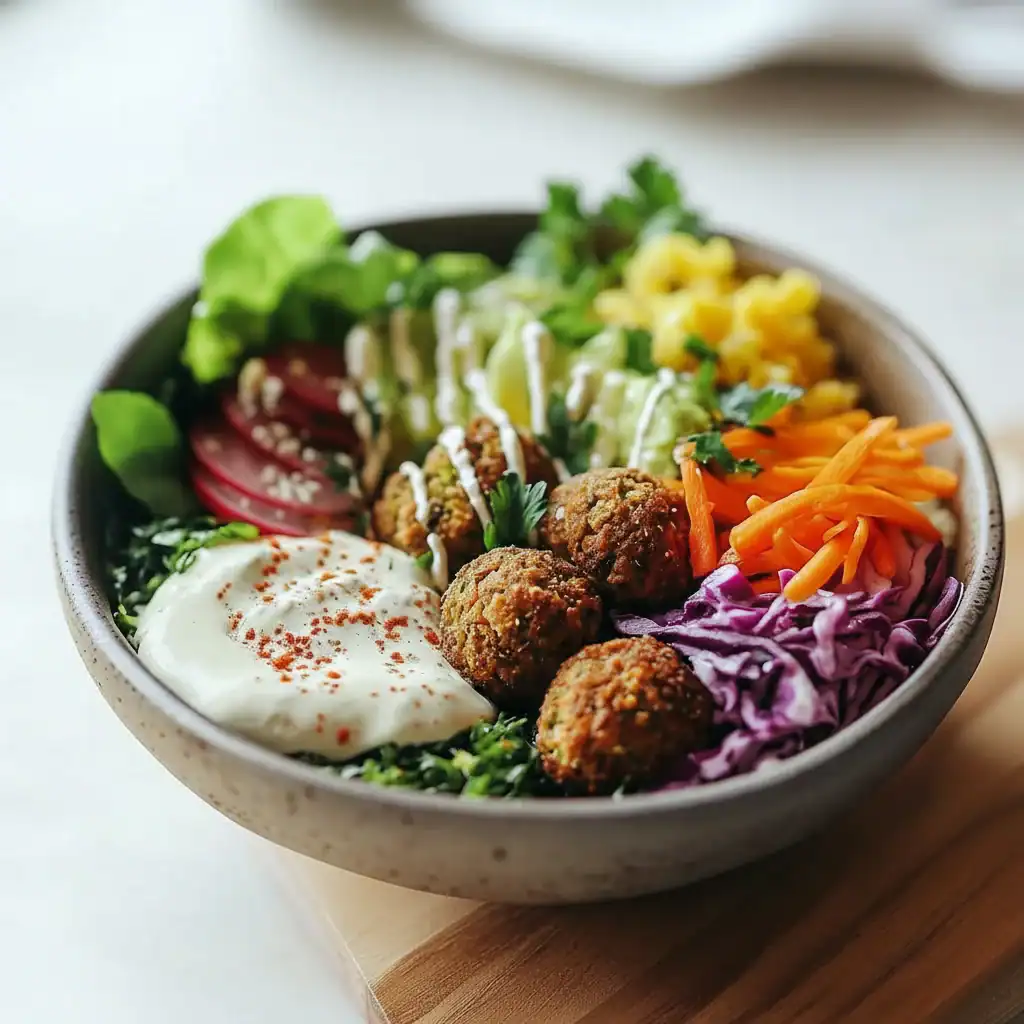
There’s a special kind of satisfaction that comes from sitting down to a meal that is not only good for you but also a genuine treat for the senses. This Colorful Falafel Bowl is exactly that. It’s a vibrant tapestry of textures and tastes – from the warm, spiced falafel with its perfectly crisp exterior to the cool, crunchy salad and the rich, creamy hummus that ties it all together. This is my go-to recipe when I need something that feels both wholesome and genuinely impressive. It’s the kind of meal that brightens up a weekday lunch or makes for a wonderfully relaxed weekend dinner.
What I adore about this Mediterranean-inspired bowl is its sheer versatility. Every element is delicious on its own, but when you combine them, you get something truly special. The sharp, tangy bite of the quick-pickled red onions cuts through the richness of the hummus, while the fresh cucumber and tomatoes provide a juicy, refreshing contrast to the earthy falafel. It’s a complete meal that leaves you feeling energised and satisfied, never heavy.
This veggie bowl works beautifully for anyone looking to incorporate more plant-based meals into their routine, but honestly, even the most committed carnivores I know have been won over by it. It’s ideal for meal prepping, as most components can be made ahead of time, ready to be assembled for a nourishing lunch in minutes. Whether you’re cooking for yourself or sharing with others, this is a recipe you’ll return to again and again.
Recipe Overview
This recipe guides you through creating a complete Mediterranean Falafel Bowl from scratch. We’ll make crispy, herb-packed falafel, a silky-smooth hummus, quick-pickled onions, and assemble it all with fresh vegetables and fluffy quinoa. I’ve tested this recipe with both pan-fried and baked falafel, and I’ll share my tips for getting them perfectly crisp either way. The result is a balanced, nourishing meal with layers of authentic flavour.
- Prep Time: 25 minutes (plus 30 minutes resting time for falafel mix)
- Cook Time: 20 minutes
- Total Time: 45 minutes (plus resting)
- Servings: 4 people
- Difficulty: Medium
Why You’ll Love This Colorful Falafel Bowl
- Genuine Flavour: The homemade falafel are infused with fresh parsley, coriander, and earthy cumin, giving them a depth of flavour you just don’t get from shop-bought versions. Paired with the garlic-and-lemon tang of the homemade hummus, every bite is wonderfully distinct.
- Ready in Under an Hour: While the falafel mixture rests, you can prepare all the other components. The whole meal comes together in about 45 minutes of active time, making it achievable even on a busier day.
- Flexible Recipe: This bowl is a fantastic template. You can swap the quinoa for couscous or brown rice, add crumbled feta or grilled halloumi, or throw in some Kalamata olives or roasted red peppers. It’s easy to adapt to what you have in the fridge.
- Great for Meal Prep: This recipe is ideal when you want to prepare healthy lunches for the week. The hummus, pickled onions, and cooked quinoa will keep beautifully in the fridge, ready for quick assembly each morning.
- Family Tested: My family, who can be particular about ‘salad for dinner’, absolutely devours this. The different components mean everyone can build their own bowl just the way they like it.
Ingredients You’ll Need
For the very best falafel texture, it’s essential to start with dried chickpeas that have been soaked overnight – please don’t be tempted to use tinned ones, as they hold too much water and can result in mushy falafel. Everything else should be readily available at your local supermarket. I find that a good quality, runny tahini makes all the difference for a truly creamy hummus.
- For the Falafel:
- 200g dried chickpeas, soaked in cold water overnight
- 1 small white onion, roughly chopped
- 3 cloves garlic, crushed
- 30g fresh parsley, large stems removed
- 30g fresh coriander, large stems removed
- 1 tsp ground cumin
- 1 tsp ground coriander
- 1 tsp baking powder
- ½ tsp salt, plus more to taste
- 2-3 tbsp vegetable or sunflower oil, for frying
- For the Hummus:
- 1 x 400g tin of chickpeas, drained and rinsed
- 100g good quality tahini
- 1 lemon, juiced
- 1 large clove garlic, crushed
- 4 tbsp cold water
- ½ tsp salt
- For the Bowl Assembly:
- 200g quinoa, cooked according to packet instructions
- 1 large cucumber, diced
- 250g cherry tomatoes, halved
- 1 red onion, very thinly sliced
- 100ml white wine vinegar
- 1 tsp sugar
- A handful of mixed lettuce leaves
Adam’s Tip: When making the falafel mix, ensure your fresh herbs are properly dried after washing. Excess water can make the mixture too wet and difficult to shape.
How to Make a Colorful Falafel Bowl
The process is straightforward. We’ll start by getting the onions pickling, as they need a little time to soften and absorb the flavour. While they sit, we can get on with the hummus and the falafel. It’s a satisfying rhythm of preparation that leads to a brilliant final dish.
- Pickle the Onions: Place the thinly sliced red onion in a small bowl. In a separate jug, mix the white wine vinegar, sugar, and a pinch of salt until the sugar dissolves. Pour this mixture over the onions, ensuring they are submerged. Set aside for at least 30 minutes.
- Make the Hummus: Add the tinned chickpeas, tahini, lemon juice, garlic, and salt to a food processor. Blend until it starts to form a thick paste. With the motor running, slowly drizzle in the cold water until you achieve a smooth, creamy consistency. Scrape down the sides, taste, and adjust seasoning if needed. Transfer to a bowl.
- Prepare the Falafel Mixture: Drain the soaked (uncooked) dried chickpeas thoroughly. Add them to the food processor along with the chopped onion, garlic, parsley, coriander, ground cumin, ground coriander, and salt. Pulse the mixture until it’s finely minced but not a complete paste – you want a slightly coarse, sandy texture.
- Rest the Mixture: Transfer the falafel mixture to a bowl, stir in the baking powder, and cover. Place it in the refrigerator to rest for at least 30 minutes. This step is crucial as it allows the mixture to firm up, making it easier to shape and preventing it from falling apart during cooking.
- Shape and Cook the Falafel: After resting, shape the mixture into 16-20 small patties or balls. I find that using a small ice cream scoop helps keep them uniform. To pan-fry, heat the oil in a large frying pan over a medium-high heat. Carefully place the falafel in the hot oil, ensuring not to overcrowd the pan. Fry for 3-4 minutes on each side, until they are deep golden brown and crisp. Remove with a slotted spoon and place on a paper towel-lined plate.
- Alternative Baking Method: To bake, preheat your oven to 200°C (180°C fan). Lightly brush the falafel with oil and place them on a baking tray lined with parchment paper. Bake for 20-25 minutes, flipping them halfway through, until golden and firm.
- Assemble the Bowls: Divide the cooked quinoa and lettuce leaves among four bowls. Top with the warm falafel, a generous dollop of hummus, diced cucumber, cherry tomatoes, and a tangle of the drained pickled red onions. Serve immediately.
Tips From My Kitchen
- Temperature Control: When pan-frying, the oil must be hot enough. If it’s too cool, the falafel will absorb too much oil and become greasy. A small piece of the mixture should sizzle immediately when dropped in.
- The Secret Step: I learned that adding a little baking powder to the falafel mix just before shaping makes them wonderfully light and airy inside. It’s a small step that makes a noticeable difference to the final texture.
- Make-Ahead: The hummus, pickled onions, and cooked quinoa can all be made up to 3 days in advance and stored in airtight containers in the fridge. You can also shape the falafel patties ahead of time and keep them refrigerated until you’re ready to cook.
- Storage: Store any leftover components separately in the fridge. The falafel are best enjoyed fresh but can be refrigerated for up to 3 days and reheated in a 180°C oven for 5-7 minutes to restore their crispness.
Equipment You’ll Need
- Food processor (essential for hummus and falafel)
- Large frying pan or skillet
- Sharp knife and cutting board
- Mixing bowls
- Slotted spoon or spatula
Common Mistakes to Avoid
- Overcrowding the pan: When frying, cooking too many falafel at once will cause the oil temperature to drop significantly. This results in them steaming rather than frying, leading to a pale, soggy exterior. Always cook in batches with plenty of space around each one.
- Wrong chickpeas: As mentioned, using tinned chickpeas is the most common reason for falafel failing. They contain too much moisture and lack the starchy structure of soaked, uncooked chickpeas, causing them to disintegrate in the hot oil.
- Skipping the rest time: The 30-minute rest in the fridge isn’t just for flavour; it’s a critical step that helps the starch and protein in the chickpeas bind the mixture together. Skipping it almost guarantees your falafel will fall apart.
Delicious Variations to Try
Once you’ve mastered the base recipe, it’s great fun to experiment. These bowls are a fantastic canvas for other flavours and textures.
- Spicy Version: Add a teaspoon of red pepper flakes or half a fresh, deseeded red chilli to the falafel mixture in the food processor for a gentle, warming heat.
- Add Some Cheese: While the recipe is vegan as is, adding some crumbled feta cheese or slices of grilled halloumi at the end provides a salty, savoury element that works wonderfully with the other flavours.
- Different Grains and Greens: Try serving this with a base of freekeh or bulgur wheat instead of quinoa. You could also swap the lettuce for peppery rocket or baby spinach.
What to Serve With Your Colorful Falafel Bowl
This is a complete meal, but a few extras can round it out, especially if you’re serving it for a more substantial dinner.
- Warm Pitta Bread: Soft, warm pitta bread is fantastic for scooping up every last bit of hummus and building little falafel wraps.
- A Fresh Salad: For extra greens, a simple side like our Classic House Salad with Red Wine Vinaigrette adds a lovely, light accompaniment.
- Drink Pairing: A crisp, dry white wine like a Sauvignon Blanc complements the fresh herbs beautifully. For a non-alcoholic option, a homemade lemonade with fresh mint is incredibly refreshing.
Frequently Asked Questions
Colorful Falafel Bowl
Ingredients
Method
- Pickle the Onions: Place the thinly sliced red onion in a small bowl. In a separate jug, mix the white wine vinegar, sugar, and a pinch of salt until the sugar dissolves. Pour this mixture over the onions, ensuring they are submerged. Set aside for at least 30 minutes.
- Make the Hummus: Add the tinned chickpeas, tahini, lemon juice, garlic, and salt to a food processor. Blend until it starts to form a thick paste. With the motor running, slowly drizzle in the cold water until you achieve a smooth, creamy consistency. Scrape down the sides, taste, and adjust seasoning if needed. Transfer to a bowl.
- Prepare the Falafel Mixture: Drain the soaked (uncooked) dried chickpeas thoroughly. Add them to the food processor along with the chopped onion, garlic, parsley, coriander, ground cumin, ground coriander, and salt. Pulse the mixture until it’s finely minced but not a complete paste – you want a slightly coarse, sandy texture.
- Rest the Mixture: Transfer the falafel mixture to a bowl, stir in the baking powder, and cover. Place it in the refrigerator to rest for at least 30 minutes. This step is crucial as it allows the mixture to firm up, making it easier to shape and preventing it from falling apart during cooking.
- Shape and Cook the Falafel: After resting, shape the mixture into 16-20 small patties or balls. I find that using a small ice cream scoop helps keep them uniform. To pan-fry, heat the oil in a large frying pan over a medium-high heat. Carefully place the falafel in the hot oil, ensuring not to overcrowd the pan. Fry for 3-4 minutes on each side, until they are deep golden brown and crisp. Remove with a slotted spoon and place on a paper towel-lined plate.
- Alternative Baking Method: To bake, preheat your oven to 200°C (180°C fan). Lightly brush the falafel with oil and place them on a baking tray lined with parchment paper. Bake for 20-25 minutes, flipping them halfway through, until golden and firm.
- Assemble the Bowls: Divide the cooked quinoa and lettuce leaves among four bowls. Top with the warm falafel, a generous dollop of hummus, diced cucumber, cherry tomatoes, and a tangle of the drained pickled red onions. Serve immediately.
Notes
I really hope you enjoy making and eating this Colorful Falafel Bowl. It’s a staple in my kitchen for a reason, and it always gets compliments when I serve it to guests. If you enjoyed this fresh and vibrant meal, you might also like my Crunchy Asian Chicken Salad for another healthy and satisfying lunch idea. Let me know how you get on in the comments below – I’d love to hear about it! Happy cooking. – Adam Henderson