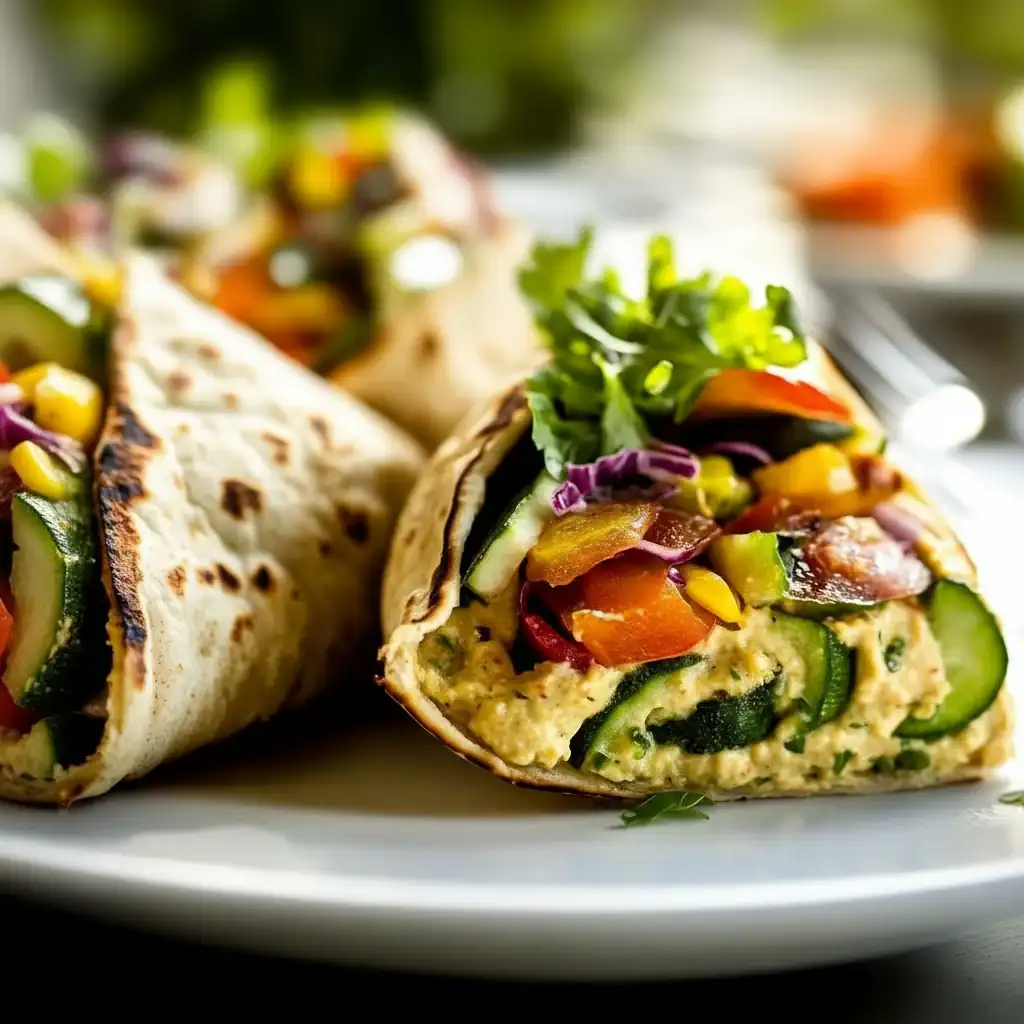
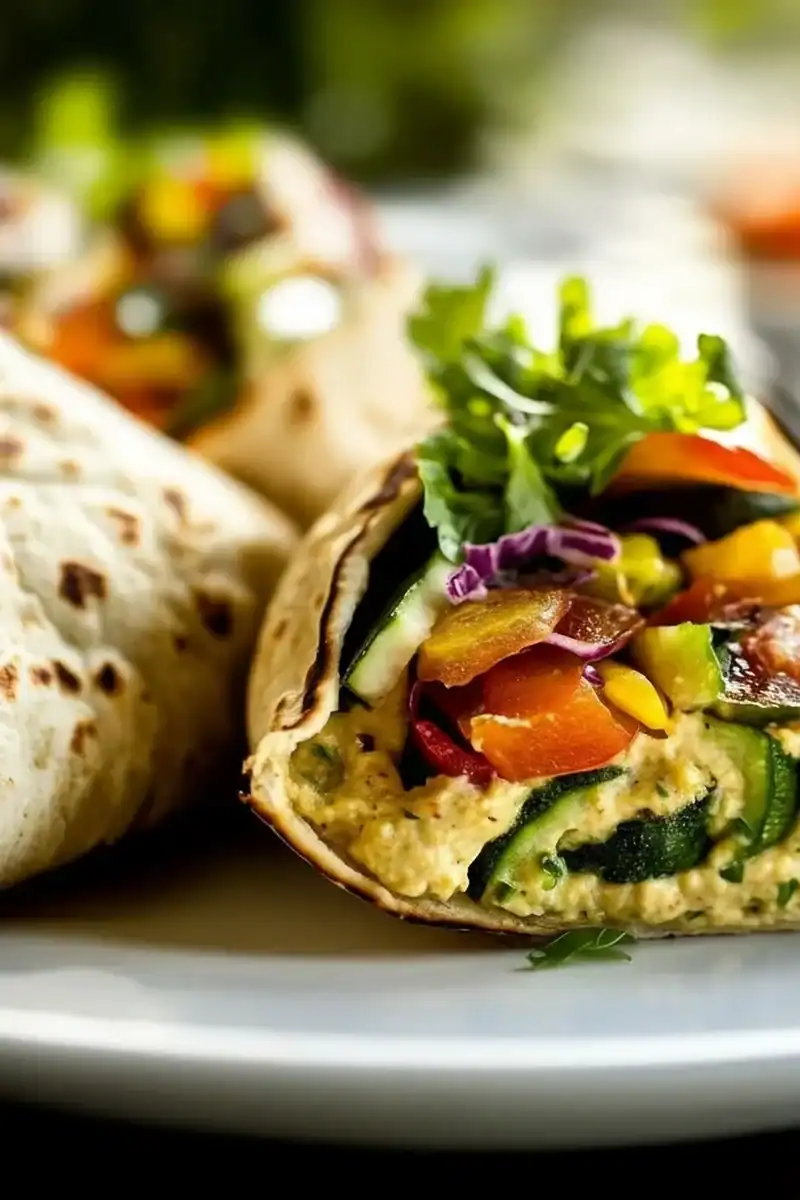
Hummus Veggie Wrap Recipe
There are days when the thought of another boring sandwich for lunch is just too much to bear. We’ve all been there, staring into the fridge, looking for inspiration that feels both healthy and genuinely satisfying. That’s where this magnificent Hummus Veggie Wrap comes in. It’s a vibrant, textured, and flavour-packed meal that has completely transformed my midday routine. I make this at least once a week – it’s become a family favourite for its sheer adaptability and freshness.
What makes this particular veggie wrap so special is the combination of textures and flavours we’re layering inside. We’re not just throwing some salad into a tortilla. We have the smooth, earthy creaminess of the hummus, the crisp, watery crunch of cucumber and bell peppers, the sharp bite of red onion, and the fresh, tender spinach leaves. It’s a thoughtfully constructed healthy sandwich that feels substantial and tastes incredible. This is the kind of vegan lunch that even my most carnivorous friends ask for.
This Hummus Wrap works beautifully for a quick work-from-home lunch, a healthy option to pack for the office, or even a light, no-fuss dinner on a warm evening. It comes together in minutes, requires no complex cooking, and leaves you feeling energised rather than sluggish. Let’s get wrapping!
Recipe Overview
This recipe is all about creating a balanced and satisfying plant-based wrap. You can expect a creamy, savoury base from the hummus, complemented by a rainbow of fresh, crunchy vegetables. The key is in the preparation – finely slicing the vegetables ensures you get a bit of everything in each bite. I’ve found that a light toasting of the tortilla before filling makes all the difference, preventing it from becoming soggy and adding a lovely warmth.
- Prep Time: 15 minutes
- Cook Time: 2 minutes
- Total Time: 17 minutes
- Servings: 2 wraps
- Difficulty: Easy
Why You’ll Love This Hummus Veggie Wrap
- Genuine Flavour: The rich, garlicky hummus provides a deeply savoury foundation that is perfectly cut through by the sweetness of the red bell pepper and the sharp, fresh notes of the red onion and cucumber. It’s a truly balanced bite.
- Ready in Under 20 Minutes: From chopping board to plate, this entire meal is ready in about 17 minutes, making it a brilliant solution for busy weekdays when you need something nutritious without the fuss.
- Flexible Recipe: This is more of a template than a strict recipe. You can swap in almost any crunchy vegetable you have in the fridge. Grated beetroot, rocket, or even some leftover roasted sweet potato work wonderfully.
- Great for Meal Prep: The components can be prepped ahead of time. Chop your vegetables and store them in an airtight container, and you can assemble a fresh wrap in less than two minutes.
- Family Tested: My kids, who are usually suspicious of anything overly green, really enjoy building their own wraps. It’s one of those rare healthy meals that everyone in our house gets excited about.
Ingredients You’ll Need
For the best Hummus Veggie Wrap, fresh, crisp ingredients are essential. I prefer to use a good quality, thick hummus; I find that brands with a higher tahini content, like Belazu, offer a richer flavour and a better texture that doesn’t make the wrap soggy. Don’t be afraid to be generous with it!
- 2 large wholemeal or seeded tortillas (approx. 25cm diameter)
- 150g good-quality classic hummus
- 50g fresh baby spinach leaves, washed and dried
- 1 medium carrot, peeled
- 1/2 a large red bell pepper
- 1/4 of a cucumber
- 1/4 of a small red onion
- 75g tinned chickpeas, drained and rinsed
- 1 tbsp fresh parsley, finely chopped
- 1 tsp lemon juice
- A pinch of sea salt
- A pinch of black pepper
- Optional: 30g crumbled feta (or vegan alternative)
Adam’s Tip: Make sure your spinach and other greens are completely dry before adding them to the wrap. I give mine a quick spin in a salad spinner. Any excess water will lead to a soggy bottom, and nobody wants that!
How to Make Hummus Veggie Wrap
The process is straightforward, focusing on preparation to ensure the perfect wrap. The key is to get all your components ready before you start assembling, which makes the final step a breeze.
- Prepare the Vegetables: Using a julienne peeler or a sharp knife, cut the carrot and cucumber into long, thin matchsticks. Thinly slice the red bell pepper and the red onion. Place all the chopped vegetables into a medium mixing bowl.
- Season the Filling: Add the drained chickpeas, chopped parsley, lemon juice, salt, and pepper to the bowl with the vegetables. Gently toss everything together until the veg is lightly coated in the seasoning. This small step adds a huge amount of flavour.
- Warm the Tortillas: Heat a large, dry frying pan over a medium heat. Place one tortilla in the pan and warm for about 30-45 seconds per side, just until it’s soft and pliable. This prevents it from cracking when you roll it. Repeat with the second tortilla.
- Spread the Hummus: Lay a warm tortilla flat on your work surface. Spread about 75g of hummus evenly over the surface, leaving a 2-3cm border around the edges. This border is crucial for a clean roll.
- Layer the Greens: Arrange a generous handful of the dry baby spinach leaves over the hummus. This creates a barrier that helps protect the tortilla from the moister ingredients.
- Add the Veggie Filling: Spoon half of the seasoned vegetable and chickpea mixture in a line down the centre of the tortilla, on top of the spinach. What works best for me is to not overfill it – it’s tempting, but it makes rolling much harder!
- Add Optional Toppings: If using, sprinkle the crumbled feta or vegan alternative over the vegetable filling.
- Fold and Roll: To roll the wrap, first fold in the two sides (the left and right edges) over the filling. Then, take the bottom edge (the one closest to you) and pull it up and over the filling, tucking it in tightly. Continue to roll it away from you until you have a snug, secure wrap.
- Serve Immediately: Slice the wrap in half on a diagonal for a professional-looking finish and serve straight away. If packing for lunch, wrap it tightly in beeswax wrap or foil.
Tips From My Kitchen
- Layering is Key: The order you layer your ingredients matters. Always spread the hummus first, followed by dry greens like spinach. This creates a moisture barrier, which is essential for preventing a soggy wrap, especially if you’re making it ahead of time.
- The Secret Step: Don’t skip seasoning your vegetables separately. Tossing the carrots, cucumber, pepper, and onion with lemon juice, salt, and parsley before they go into the wrap elevates the flavour from good to great. I learned that this simple action makes each bite more vibrant.
- Make-Ahead: You can chop all your vegetables and mix them with the seasoning up to 2 days in advance. Store them in an airtight container in the fridge. This makes assembly take just a couple of minutes when you’re ready to eat.
- Storage: An assembled wrap is best eaten within a few hours. If you must store it, wrap it very tightly in cling film or foil and keep it in the fridge for up to 24 hours. The texture will soften slightly, but it will still be delicious.
Equipment You’ll Need
You don’t need any fancy gadgets for this recipe, just some basic kitchen tools.
- Large dry frying pan or skillet
- Sharp chef’s knife and cutting board
- Medium mixing bowl
- Julienne peeler (optional, but helpful)
- Spatula or butter knife for spreading
Delicious Variations to Try
Once you have the basic technique down, this wrap is a brilliant canvas for customisation. It’s a great way to use up leftover bits and pieces from the fridge.
- Spicy Hummus Wrap: Add a kick by using a spicy hummus or mixing a teaspoon of sriracha or harissa paste into your classic hummus before spreading. A few slices of fresh jalapeño in the filling also works a treat.
- Protein-Packed Veggie Wrap: For a more substantial meal, add some plant-based protein. Marinated and baked tofu strips, falafel, or even some seasoned quinoa add great texture and staying power. For non-vegans, grilled halloumi is a fantastic addition.
- Mediterranean Twist: Lean into the Mediterranean flavours by adding chopped Kalamata olives, sun-dried tomatoes, and switching the parsley for fresh dill or mint. A sprinkle of za’atar over the hummus before layering is also divine.
What to Serve With Your Hummus Veggie Wrap
This wrap is a complete meal on its own, but sometimes it’s nice to have a little something on the side. These pairings work very well.
- A Simple Green Salad: A handful of mixed leaves with a light dressing, like this Classic House Salad with Red Wine Vinaigrette, complements the wrap without overpowering it.
- Sweet Potato Fries: For a more substantial lunch or a casual dinner, a side of baked sweet potato fries provides a lovely sweet and savoury contrast.
- A Cool Drink: A crisp, cold glass of homemade iced tea with lemon or a light lager beer is wonderfully refreshing alongside the fresh flavours of the wrap.
Frequently Asked Questions
Hummus Veggie Wrap
Ingredients
Method
- Prepare the Vegetables: Using a julienne peeler or a sharp knife, cut the carrot and cucumber into long, thin matchsticks. Thinly slice the red bell pepper and the red onion. Place all the chopped vegetables into a medium mixing bowl.
- Season the Filling: Add the drained chickpeas, chopped parsley, lemon juice, salt, and pepper to the bowl with the vegetables. Gently toss everything together until the veg is lightly coated in the seasoning. This small step adds a huge amount of flavour.
- Warm the Tortillas: Heat a large, dry frying pan over a medium heat. Place one tortilla in the pan and warm for about 30-45 seconds per side, just until it's soft and pliable. This prevents it from cracking when you roll it. Repeat with the second tortilla.
- Spread the Hummus: Lay a warm tortilla flat on your work surface. Spread about 75g of hummus evenly over the surface, leaving a 2-3cm border around the edges. This border is crucial for a clean roll.
- Layer the Greens: Arrange a generous handful of the dry baby spinach leaves over the hummus. This creates a barrier that helps protect the tortilla from the moister ingredients.
- Add the Veggie Filling: Spoon half of the seasoned vegetable and chickpea mixture in a line down the centre of the tortilla, on top of the spinach. What works best for me is to not overfill it – it’s tempting, but it makes rolling much harder!
- Add Optional Toppings: If using, sprinkle the crumbled feta or vegan alternative over the vegetable filling.
- Fold and Roll: To roll the wrap, first fold in the two sides (the left and right edges) over the filling. Then, take the bottom edge (the one closest to you) and pull it up and over the filling, tucking it in tightly. Continue to roll it away from you until you have a snug, secure wrap.
- Serve Immediately: Slice the wrap in half on a diagonal for a professional-looking finish and serve straight away. If packing for lunch, wrap it tightly in beeswax wrap or foil.
Notes
I really hope you give this Hummus Veggie Wrap a go. It’s such a simple way to pack more fresh vegetables into your day, and it proves that a healthy sandwich or vegan lunch can be genuinely exciting. It’s a recipe that’s easy to adapt, so feel free to make it your own. If you try it, I’d love for you to leave a comment below and let me know how you got on!
Happy cooking,
Adam Henderson