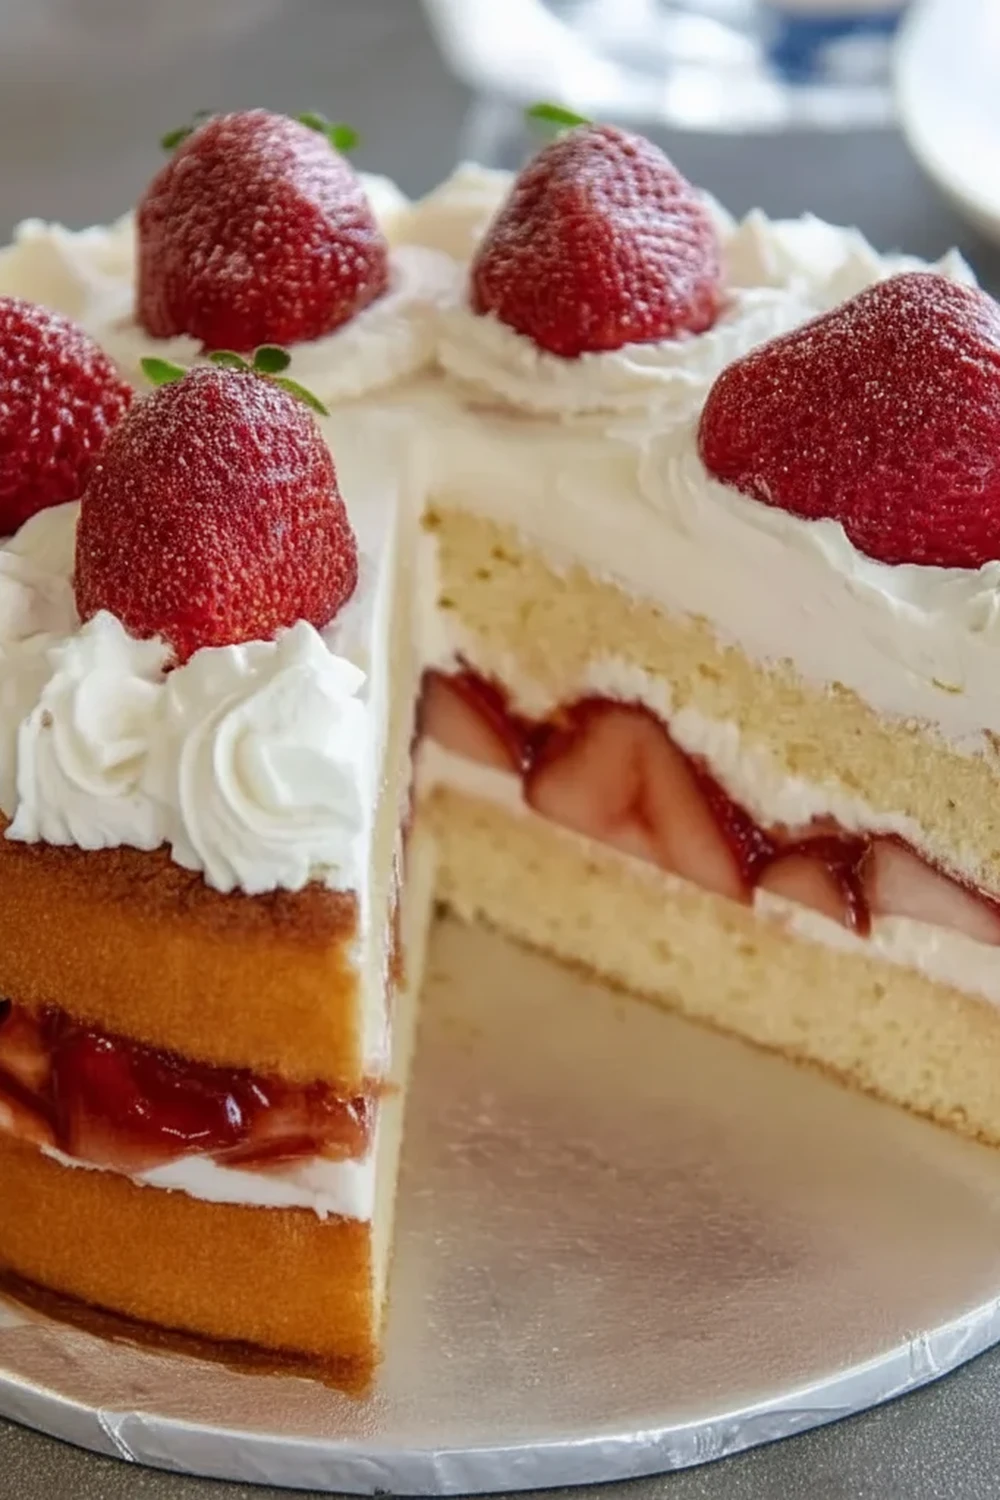
Light Japanese Strawberry Sponge Cake Recipe
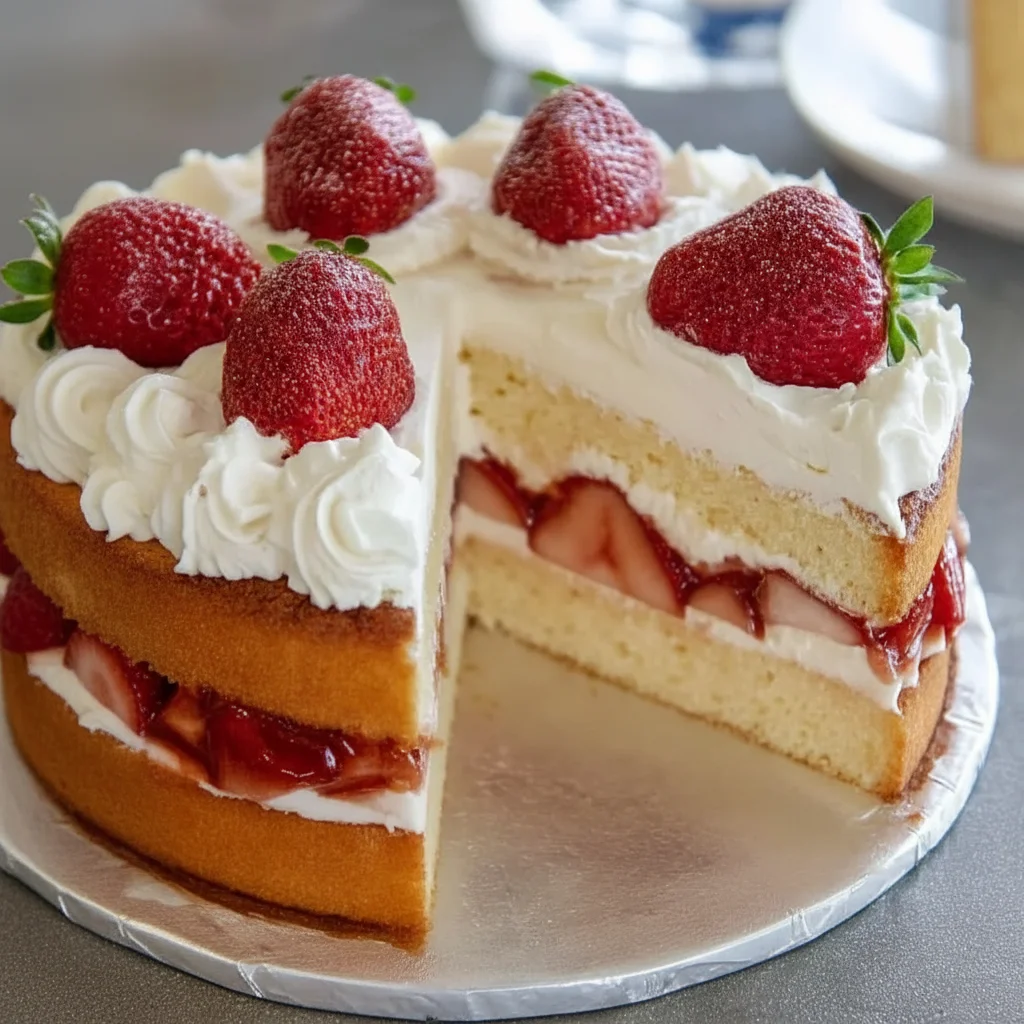
There’s something uniquely special about a Japanese Strawberry Sponge Cake. It’s a world away from the denser, butter-heavy sponges we often find in British baking. This cake is all about lightness; it’s an ethereal, cloud-like creation with a delicate crumb that practically melts in your mouth. Paired with billowy whipped cream and sweet, vibrant strawberries, it’s a masterclass in texture and subtle flavour. I’ve been making this for over 6 years, and it never disappoints, becoming a staple for birthdays and sunny weekend afternoons in my home.
The beauty of this recipe lies in its simplicity of ingredients, which come together to create something truly elegant. Unlike a Victoria sponge, the structure comes from whipping whole eggs and sugar to a thick, stable foam, a technique that results in its signature airy texture. This cake, often known as ‘ichigo shortcake’ in Japan, is a beloved treat, and for good reason. For more on its cultural significance, you can read about the Japanese version of strawberry shortcake and how it became such a popular celebration cake. It’s a wonderful light dessert, especially after a satisfying main course like my Garlic Parmesan Chicken Pasta, offering a fresh and graceful finish to a meal.
This Japanese Strawberry Sponge Cake recipe works beautifully for spring and summer gatherings when strawberries are at their peak. It’s the kind of dessert that looks incredibly impressive but is built on fundamental baking techniques that are deeply rewarding to master. We’ll walk through each step together, ensuring you get that perfect, delicate sponge every time.
Recipe Overview
This recipe guides you through creating an authentic Japanese-style strawberry sponge cake. Expect a feather-light Genoise sponge, stabilised fresh whipped cream that holds its shape beautifully, and layers of fresh, juicy strawberries. The key is achieving the ‘ribbon stage’ with the eggs for that ultimate airy texture; I once rushed this part and the difference was noticeable, so we’ll take our time there.
- Prep Time: 40 minutes
- Cook Time: 30 minutes
- Total Time: 1 hour 10 minutes (+ cooling time)
- Servings: 8-10 people
- Difficulty: Medium
Why You’ll Love This Japanese Strawberry Sponge Cake Recipe
- Genuine Flavour: The sponge itself is subtly sweet with a hint of vanilla, which provides the perfect backdrop for the main stars: the naturally sweet strawberries and the rich, velvety double cream.
- Ready in Under 90 Minutes: The active work of preparing and baking the cake comes together in about 70 minutes, with the remaining time dedicated to cooling and assembly.
- Flexible Recipe: While strawberries are classic, this sponge is a fantastic base for other soft fruits. Try it with fresh raspberries and a touch of lemon zest in the cream, or even thinly sliced peaches in late summer.
- Great for Special Occasions: It’s an ideal centrepiece for a birthday, an elegant addition to an afternoon tea, or a lovely treat for Mother’s Day.
- Family Tested: My kids always ask for this cake for their birthdays. They adore the light texture, and it’s far less heavy than a traditional chocolate or fruit cake.
Ingredients You’ll Need
For a cake this delicate, the quality of your ingredients really matters. I always use free-range, room-temperature eggs, as they whip up with much more volume. For the cream, a good quality double cream with a high fat content will whip up more easily and hold its shape better.
- For the Genoise Sponge:
- 4 large free-range eggs, at room temperature
- 120g caster sugar
- 120g plain flour, sifted
- 20g unsalted butter
- 30ml whole milk
- 1 tsp vanilla extract
- For the Sugar Syrup:
- 50g caster sugar
- 100ml water
- For the Filling & Topping:
- 500ml double cream, very cold
- 50g icing sugar, sifted
- 1 tsp vanilla extract
- 400g fresh strawberries, hulled
Adam’s Tip: Don’t be tempted to skip sifting the flour. It’s an essential step to prevent lumps and helps keep the batter light and airy. I usually sift it two or three times for the best result.
How to Make Japanese Strawberry Sponge Cake
The process for this cake is methodical, but each step is crucial for the final texture. We’ll start by creating the incredibly light sponge, then prepare the simple syrup and cream while it cools, before bringing it all together in the final assembly.
- Prepare the Tin and Oven: Preheat your oven to 170°C (150°C fan). Grease a 20cm (8-inch) round cake tin and line the bottom and sides with baking parchment. In a small saucepan, gently melt the butter with the milk and vanilla extract, then set aside to cool slightly.
- Whip the Eggs and Sugar: Add the eggs and caster sugar to a large, heatproof bowl (the bowl of your stand mixer is ideal). Set it over a saucepan of simmering water (a bain-marie), ensuring the bottom of the bowl doesn’t touch the water. Whisk continuously until the sugar has dissolved and the mixture is warm to the touch (around 40°C).
- Reach the Ribbon Stage: Remove the bowl from the heat and, using an electric mixer or stand mixer with the whisk attachment, beat on high speed for 8-10 minutes. The mixture will become very pale, thick, and triple in volume. You’ve reached the crucial ribbon stage when you can lift the whisk and the batter falls back in a thick ribbon that sits on the surface for a few seconds before melting back in.
- Fold in the Flour: Sift the plain flour over the egg mixture in two or three additions. Using a large metal spoon or spatula, gently fold the flour in until just combined. Be careful not to knock the air out. What works best for me is a figure-of-eight motion, cutting through the middle and scraping around the sides.
- Incorporate the Butter Mixture: Take a large spoonful of the batter and mix it into the cooled butter and milk mixture. This lightens the butter mixture, making it easier to incorporate. Gently pour this back into the main batter and fold through carefully until just incorporated.
- Bake the Sponge: Pour the batter into your prepared tin and smooth the top. Bake for 25-30 minutes, or until the cake is golden, has started to pull away from the sides of the tin, and a skewer inserted into the centre comes out clean.
- Cool Completely: Let the cake cool in the tin for 10 minutes before turning it out onto a wire rack. Peel off the baking parchment and leave it to cool completely. This can take at least an hour.
- Prepare the Fillings: While the cake cools, make the syrup by gently heating the water and sugar in a small pan until the sugar dissolves. Set aside to cool. For the cream, pour the cold double cream, sifted icing sugar, and vanilla into a large bowl and whip until it holds firm peaks.
- Assemble the Cake: Once the cake is completely cool, use a serrated knife to carefully slice it in half horizontally. Place the bottom layer on your serving plate. Brush it generously with half of the sugar syrup. Spread about a third of the whipped cream over the sponge. Arrange a layer of sliced strawberries on top.
- Finish and Decorate: Place the top layer of the cake on, and brush with the remaining syrup. Use the remaining cream to cover the top and sides of the cake, using a palette knife for a smooth or textured finish. Decorate the top with the remaining whole or halved strawberries.
Tips From My Kitchen
- Temperature Control: Room temperature eggs are absolutely non-negotiable for a light sponge. Cold eggs will not whip to the same volume, resulting in a denser cake. Take them out of the fridge at least an hour before you start.
- The Secret Step: The bain-marie method isn’t just for melting chocolate. Gently warming the eggs and sugar helps the sugar dissolve completely, creating a more stable egg foam. I learned that this is the defining technique for a truly authentic Genoise sponge.
- Make-Ahead: The sponge layer is ideal for making ahead. You can bake it the day before, let it cool completely, then wrap it tightly in cling film and store it at room temperature. Assemble with fresh cream and strawberries on the day you plan to serve it.
- Storage: Once assembled, the cake is best enjoyed on the same day for the best texture. However, it will keep in an airtight container in the fridge for up to 2 days. The sponge might absorb some moisture from the cream, but it will still be lovely.
Common Mistakes to Avoid
- Over-mixing After Adding Flour: The moment flour is added, your goal is to fold, not stir. Over-mixing develops gluten and, more critically, knocks out all the air you’ve just spent 10 minutes whipping into the eggs. This is the number one cause of a dense, rubbery sponge.
- Incorrect Oven Temperature: This cake is delicate and needs a moderate oven. If your oven is too hot, the cake will form a crust too quickly, rise dramatically, and then sink in the middle as it cools. An oven thermometer is a baker’s best friend.
- Not Whipping the Eggs Enough: Don’t get impatient during the whipping stage. If you stop before the ribbon stage, the batter won’t have enough structure to hold its own weight or the weight of the flour, leading to a flat, disappointing cake.
Delicious Variations to Try
Once you’ve mastered the basic sponge, it’s a wonderful canvas for other flavours. It’s much more versatile than a standard Banana Bread Recipe, for example.
- Matcha Cream Version: For a classic Japanese flavour combination, sift 1 tablespoon of good-quality matcha powder into the icing sugar before whipping it with the double cream. The slightly bitter, earthy notes of the matcha are a perfect contrast to the sweet cake.
- Chocolate and Cherry: Add 20g of sifted, high-quality cocoa powder along with the flour for a light chocolate sponge. Pair this with a filling of whipped cream and fresh or syruped cherries for a Black Forest-inspired take.
- Citrus Burst: Add the finely grated zest of one lemon or orange to the egg and sugar mixture before whipping. This infuses the sponge with a beautiful, fresh citrus aroma that works wonderfully with summer berries.
What to Serve With Japanese Strawberry Sponge Cake
This cake truly stands on its own, but here are a few suggestions to round out the experience.
- A Pot of Tea: It pairs beautifully with a delicate green tea like Sencha, or a fragrant floral tea like jasmine or Earl Grey. The clean taste of the tea complements the light cake perfectly.
- A Glass of Bubbly: For a celebration, a glass of Prosecco or a light, fruity sparkling rosé is a fantastic accompaniment. The bubbles cut through the richness of the cream.
- Nothing at All: Honestly, my favourite way to serve this is simply as it is, on a nice plate with a fork. It doesn’t need anything else to shine.
Frequently Asked Questions
Japanese Strawberry Sponge Cake
Ingredients
Method
- Prepare the Tin and Oven: Preheat your oven to 170°C (150°C fan). Grease a 20cm (8-inch) round cake tin and line the bottom and sides with baking parchment. In a small saucepan, gently melt the butter with the milk and vanilla extract, then set aside to cool slightly.
- Whip the Eggs and Sugar: Add the eggs and caster sugar to a large, heatproof bowl (the bowl of your stand mixer is ideal). Set it over a saucepan of simmering water (a bain-marie), ensuring the bottom of the bowl doesn't touch the water. Whisk continuously until the sugar has dissolved and the mixture is warm to the touch (around 40°C).
- Reach the Ribbon Stage: Remove the bowl from the heat and, using an electric mixer or stand mixer with the whisk attachment, beat on high speed for 8-10 minutes. The mixture will become very pale, thick, and triple in volume. You've reached the crucial ribbon stage when you can lift the whisk and the batter falls back in a thick ribbon that sits on the surface for a few seconds before melting back in.
- Fold in the Flour: Sift the plain flour over the egg mixture in two or three additions. Using a large metal spoon or spatula, gently fold the flour in until just combined. Be careful not to knock the air out. What works best for me is a figure-of-eight motion, cutting through the middle and scraping around the sides.
- Incorporate the Butter Mixture: Take a large spoonful of the batter and mix it into the cooled butter and milk mixture. This lightens the butter mixture, making it easier to incorporate. Gently pour this back into the main batter and fold through carefully until just incorporated.
- Bake the Sponge: Pour the batter into your prepared tin and smooth the top. Bake for 25-30 minutes, or until the cake is golden, has started to pull away from the sides of the tin, and a skewer inserted into the centre comes out clean.
- Cool Completely: Let the cake cool in the tin for 10 minutes before turning it out onto a wire rack. Peel off the baking parchment and leave it to cool completely. This can take at least an hour.
- Prepare the Fillings: While the cake cools, make the syrup by gently heating the water and sugar in a small pan until the sugar dissolves. Set aside to cool. For the cream, pour the cold double cream, sifted icing sugar, and vanilla into a large bowl and whip until it holds firm peaks.
- Assemble the Cake: Once the cake is completely cool, use a serrated knife to carefully slice it in half horizontally. Place the bottom layer on your serving plate. Brush it generously with half of the sugar syrup. Spread about a third of the whipped cream over the sponge. Arrange a layer of sliced strawberries on top.
- Finish and Decorate: Place the top layer of the cake on, and brush with the remaining syrup. Use the remaining cream to cover the top and sides of the cake, using a palette knife for a smooth or textured finish. Decorate the top with the remaining whole or halved strawberries.
Notes
I hope you enjoy making this Japanese Strawberry Sponge Cake as much as I do. It’s a truly rewarding bake that always gets compliments for its beautiful lightness and fresh flavours. Take your time with the steps, trust the process, and you’ll be rewarded with a spectacular dessert. I’d love to hear how yours turns out, so please feel free to leave a comment below!
Happy baking,
Adam
You might also like these recipes
Bake This Sweet Tart Cranberry Crumble Bars Recipe
There’s a particular magic to a traybake, something comforting and…
Cinnamon Sugar Air Fryer Churro Bites Recipe
There’s something universally comforting about the scent of cinnamon and…
Bake This Bright Lemon Raspberry Cookies Recipe
There’s something truly special about a biscuit tin filled with…
Bake This Gourmet Brownie Cookies Recipe Today
There are moments in the kitchen that call for a…
Try This Layered Black Forest Trifle Recipe
There’s something wonderfully nostalgic about a trifle. It’s a dessert…
Bake This Decadent Fudgy Brownie Cookies Recipe
There are moments in the kitchen that feel like a…