
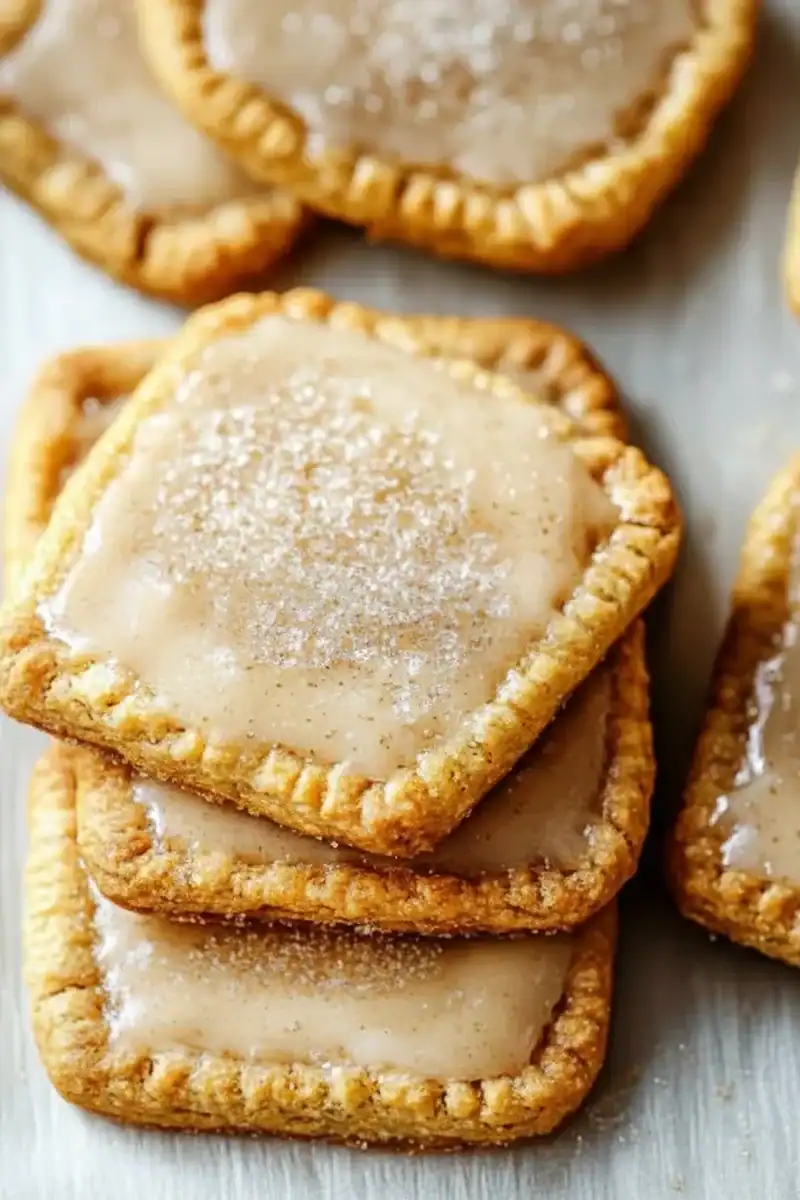
Brown Sugar Pop Tart Cookies

There’s a special kind of joy found in recreating a childhood favourite, but with a grown-up, homemade touch. That’s precisely what these Brown Sugar Pop Tart Cookies are all about. They take the nostalgic memory of a toaster pastry and transform it into a buttery, tender cookie, filled with a gooey, caramel-like brown sugar and cinnamon centre. The cookie itself is almost like a shortbread – crisp at the edges but wonderfully soft in the middle, providing the perfect pocket for that rich filling. Forget the shop-bought versions; this is a completely different experience.
Friends always ask me for this recipe after trying it at my weekend brunches. It’s the combination of textures and the familiar, comforting flavour of brown sugar and cinnamon that seems to win everyone over. We make these when we want something a little more special than a standard biscuit with our afternoon tea, or even as a fun breakfast cookie alongside a cup of strong coffee. They’re a fantastic baking project for a quiet afternoon, filling the kitchen with the most incredible, sweet and spicy aroma.
If you’re a fan of cinnamon cookies or looking for a cookie recipe that’s a little out of the ordinary, you’ve found it. This recipe isn’t just about making a sweet treat; it’s about crafting a little bite of nostalgia that’s genuinely delicious. For another baked good that always gets rave reviews, you might also enjoy my classic Banana Bread Recipe.
Recipe Overview
These Brown Sugar Pop Tart Cookies deliver on their promise: a rich, buttery cookie envelope with a warm, spiced filling that tastes of caramel and cinnamon. I found during testing that getting the filling-to-cookie ratio just right is key; too much and it spills, too little and you miss that glorious gooey centre. This recipe hits the sweet spot. They look impressive but are built from simple, straightforward steps.
- Prep Time: 25 minutes (plus 1 hour chilling)
- Cook Time: 12-14 minutes
- Total Time: 1 hour 40 minutes
- Servings: 12 cookies
- Difficulty: Medium
Why You’ll Love These Brown Sugar Pop Tart Cookies
- Genuine Flavour: The dark brown sugar provides a deep, molasses-rich sweetness that’s perfectly balanced by the warmth of the ground cinnamon. The cookie itself is buttery and not overly sweet, letting the fantastic filling shine.
- A Fun Baking Project: While they take a little more effort than a simple drop cookie, the process of rolling, filling, and crimping is incredibly satisfying and comes together in just over an hour and a half (including chilling).
- Flexible Recipe: You can easily adapt the filling. Try adding a pinch of nutmeg or allspice along with the cinnamon, or even a little orange zest for a festive twist. The sprinkles can be changed for any occasion – think red and green for Christmas or pastels for Easter.
- Great for Gifting: These cookies stack and travel well, making them an ideal choice for homemade gifts, bake sales, or bringing to a friend’s house. They always get compliments.
- Family Tested: My kids love getting involved with the decorating part. Topping them with the icing and rainbow sprinkles is their favourite job, and these are always the first to vanish from the biscuit tin.
Ingredients You’ll Need
For this recipe, we rely on a few pantry staples. The most important thing is to use good-quality, cold unsalted butter – it’s the foundation of the tender cookie dough. I always use a block butter rather than a soft spreadable type, as the lower water content gives a much better texture.
- For the Cookie Dough:
- 250g plain flour
- 125g cold unsalted butter, cut into small cubes
- 75g icing sugar, sifted
- 1 large free-range egg yolk
- 1 tsp vanilla extract
- A pinch of salt
- For the Brown Sugar Cinnamon Filling:
- 70g dark brown soft sugar
- 1 tbsp plain flour
- 1 tsp ground cinnamon
- 2 tbsp unsalted butter, melted
- For the Icing & Topping:
- 100g icing sugar, sifted
- 2-3 tsp milk
- ½ tsp vanilla extract
- Rainbow sprinkles, for decorating
Adam’s Tip: Don’t be tempted to use light brown sugar for the filling. The dark variety has a higher molasses content, which is what creates that wonderfully rich, almost caramel-like flavour that makes these cookies so special.
How to Make Brown Sugar Pop Tart Cookies
The key to this recipe is chilling the dough properly. It might seem like an extra step, but it’s what ensures the cookies hold their rectangular shape and develop a beautifully tender, flaky texture. Let’s get started.
- Make the Dough: In a large bowl, combine the 250g plain flour, 75g sifted icing sugar, and a pinch of salt. Add the 125g of cold, cubed butter. Using your fingertips, rub the butter into the flour mixture until it resembles fine breadcrumbs.
- Bring it Together: In a small bowl, lightly whisk the egg yolk and 1 tsp of vanilla extract. Pour this into the flour mixture and use a knife or spatula to stir until it starts to clump together. Gently bring the dough together with your hands, forming a smooth disc. Avoid overworking it.
- Chill the Dough: Wrap the dough disc tightly in cling film and place it in the refrigerator to chill for at least 1 hour, or up to 2 days. This step is essential for preventing the cookies from spreading.
- Prepare the Filling: While the dough is chilling, make the filling. In a small bowl, mix together the 70g dark brown sugar, 1 tbsp plain flour, and 1 tsp cinnamon. Pour in the 2 tbsp of melted butter and stir until you have a thick, damp paste.
- Roll and Cut: Once chilled, unwrap the dough and place it on a lightly floured surface. Roll it out to approximately 3mm thick. Using a sharp knife or a rectangular cookie cutter, cut out 24 rectangles, each about 5cm x 8cm. I find that using a ruler helps keep things neat.
- Assemble the Cookies: Arrange 12 of the rectangles on a baking tray lined with baking parchment. Spoon about a teaspoon of the brown sugar filling into the centre of each, leaving a 1cm border around the edges. Lightly brush the border with a little water.
- Seal and Crimp: Carefully place the remaining 12 rectangles on top. Gently press down around the filling to push out any air, then use the tines of a fork to crimp and seal the edges all the way around. Prick the top of each cookie a couple of times with the fork.
- Final Chill & Bake: Place the entire baking tray in the freezer for 15 minutes. This helps the cookies hold their shape perfectly. Meanwhile, preheat your oven to 180°C (160°C fan). Bake the chilled cookies for 12-14 minutes, or until the edges are a light golden brown.
- Cool Completely: Let the cookies cool on the baking tray for 5 minutes before carefully transferring them to a wire rack to cool completely. They must be fully cool before you add the icing.
- Decorate: To make the icing, mix the 100g sifted icing sugar with 2 tsp of milk and the ½ tsp vanilla extract until you have a smooth, spreadable consistency. Add a little more milk if it’s too thick. Spread a thin layer of icing over each cookie and immediately top with rainbow sprinkles before it sets.
Tips From My Kitchen
- Temperature Control: Your butter and dough must stay cold. If your kitchen is warm and the dough starts to feel sticky or soft while you’re rolling and cutting, don’t hesitate to pop it back in the fridge for 10-15 minutes to firm up again.
- The Secret Step: The 15-minute freeze just before baking is a game-changer. I learned that this extra chill solidifies the butter, which means the cookies bake up taller and hold their sharp rectangular shape without spreading.
- Make-Ahead: The unbaked, assembled cookies can be frozen solid on a baking tray, then transferred to a freezer bag. They can be baked directly from frozen; just add 2-3 minutes to the cooking time. The dough disc can also be refrigerated for up to 2 days.
- Storage: Once decorated and fully set, store the cookies in an airtight container at room temperature. They will keep well for up to 4 days, though the cookie will soften slightly after the first day.
Common Mistakes to Avoid
- Overfilling the Cookies: It’s tempting to add a large dollop of the brown sugar filling, but this is the number one reason for leakage during baking. A level teaspoon is all you need for a perfect, gooey centre that stays put.
- Baking on a Warm Tray: Always use a cool baking tray. Placing cold cookie dough onto a warm tray (from a previous batch) will cause the butter to melt too quickly, leading to excessive spreading.
- Skipping the Rest Time: Chilling the dough is not an optional step. It allows the gluten in the flour to relax and the butter to solidify, resulting in a cookie that is tender, not tough, and holds its shape beautifully. This process is crucial for so many pastry and cookie recipes, as explained by food science experts at King Arthur Baking.
What to Serve With Brown Sugar Pop Tart Cookies
These Pop Tart Cookies are a delightful treat all on their own, but they pair wonderfully with a few simple things to elevate the experience. They’re a sweet finish to a savoury meal like my Garlic Parmesan Chicken Pasta.
- A Hot Drink: The warm spices are a natural match for a strong cup of coffee, a milky latte, or a classic English breakfast tea.
- A Scoop of Ice Cream: For a more decadent dessert, serve a cookie slightly warmed (just 10 seconds in the microwave) with a scoop of high-quality vanilla bean ice cream. The contrast between warm and cold is fantastic.
- A Glass of Milk: Sometimes, the simplest pairing is the best. A tall, cold glass of milk is the perfect companion for dunking.
Frequently Asked Questions
Brown Sugar Pop Tart Cookies
Ingredients
Method
- Make the Dough: In a large bowl, combine the 250g plain flour, 75g sifted icing sugar, and a pinch of salt. Add the 125g of cold, cubed butter. Using your fingertips, rub the butter into the flour mixture until it resembles fine breadcrumbs.
- Bring it Together: In a small bowl, lightly whisk the egg yolk and 1 tsp of vanilla extract. Pour this into the flour mixture and use a knife or spatula to stir until it starts to clump together. Gently bring the dough together with your hands, forming a smooth disc. Avoid overworking it.
- Chill the Dough: Wrap the dough disc tightly in cling film and place it in the refrigerator to chill for at least 1 hour, or up to 2 days. This step is essential for preventing the cookies from spreading.
- Prepare the Filling: While the dough is chilling, make the filling. In a small bowl, mix together the 70g dark brown sugar, 1 tbsp plain flour, and 1 tsp cinnamon. Pour in the 2 tbsp of melted butter and stir until you have a thick, damp paste.
- Roll and Cut: Once chilled, unwrap the dough and place it on a lightly floured surface. Roll it out to approximately 3mm thick. Using a sharp knife or a rectangular cookie cutter, cut out 24 rectangles, each about 5cm x 8cm. I find that using a ruler helps keep things neat.
- Assemble the Cookies: Arrange 12 of the rectangles on a baking tray lined with baking parchment. Spoon about a teaspoon of the brown sugar filling into the centre of each, leaving a 1cm border around the edges. Lightly brush the border with a little water.
- Seal and Crimp: Carefully place the remaining 12 rectangles on top. Gently press down around the filling to push out any air, then use the tines of a fork to crimp and seal the edges all the way around. Prick the top of each cookie a couple of times with the fork.
- Final Chill & Bake: Place the entire baking tray in the freezer for 15 minutes. This helps the cookies hold their shape perfectly. Meanwhile, preheat your oven to 180°C (160°C fan). Bake the chilled cookies for 12-14 minutes, or until the edges are a light golden brown.
- Cool Completely: Let the cookies cool on the baking tray for 5 minutes before carefully transferring them to a wire rack to cool completely. They must be fully cool before you add the icing.
- Decorate: To make the icing, mix the 100g sifted icing sugar with 2 tsp of milk and the ½ tsp vanilla extract until you have a smooth, spreadable consistency. Add a little more milk if it's too thick. Spread a thin layer of icing over each cookie and immediately top with rainbow sprinkles before it sets.
Notes
I hope you enjoy making (and eating!) these Brown Sugar Pop Tart Cookies as much as we do in my house. They are a truly special treat that brings back fond memories while creating new ones. If you’re looking for another fun baking project after this one, give my Chocolate Peanut Butter Banana Bread a try. Please leave a comment below and let me know how yours turned out! Happy baking, Adam.


