
Creamy Blackberry Cheesecake Recipe Dessert
There’s a specific moment in late summer when the hedgerows are heavy with dark, glossy blackberries. For me, that’s the signal that it’s time to make this cheesecake. This isn’t just any fruit cheesecake; it’s a recipe I’ve refined over years of happy experimentation in my kitchen, resulting in what I believe is the ultimate balance of rich, creamy filling and a tart, vibrant blackberry swirl. I’ve been making this for over 10 years, and it never disappoints.
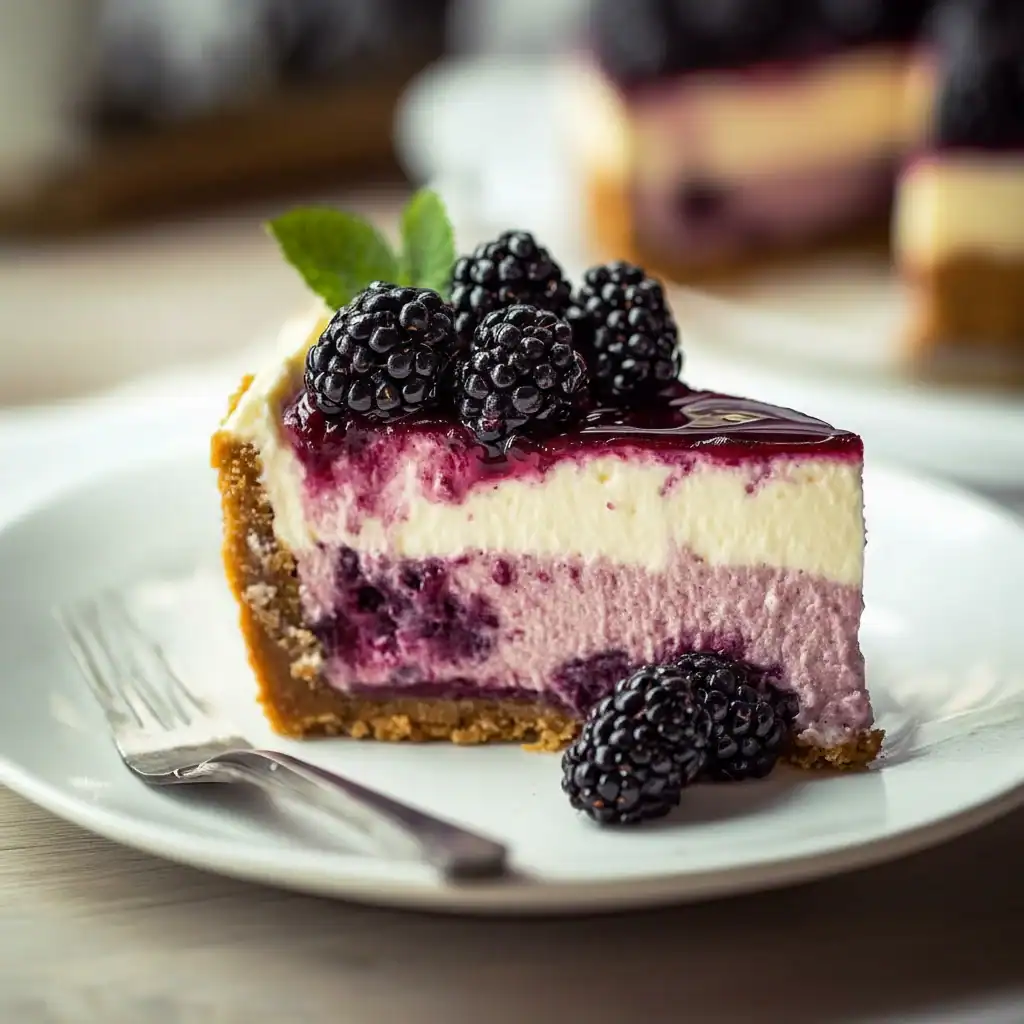
What sets this creamy blackberry cheesecake recipe apart is the texture. We achieve a genuinely velvety, dense yet light filling by using full-fat cream cheese and a slow bake, followed by an even slower cool-down. This method prevents the dreaded cracks and results in a flawless finish every time. The sweet, juicy blackberry sauce, which we’ll make from scratch, isn’t just a topping; it’s swirled directly into the batter before baking. This infuses every single slice with that beautiful berry flavour and creates a stunning marbled effect.
This dessert is a true showstopper, ideal for rounding off a special family dinner or bringing to a summer gathering. It looks like it came from a fancy patisserie, but it’s built on straightforward techniques that any home cook can master. It’s the kind of berry dessert that feels both elegant and deeply comforting, a recipe that always gets compliments and requests for the instructions.
Recipe Overview
This baked blackberry cheesecake recipe delivers a rich, tangy, and supremely creamy dessert with a classic digestive biscuit base. The star is the homemade blackberry swirl, which cuts through the richness of the cream cheese filling with a burst of authentic fruit flavour. I’ve found that baking the cheesecake in a water bath is the secret to its unbelievably smooth texture and crack-free top, so don’t skip that step!
- Prep Time: 30 minutes
- Cook Time: 1 hour 15 minutes
- Chilling Time: 6 hours (or overnight)
- Total Time: 7 hours 45 minutes
- Servings: 10-12 slices
- Difficulty: Medium
Why You’ll Love This Creamy Blackberry Cheesecake Recipe Dessert
- Incredible Texture and Flavour: The filling is dense and luscious without being heavy, thanks to the combination of full-fat cream cheese and soured cream. The homemade blackberry coulis provides a sharp, fruity contrast that prevents the cheesecake from being overly sweet.
- A Showstopping Centrepiece: The deep purple blackberry swirl against the pale cream filling creates a beautiful marbled pattern. It’s a dessert that looks incredibly impressive, yet the technique is very achievable.
- A Flexible Recipe: While blackberries are the star, this recipe works beautifully with other berries. Raspberries, blueberries, or even a mix of summer fruits can be substituted with great results. You can also add a little lemon zest to the filling for an extra citrusy note.
- Works Beautifully for Celebrations: This is my go-to summer cake for birthdays, garden parties, or when we have friends over for a BBQ. It can be made a day in advance, which frees you up on the day of the event.
- Family Tested and Approved: This is a dessert that disappears astonishingly fast in our house. My kids absolutely devour this every time I make it, often fighting over who gets the last slice with the most blackberry swirl.

Ingredients You’ll Need
For a truly creamy cheesecake, using full-fat ingredients is non-negotiable. I always use Philadelphia Original cream cheese as I find it gives the most consistent, rich, and tangy result. Don’t be tempted by lower-fat versions, as they contain more water and can lead to a less stable, runnier filling.
- For the Biscuit Base:
- 250g digestive biscuits
- 125g unsalted butter, melted
- For the Blackberry Swirl:
- 300g fresh or frozen blackberries
- 75g caster sugar
- 1 tbsp lemon juice
- 1 tbsp cornflour mixed with 2 tbsp cold water
- For the Creamy Cheesecake Filling:
- 700g full-fat cream cheese, at room temperature
- 200g caster sugar
- 200ml soured cream, at room temperature
- 1 tsp vanilla extract
- 3 large free-range eggs, at room temperature
- 1 large free-range egg yolk, at room temperature
Adam’s Tip: Having your cream cheese, soured cream, and eggs at room temperature is absolutely critical. Cold ingredients don’t combine smoothly and can result in a lumpy batter. I take mine out of the fridge a good hour or two before I start.
How to Make This Creamy Blackberry Cheesecake Recipe Dessert
We’ll tackle this recipe in three parts: creating the crisp base, making the vibrant blackberry coulis, and then whipping up the velvety filling before bringing it all together. The most important part is the slow cooling process, so be patient!
- Prepare the Base and Pan: Preheat your oven to 180°C (160°C fan). Grease and line the base of a 23cm (9-inch) springform tin with baking parchment. To prepare for the water bath, wrap the outside of the tin in a double layer of heavy-duty tin foil, ensuring it comes high up the sides to prevent any water from seeping in.
- Make the Biscuit Base: Crush the digestive biscuits into fine crumbs using a food processor, or place them in a bag and bash with a rolling pin. Transfer the crumbs to a bowl and pour over the melted butter. Mix until it resembles damp sand. Tip this into your prepared tin and press down firmly and evenly with the back of a spoon. Bake for 10 minutes, then set aside to cool.
- Create the Blackberry Swirl: While the base bakes, place the blackberries, sugar, and lemon juice in a small saucepan over a medium heat. Cook for 5-7 minutes, stirring occasionally, until the berries have broken down. Pour the cornflour slurry into the pan and stir continuously for another minute until the sauce thickens. Strain the sauce through a fine-mesh sieve to remove the seeds, pressing down on the solids to extract all the liquid. Set the smooth coulis aside to cool completely.
- Start the Filling: In a large bowl using a stand mixer with the paddle attachment or a hand mixer, beat the room-temperature cream cheese on a low speed until completely smooth and free of lumps. This is important – start slow to avoid incorporating too much air. Scrape down the sides of the bowl.
- Combine the Filling Ingredients: Add the caster sugar and beat on low until just combined. Add the soured cream and vanilla extract, mixing again until smooth. What works best for me is adding the eggs and yolk one at a time, beating on a low speed only until the yellow of each egg has disappeared into the batter. Do not overmix! Overmixing is the main cause of cracks.
- Assemble the Cheesecake: Pour the cheesecake filling over your cooled biscuit base and smooth the top with a spatula. Dollop spoonfuls of the cooled blackberry coulis over the surface. Use a skewer or a thin knife to gently swirl the coulis into the filling to create a marbled pattern.
- Bake in a Water Bath: Place your foil-wrapped tin into a larger roasting tray. Carefully pour boiling water into the roasting tray until it comes halfway up the sides of the cheesecake tin. This is the bain-marie, or water bath, and it ensures a gentle, even bake. Bake for 1 hour to 1 hour 15 minutes. The cheesecake is done when the edges are set but the centre has a slight wobble, like a jelly.
- Cool Down Slowly: This step is key! Turn off the oven, prop the door open with a wooden spoon, and leave the cheesecake to cool in the oven for at least 1 hour. Then, remove it from the water bath, take off the foil, and let it cool to room temperature on a wire rack. Finally, cover and chill in the fridge for at least 6 hours, or preferably overnight.
- Serve: Once fully chilled, carefully run a thin knife around the edge of the cheesecake before releasing the springform tin. Transfer to a serving plate, slice, and enjoy.
Tips From My Kitchen
- Room Temperature is Everything: I can’t stress this enough. Cold cream cheese will give you a lumpy batter no matter how much you beat it. Taking ingredients out of the fridge an hour or two beforehand makes all the difference for a silky smooth filling.
- The Secret is Not Over-mixing: I learned that vigorously beating the filling, especially after adding the eggs, incorporates too much air. These air bubbles expand in the heat of the oven and then collapse as it cools, causing cracks. Mix on a low speed and only until the ingredients are just combined.
- Plan Ahead: This is a wonderful dessert to make in advance. The flavour and texture actually improve after a night in the fridge. You can prepare the entire cheesecake up to two days before you plan to serve it.
- Storage: Leftover cheesecake will keep beautifully in the fridge. Cover it with cling film or store it in an airtight container for up to 4 days. I find the flavours meld and deepen by day two.
Equipment You’ll Need
- 23cm (9-inch) springform tin
- Stand mixer or electric hand mixer
- Large roasting tray (for the water bath)
- Heavy-duty aluminium foil
- Saucepan
- Fine-mesh sieve
- Wire cooling rack
Common Mistakes to Avoid
- A Soggy Base: This usually happens when the water bath leaks into the tin. Use two layers of good quality, heavy-duty foil and make sure there are no tears. Press it tightly against the tin.
- A Cracked Top: This is caused by three things: over-mixing the batter, baking at too high a temperature, or cooling the cheesecake too quickly. Follow the instructions for low-speed mixing and the slow oven cool-down to prevent this.
- Not Chilling for Long Enough: A cheesecake needs time to set fully. If you slice into it too early, it will be soft and won’t hold its shape. Chilling overnight is always best for a clean, firm slice.
Delicious Variations to Try
Once you’ve mastered the basic recipe, it’s fun to experiment. This fruit cheesecake is wonderfully adaptable.
- Ginger & Spice Base: Swap half of the digestive biscuits for ginger nut biscuits. The warmth of the ginger is a fantastic companion to the tartness of the blackberries.
- Vegan Blackberry Cheesecake: For a plant-based version, use vegan cream cheese, a dairy-free butter alternative for the base, and a plant-based cream substitute for the soured cream. Many digestive biscuits are already vegan, but always check the packet.
- Mixed Berry Swirl: Don’t have enough blackberries? Use a combination of blackberries, raspberries, and blueberries to make the coulis. This creates a lovely, complex berry flavour that makes a fantastic summer cake.
What to Serve With This Creamy Blackberry Cheesecake
This dessert is a star all on its own, but a few simple additions can elevate it further.
- Fresh Berries: A small handful of fresh blackberries and maybe a few mint leaves on the side of each slice looks beautiful and adds a fresh contrast.
- A Drizzle of Cream: A little pouring single cream alongside cuts through the richness and adds another layer of simple luxury.
- Dessert Wine: For an adult pairing, a chilled glass of a late-harvest Riesling or a sweet rosé works wonderfully, as their fruity notes complement the blackberries without being overpowering.
Frequently Asked Questions
Creamy Blackberry Cheesecake
Ingredients
Method
- Prepare the Base and Pan: Preheat your oven to 180°C (160°C fan). Grease and line the base of a 23cm (9-inch) springform tin with baking parchment. To prepare for the water bath, wrap the outside of the tin in a double layer of heavy-duty tin foil, ensuring it comes high up the sides to prevent any water from seeping in.
- Make the Biscuit Base: Crush the digestive biscuits into fine crumbs using a food processor, or place them in a bag and bash with a rolling pin. Transfer the crumbs to a bowl and pour over the melted butter. Mix until it resembles damp sand. Tip this into your prepared tin and press down firmly and evenly with the back of a spoon. Bake for 10 minutes, then set aside to cool.
- Create the Blackberry Swirl: While the base bakes, place the blackberries, sugar, and lemon juice in a small saucepan over a medium heat. Cook for 5-7 minutes, stirring occasionally, until the berries have broken down. Pour the cornflour slurry into the pan and stir continuously for another minute until the sauce thickens. Strain the sauce through a fine-mesh sieve to remove the seeds, pressing down on the solids to extract all the liquid. Set the smooth coulis aside to cool completely.
- Start the Filling: In a large bowl using a stand mixer with the paddle attachment or a hand mixer, beat the room-temperature cream cheese on a low speed until completely smooth and free of lumps. This is important – start slow to avoid incorporating too much air. Scrape down the sides of the bowl.
- Combine the Filling Ingredients: Add the caster sugar and beat on low until just combined. Add the soured cream and vanilla extract, mixing again until smooth. What works best for me is adding the eggs and yolk one at a time, beating on a low speed only until the yellow of each egg has disappeared into the batter. Do not overmix! Overmixing is the main cause of cracks.
- Assemble the Cheesecake: Pour the cheesecake filling over your cooled biscuit base and smooth the top with a spatula. Dollop spoonfuls of the cooled blackberry coulis over the surface. Use a skewer or a thin knife to gently swirl the coulis into the filling to create a marbled pattern.
- Bake in a Water Bath: Place your foil-wrapped tin into a larger roasting tray. Carefully pour boiling water into the roasting tray until it comes halfway up the sides of the cheesecake tin. This is the bain-marie, or water bath, and it ensures a gentle, even bake. Bake for 1 hour to 1 hour 15 minutes. The cheesecake is done when the edges are set but the centre has a slight wobble, like a jelly.
- Cool Down Slowly: This step is key! Turn off the oven, prop the door open with a wooden spoon, and leave the cheesecake to cool in the oven for at least 1 hour. Then, remove it from the water bath, take off the foil, and let it cool to room temperature on a wire rack. Finally, cover and chill in the fridge for at least 6 hours, or preferably overnight.
- Serve: Once fully chilled, carefully run a thin knife around the edge of the cheesecake before releasing the springform tin. Transfer to a serving plate, slice, and enjoy.
Notes
I truly hope you enjoy making this creamy blackberry cheesecake. It’s a recipe that holds a lot of happy memories for my family and one I’m delighted to share. Taking the time to follow the steps, especially the slow cooling, will reward you with a spectacular dessert that you’ll be proud to serve. Let me know how you get on in the comments below – I’d love to hear about it!
Happy Baking,
Adam Henderson


