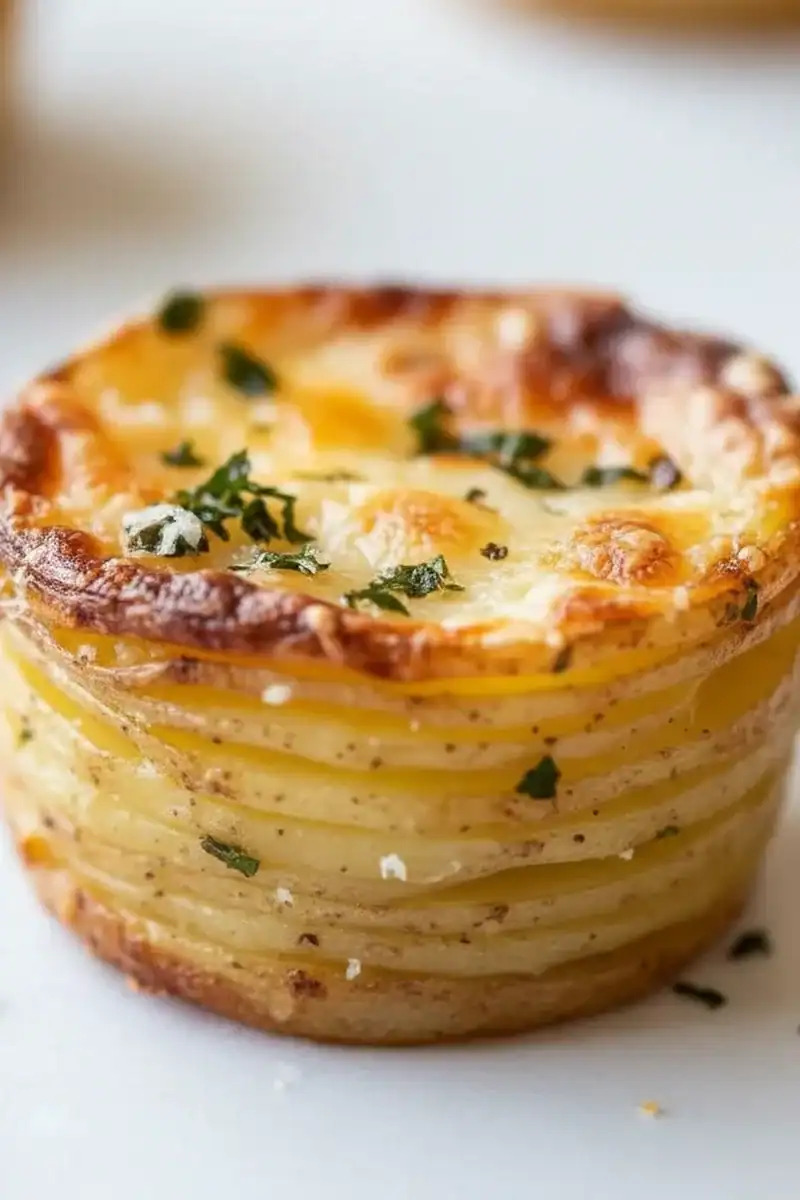
Crispy Cheesy Parmesan Potato Stacks
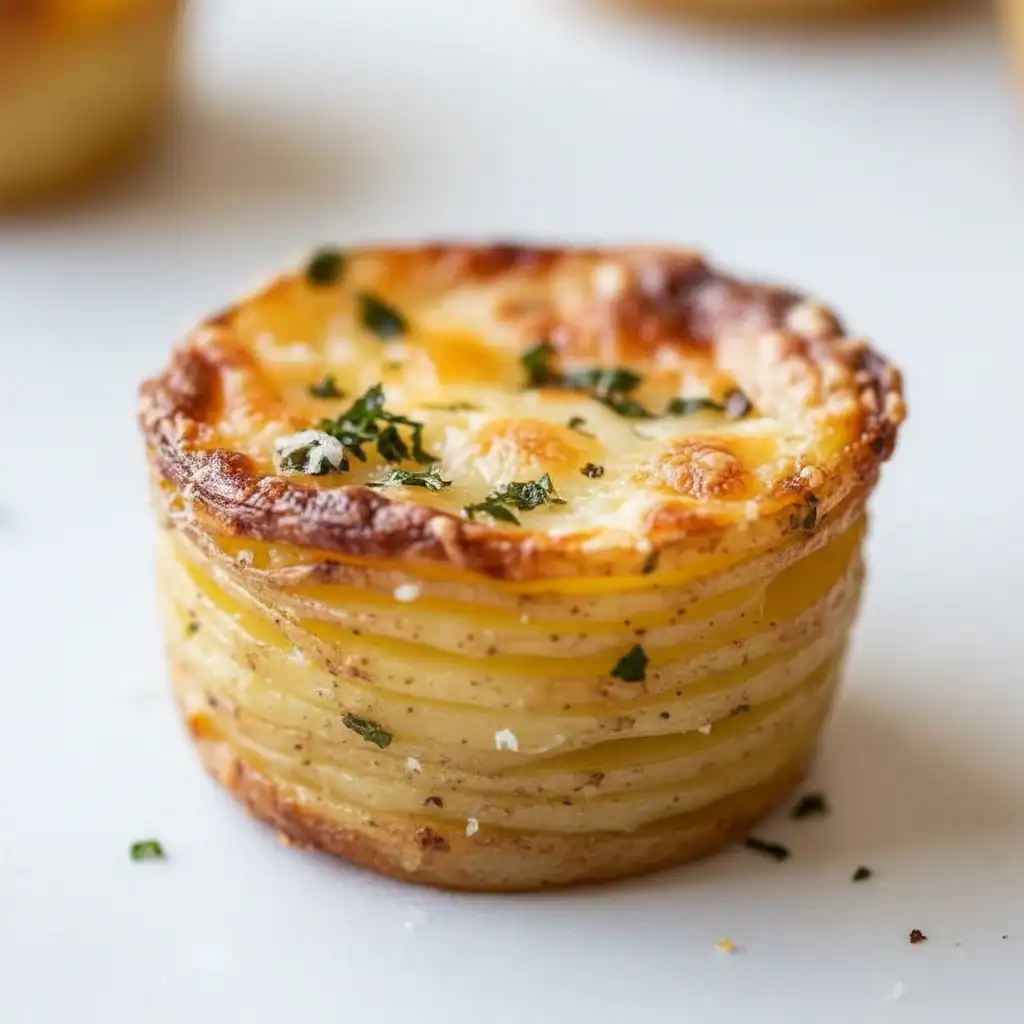
There are roasted potatoes, and then there are these glorious little towers of crispy, cheesy potato goodness. We’re not just talking about tossing some spuds in oil and hoping for the best. We’re talking about taking the humble potato and transforming it into a side dish that will have everyone reaching for a second, and maybe even a third. These Crispy Cheesy Parmesan Potato Stacks are all about texture: wonderfully crisp, golden-brown edges that give way to soft, tender, buttery layers inside. It’s a bit of kitchen magic that looks incredibly impressive but is built on simple, comforting flavours.
I first developed this recipe for a family Sunday roast when I wanted to serve something a little more special than our usual roasties. The goal was to get that perfect balance of a crunchy exterior and a soft, almost creamy interior, with the salty, nutty flavour of Parmesan running through every single layer. My kids absolutely devour this every time I make it, and the sound of them crunching through the crispy edges is one of my favourite kitchen sounds. They work beautifully for a special dinner party but are straightforward enough for a weeknight treat when you want to elevate a simple meal.
This recipe is all about layering thin slices of potato with melted butter, garlic, thyme, and a generous amount of Parmesan cheese in a muffin tin. The muffin tin is the secret here; it forces the stacks to bake upwards, crisping the sides and tops to perfection while the inside steams gently in the buttery, cheesy mixture. The result is a portion of potatoes that feels both elegant and deeply satisfying.
Recipe Overview
This recipe transforms simple potatoes into an unforgettable side dish. We’ll be thinly slicing potatoes, tossing them in a fragrant mixture of melted butter, garlic, and heaps of Parmesan cheese, then stacking them in a muffin tin to bake. The process creates individual potato stacks that are unbelievably crispy on the outside and wonderfully tender within. After testing this recipe five times, I finally got it just right – the key is getting the slices thin and not skimping on the cheese!
- Prep Time: 20 minutes
- Cook Time: 55 minutes
- Total Time: 1 hour 15 minutes
- Servings: 12 stacks
- Difficulty: Medium
Why You’ll Love This Crispy Cheesy Parmesan Potato Stacks Recipe
- Incredible Texture and Flavour: This isn’t just a potato dish; it’s a textural journey. You get the immensely satisfying crunch from the edges, which have been fried to a deep golden-brown in the butter, followed by the soft, yielding layers of potato. The salty, umami-rich flavour of the Parmesan cheese toasts in the oven and seasons every single slice.
- An Impressive Side Dish: These muffin tin potatoes look like they came from a high-end restaurant kitchen. The way they stand tall on the plate makes them a visually stunning addition to any meal, and everyone seems to love them.
- A Flexible Foundation: While Parmesan and thyme are a classic pairing, this recipe is a great base for your own creativity. You can swap herbs, add spices, or mix in different hard cheeses to make it your own.
- Works Wonderfully for Gatherings: Whether it’s a Sunday roast, Christmas dinner, or a steak night with friends, these potato stacks elevate the entire meal. Because they are pre-portioned, they are also very easy to serve.
- Family Tested and Approved: This is the one side dish my entire family gets excited about. Even my pickiest eater can’t resist the combination of crispy edges and cheesy flavour. It always gets compliments.
Ingredients You’ll Need
The beauty of this recipe lies in its use of simple, high-quality ingredients. Choosing the right potato is important; I recommend a floury variety like Maris Piper or King Edward, as they become fluffy and tender when baked. For the cheese, please use a block of proper Parmesan and grate it yourself. The pre-grated stuff often contains anti-caking agents that prevent it from melting as beautifully.
- 900g Maris Piper or King Edward potatoes (about 4-5 medium potatoes)
- 85g unsalted butter, melted
- 75g Parmesan cheese, freshly grated
- 1 tsp garlic powder
- 1 tsp onion powder
- 1 tsp fresh thyme leaves, finely chopped
- 1 tsp sea salt
- ½ tsp freshly ground black pepper
Adam’s Tip: If you can, use a good quality cultured butter. The slightly tangy, richer flavour really makes a difference and helps the outside of the potatoes develop a deeper, more golden-brown colour. It’s a small change that adds a noticeable layer of flavour.
How to Make Crispy Cheesy Parmesan Potato Stacks
The process is all about the preparation. Getting the potato slices uniformly thin is the most important step, as this ensures they cook evenly and create those distinct, delicious layers. A mandoline slicer makes this job much easier, but a sharp knife and a steady hand work just as well.
- Preheat and Prepare: Preheat your oven to 200°C (180°C fan). Generously grease a 12-cup standard muffin tin with butter or a neutral oil spray. Don’t be shy here; a good coating prevents sticking and helps the bottoms crisp up.
- Slice the Potatoes: Wash and peel the potatoes. Using a mandoline slicer or a very sharp knife, slice the potatoes into paper-thin rounds, about 1-2mm thick. Place the slices into a large mixing bowl.
- Create the Flavour Mixture: In a separate, smaller bowl, combine the melted butter, grated Parmesan, garlic powder, onion powder, chopped thyme, sea salt, and black pepper. Stir everything together until it’s well combined.
- Coat the Potatoes: Pour the butter and Parmesan mixture over the sliced potatoes in the large bowl. Use your hands to gently toss and separate the slices, ensuring every single piece is coated. This is the secret to flavour in every layer. What works best for me is getting right in there to make sure no slices are stuck together.
- Stack Them High: Begin stacking the coated potato slices into the prepared muffin tin cups. Pack them in tightly, pressing down gently as you go, until each cup is filled just above the rim. The potatoes will shrink a bit as they cook.
- First Bake (The Steam): Drizzle any remaining butter mixture from the bowl over the tops of the stacks. Cover the muffin tin loosely with aluminium foil. Bake for 30 minutes. The foil traps steam, which cooks the inside of the stacks until they are tender.
- Second Bake (The Crisp): After 30 minutes, carefully remove the foil. Return the muffin tin to the oven and bake uncovered for another 20-25 minutes, or until the tops and edges are deep golden brown and wonderfully crispy.
- Rest and Serve: Let the potato stacks cool in the tin for about 5 minutes. This helps them set and makes them easier to remove. Run a small knife or offset spatula around the edge of each stack to loosen, then carefully lift them out. Serve immediately while hot and crispy.
Tips From My Kitchen
- Potato Prep is Key: For even crispier potatoes, you can soak the slices in cold water for 20-30 minutes after slicing. This removes excess starch. You must, however, dry them thoroughly with a clean tea towel or kitchen paper before tossing them with the butter mixture. Water is the enemy of crispiness!
- The Double-Bake Method: The two-stage baking process is non-negotiable for the best texture. Covering them first steams the potatoes until they are tender all the way through. Uncovering them for the final bake allows the high heat to drive off moisture, creating that irresistible crunch via the Maillard reaction.
- Make-Ahead Advice: You can assemble the stacks in the muffin tin up to 4 hours in advance. Cover them tightly with cling film and store them in the fridge. You may need to add 5-10 minutes to the initial covered baking time when cooking from cold.
- Storage and Reheating: Leftovers can be stored in an airtight container in the fridge for up to 3 days. To bring back their crispy glory, reheat them on a baking tray in an oven preheated to 180°C for 10-15 minutes, or in an air fryer for 5-7 minutes.
Equipment You’ll Need
You don’t need a lot of fancy kit for this recipe, but a couple of items make a big difference to the final result.
- 12-cup standard muffin tin
- Mandoline slicer or a very sharp knife
- Large and small mixing bowls
- Pastry brush (for greasing the tin)
Delicious Variations to Try
Once you’ve mastered the basic recipe, it’s fun to experiment with different flavours. Here are a few ideas that work really well:
- Spicy Kick: Add ½ teaspoon of smoked paprika and a ¼ teaspoon of cayenne pepper to the butter mixture for a gentle, smoky heat that complements the cheese beautifully.
- Herbaceous Twist: Swap the thyme for finely chopped fresh rosemary, or add a tablespoon of chopped fresh chives or parsley to the stacks right after they come out of the oven for a fresh, oniony bite.
- Cheesy Upgrade: For an even richer and meltier stack, substitute 25g of the Parmesan with finely grated Gruyère or a sharp, mature cheddar. The Gruyère adds a wonderful nutty sweetness.
What to Serve With Crispy Cheesy Parmesan Potato Stacks
These potatoes are a versatile side dish that pairs well with so many main courses. Their rich, savoury flavour is a natural match for roasted meats and simple grilled dishes.
- Roast Chicken or Beef: They are an ideal partner for a classic Sunday roast, soaking up any delicious juices on the plate.
- Grilled Steak: Serve them instead of chips for a more elegant steak dinner. The crispy texture is a fantastic contrast to a tender steak.
- A Crisp Salad: To balance the richness of the potatoes, serve them alongside a simple green salad. This Classic House Salad with Red Wine Vinaigrette offers a lovely, sharp counterpoint.
- Wine Pairing: A light-bodied red wine like a Pinot Noir or a crisp, dry white like a Sauvignon Blanc would both work wonderfully here, cutting through the richness of the butter and cheese.
Frequently Asked Questions
Crispy Cheesy Parmesan Potato Stacks
Ingredients
Method
- Preheat and Prepare: Preheat your oven to 200°C (180°C fan). Generously grease a 12-cup standard muffin tin with butter or a neutral oil spray. Don’t be shy here; a good coating prevents sticking and helps the bottoms crisp up.
- Slice the Potatoes: Wash and peel the potatoes. Using a mandoline slicer or a very sharp knife, slice the potatoes into paper-thin rounds, about 1-2mm thick. Place the slices into a large mixing bowl.
- Create the Flavour Mixture: In a separate, smaller bowl, combine the melted butter, grated Parmesan, garlic powder, onion powder, chopped thyme, sea salt, and black pepper. Stir everything together until it's well combined.
- Coat the Potatoes: Pour the butter and Parmesan mixture over the sliced potatoes in the large bowl. Use your hands to gently toss and separate the slices, ensuring every single piece is coated. This is the secret to flavour in every layer. What works best for me is getting right in there to make sure no slices are stuck together.
- Stack Them High: Begin stacking the coated potato slices into the prepared muffin tin cups. Pack them in tightly, pressing down gently as you go, until each cup is filled just above the rim. The potatoes will shrink a bit as they cook.
- First Bake (The Steam): Drizzle any remaining butter mixture from the bowl over the tops of the stacks. Cover the muffin tin loosely with aluminium foil. Bake for 30 minutes. The foil traps steam, which cooks the inside of the stacks until they are tender.
- Second Bake (The Crisp): After 30 minutes, carefully remove the foil. Return the muffin tin to the oven and bake uncovered for another 20-25 minutes, or until the tops and edges are deep golden brown and wonderfully crispy.
- Rest and Serve: Let the potato stacks cool in the tin for about 5 minutes. This helps them set and makes them easier to remove. Run a small knife or offset spatula around the edge of each stack to loosen, then carefully lift them out. Serve immediately while hot and crispy.
Notes
I really hope you give these Crispy Cheesy Parmesan Potato Stacks a go. They take a little bit of time to assemble, but the payoff in flavour and texture is more than worth it. It’s one of those recipes that proves how a few simple ingredients, treated with a bit of care, can become something truly special. If you make them, please drop a comment below and let me know how they turned out!
Happy cooking,
Adam