Crispy Homemade Chicken Nuggets Recipe
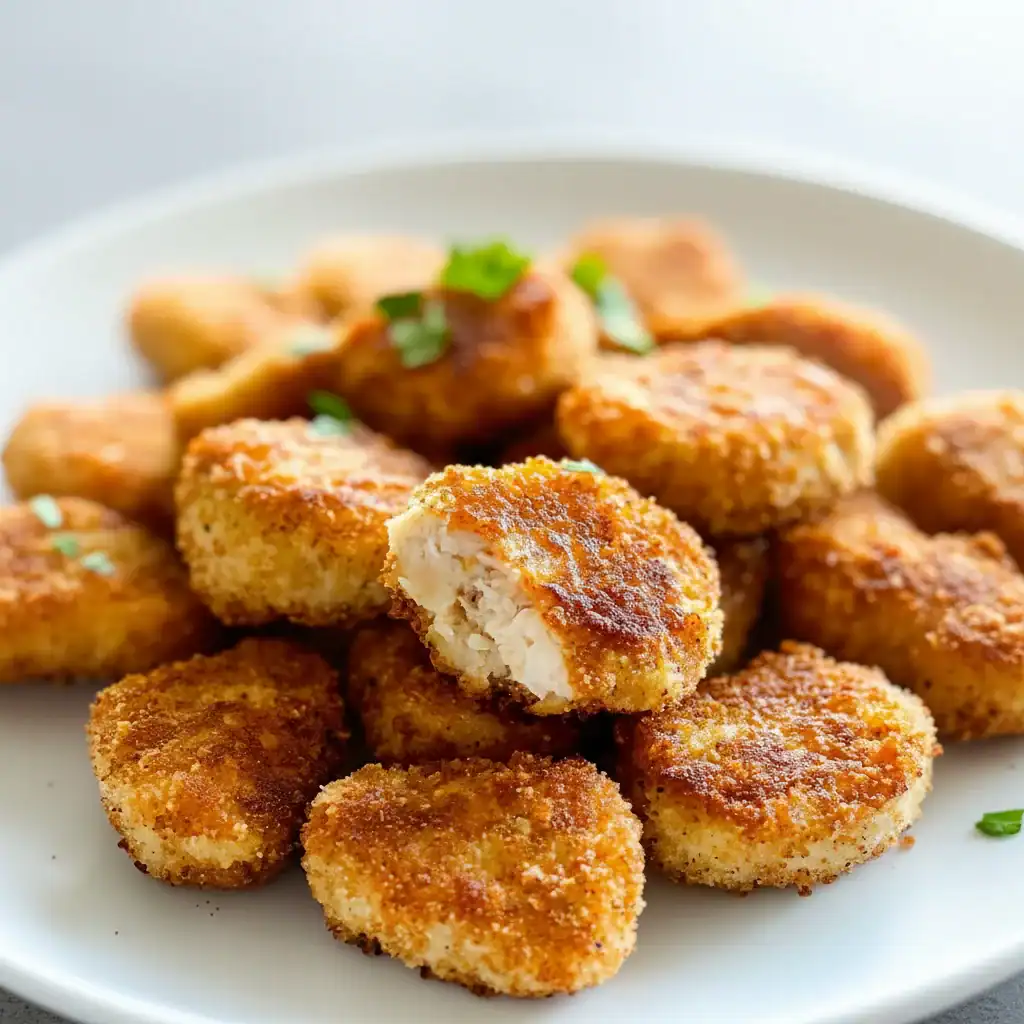
There’s a certain magic to a really good chicken nugget. Not the pale, uniform shapes from a frozen bag, but a proper, homemade one. I’m talking about a nugget with a craggy, golden-brown crust that shatters when you bite into it, giving way to genuinely juicy, tender chicken inside. It’s the kind of food that instantly brings a smile to your face, whether you’re five or fifty-five.
This Crispy Homemade Chicken Nuggets Recipe is the result of my quest to create that very magic in my own kitchen. Forget bland, processed alternatives; we’re using real chicken breast, a simple but effective trio of seasonings, and a breading technique that guarantees an unbeatable crunch. Friends always ask me for this recipe after trying it at dinner parties, and they’re always surprised at how straightforward it is to achieve such great results at home. It’s the sort of meal that makes a standard weeknight feel a little more special.
These crispy chicken bites are fantastic for a family teatime, a casual Saturday lunch, or even packed cold in a lunchbox for a delicious midday treat. We’ll cover both frying and baking methods, so you can choose whichever suits you best. Let’s get cooking.
Recipe Overview
This recipe guides you through creating exceptionally crispy chicken nuggets from scratch. We use a three-step breading process with seasoned flour and Panko breadcrumbs which creates a light but incredibly crunchy coating. After testing this five times, I found that the double dredge method (which I’ll share in my tips) results in the absolute crispiest finish, though the standard single dredge is still wonderful. The chicken inside remains succulent and flavourful.
- Prep Time: 20 minutes
- Cook Time: 15 minutes
- Total Time: 35 minutes
- Servings: 4 people
- Difficulty: Easy
Why You’ll Love This Crispy Homemade Chicken Nuggets Recipe
- Genuine Flavour: We season the flour with smoked paprika, garlic powder, and onion powder. This creates a savoury, slightly smoky crust that beautifully complements the simple taste of the chicken, a world away from mass-produced versions.
- Ready in Under 40 Minutes: From dicing the chicken to pulling the last golden nugget from the pan, the whole process comes together in about 35 minutes, making it a great option for a satisfying evening meal without hours in the kitchen.
- Flexible Recipe: This recipe works beautifully whether you fry or bake the nuggets. You can also adjust the spice level by adding a pinch of cayenne pepper, or make a gluten-free version using an all-purpose GF flour blend and gluten-free breadcrumbs.
- Great for Family Meals: These homemade chicken nuggets are ideal for a kids’ lunch or a relaxed family dinner. They are always a huge hit with the younger members of my family, who much prefer them to anything from a takeaway.
- Simple, Real Ingredients: You know exactly what’s in them – just chicken, flour, eggs, and seasonings. There are no strange additives or preservatives here, just honest, good food.
Ingredients You’ll Need
For the best results, start with good quality ingredients. I always opt for free-range chicken breasts as I find they have a better texture and taste. For the coating, I strongly recommend Japanese Panko breadcrumbs – they are lighter and flakier than traditional breadcrumbs, which is the secret to that exceptional crunch.
- 600g boneless, skinless chicken breasts
- 100g plain flour
- 2 large free-range eggs
- 150g Panko breadcrumbs
- 1 tsp salt
- 1 tsp black pepper, freshly ground
- 1 tsp garlic powder
- 1 tsp smoked paprika
- ½ tsp onion powder
- Approx. 500ml vegetable or sunflower oil, for frying
Adam’s Tip: Don’t be afraid to lightly toast your Panko breadcrumbs in a dry pan for 2-3 minutes before using them. It deepens their flavour and helps them get even more golden-brown when cooked.
How to Make Crispy Homemade Chicken Nuggets
The process is all about setting up an efficient production line. Get your three bowls ready for the flour, egg, and breadcrumbs, and the rest flows smoothly. This methodical approach ensures each nugget gets a perfect, even coating.
- Prepare the Chicken: Pat the chicken breasts dry with a paper towel. Using a sharp knife, cut them into bite-sized pieces, about 3-4cm wide. Try to keep them a similar size to ensure they cook evenly.
- Set Up Your Breading Station: You’ll need three shallow bowls or dishes. In the first, mix the plain flour, salt, pepper, garlic powder, smoked paprika, and onion powder together until well combined. In the second bowl, whisk the two eggs with a splash of water. In the third bowl, pour in the Panko breadcrumbs.
- First Coat – Flour: Take a piece of chicken and dredge it in the seasoned flour mixture, making sure it’s completely coated. Gently shake off any excess flour. This dry layer is crucial for helping the egg wash stick.
- Second Coat – Egg: Dip the floured chicken piece into the whisked egg, allowing any excess to drip back into the bowl for a moment.
- Final Coat – Breadcrumbs: Immediately place the egg-washed chicken into the Panko breadcrumbs. I find that what works best for me is to use my dry hand to scoop breadcrumbs over the top and press down firmly. This helps the coating adhere properly and not fall off during cooking. Place the breaded nugget on a clean plate or baking tray and repeat with the remaining chicken pieces.
- Heat the Oil: Pour the vegetable oil into a large, heavy-bottomed frying pan or skillet until it’s about 2cm deep. Heat over a medium-high heat until it reaches around 175°C (350°F). If you don’t have a thermometer, you can test it by dropping a breadcrumb in; if it sizzles vigorously, the oil is ready.
- Fry the Nuggets: Carefully place the nuggets into the hot oil, ensuring you don’t overcrowd the pan. Cook them in batches. Fry for 3-4 minutes on each side, until they are a deep golden brown and the chicken is cooked through.
- Drain and Serve: Use a slotted spoon to remove the cooked nuggets from the pan and place them on a wire rack to drain. This allows air to circulate and keeps the bottoms crispy. Serve immediately with your favourite dipping sauces.
Tips From My Kitchen
- Temperature Control is Key: For perfectly fried chicken, maintaining the oil temperature at around 175°C is vital. If the oil is too cool, the nuggets will absorb too much of it and become greasy. If it’s too hot, the breadcrumbs will burn before the chicken inside is cooked.
- The Secret to Extra Crunch: I learned that for a really thick, crunchy coating, you can do a double dredge. Go from flour, to egg, back to flour, back to egg, and then finally into the Panko breadcrumbs. It adds a few minutes to the prep time but the texture is phenomenal.
- Make-Ahead Method: You can prepare these nuggets ahead of time. Follow the steps up to the end of the breading process, then lay the uncooked nuggets in a single layer on a parchment-lined tray. Cover and refrigerate for up to 24 hours before you plan to cook them.
- Storage and Reheating: Leftover cooked nuggets can be stored in an airtight container in the refrigerator for up to 3 days. To restore their crispiness, reheat them on a baking tray in an oven preheated to 190°C (170°C fan) for about 10-12 minutes.
Equipment You’ll Need
- Large frying pan or skillet
- Sharp knife and cutting board
- 3 shallow bowls or dishes for breading
- Tongs or a slotted spoon
- Wire rack
Common Mistakes to Avoid
- Overcrowding the pan: Frying too many nuggets at once will cause the oil temperature to drop significantly. This steams the nuggets rather than frying them, resulting in a soggy, greasy coating. Always cook in batches, leaving plenty of space around each piece.
- Incorrect Oil Temperature: As mentioned in my tips, this is the most common pitfall. Using a kitchen thermometer is the best way to guarantee your oil is at the optimal 175°C for that perfect golden finish.
- Letting them Drain on Paper Towels: While it seems logical to use paper towels to absorb excess oil, they can trap steam underneath the nuggets, making the bottom coating soft. A wire rack is always the better choice for maintaining that all-over crunch.
Delicious Variations to Try
Once you’ve mastered the basic recipe, it’s great fun to experiment with different flavours. Here are a few ideas to get you started:
- Spicy Chicken Nuggets: Add 1 teaspoon of cayenne pepper or hot chilli powder to your flour mixture for a fiery kick. You could also serve them with a spicy sriracha mayonnaise dip.
- Herby Parmesan Nuggets: Mix 50g of finely grated Parmesan cheese and 1 tablespoon of dried mixed herbs (like oregano and thyme) into your Panko breadcrumbs for an Italian-inspired twist.
- Alternative Protein: This breading method works wonderfully for other proteins. Try it with turkey breast chunks, firm white fish like cod or haddock, or even thick slices of halloumi for a vegetarian option.
What to Serve With Crispy Homemade Chicken Nuggets
These nuggets are wonderfully versatile and pair well with so many different sides. They are a great component of a larger meal or can be the main event themselves.
- For a classic combination, serve them with chunky homemade chips and a side of coleslaw. A simple green salad also works well, like this Classic House Salad with Red Wine Vinaigrette.
- They make a fantastic main course alongside a comforting pasta dish. Something like my Garlic Parmesan Chicken Pasta would be an excellent partner.
- Dipping sauces are a must! A smoky BBQ sauce, a tangy honey-mustard dressing, or a simple garlic aioli are all fantastic choices.
- For drinks, a cold, crisp lager or a refreshing glass of cloudy lemonade cuts through the richness of the fried coating beautifully.
Frequently Asked Questions
Crispy Homemade Chicken Nuggets
Ingredients
Method
- Prepare the Chicken: Pat the chicken breasts dry with a paper towel. Using a sharp knife, cut them into bite-sized pieces, about 3-4cm wide. Try to keep them a similar size to ensure they cook evenly.
- Set Up Your Breading Station: You'll need three shallow bowls or dishes. In the first, mix the plain flour, salt, pepper, garlic powder, smoked paprika, and onion powder together until well combined. In the second bowl, whisk the two eggs with a splash of water. In the third bowl, pour in the Panko breadcrumbs.
- First Coat - Flour: Take a piece of chicken and dredge it in the seasoned flour mixture, making sure it's completely coated. Gently shake off any excess flour. This dry layer is crucial for helping the egg wash stick.
- Second Coat - Egg: Dip the floured chicken piece into the whisked egg, allowing any excess to drip back into the bowl for a moment.
- Final Coat - Breadcrumbs: Immediately place the egg-washed chicken into the Panko breadcrumbs. I find that what works best for me is to use my dry hand to scoop breadcrumbs over the top and press down firmly. This helps the coating adhere properly and not fall off during cooking. Place the breaded nugget on a clean plate or baking tray and repeat with the remaining chicken pieces.
- Heat the Oil: Pour the vegetable oil into a large, heavy-bottomed frying pan or skillet until it's about 2cm deep. Heat over a medium-high heat until it reaches around 175°C (350°F). If you don’t have a thermometer, you can test it by dropping a breadcrumb in; if it sizzles vigorously, the oil is ready.
- Fry the Nuggets: Carefully place the nuggets into the hot oil, ensuring you don't overcrowd the pan. Cook them in batches. Fry for 3-4 minutes on each side, until they are a deep golden brown and the chicken is cooked through.
- Drain and Serve: Use a slotted spoon to remove the cooked nuggets from the pan and place them on a wire rack to drain. This allows air to circulate and keeps the bottoms crispy. Serve immediately with your favourite dipping sauces.
Notes
There is something so satisfying about making a family favourite from scratch and knowing it’s full of good, simple ingredients. This Crispy Homemade Chicken Nuggets Recipe proves that you don’t need a deep-fat fryer or a complicated ingredient list to make something truly delicious. I hope you and your family enjoy these as much as we do. Let me know how you get on in the comments below – I’d love to hear about any variations you try! From my kitchen to yours, Adam Henderson.