Frozen Pineapple Slush Recipe
There’s a specific kind of heat that settles over a British summer afternoon, the kind that makes you long for something utterly refreshing and ice-cold. On days like these, my mind drifts back to a little beach shack I visited in the Caribbean, where they served the most incredible frozen pineapple drinks. I’ve been making my version of this Frozen Pineapple Slush for over 3 years now, and it never disappoints; it’s the taste of pure sunshine in a glass.
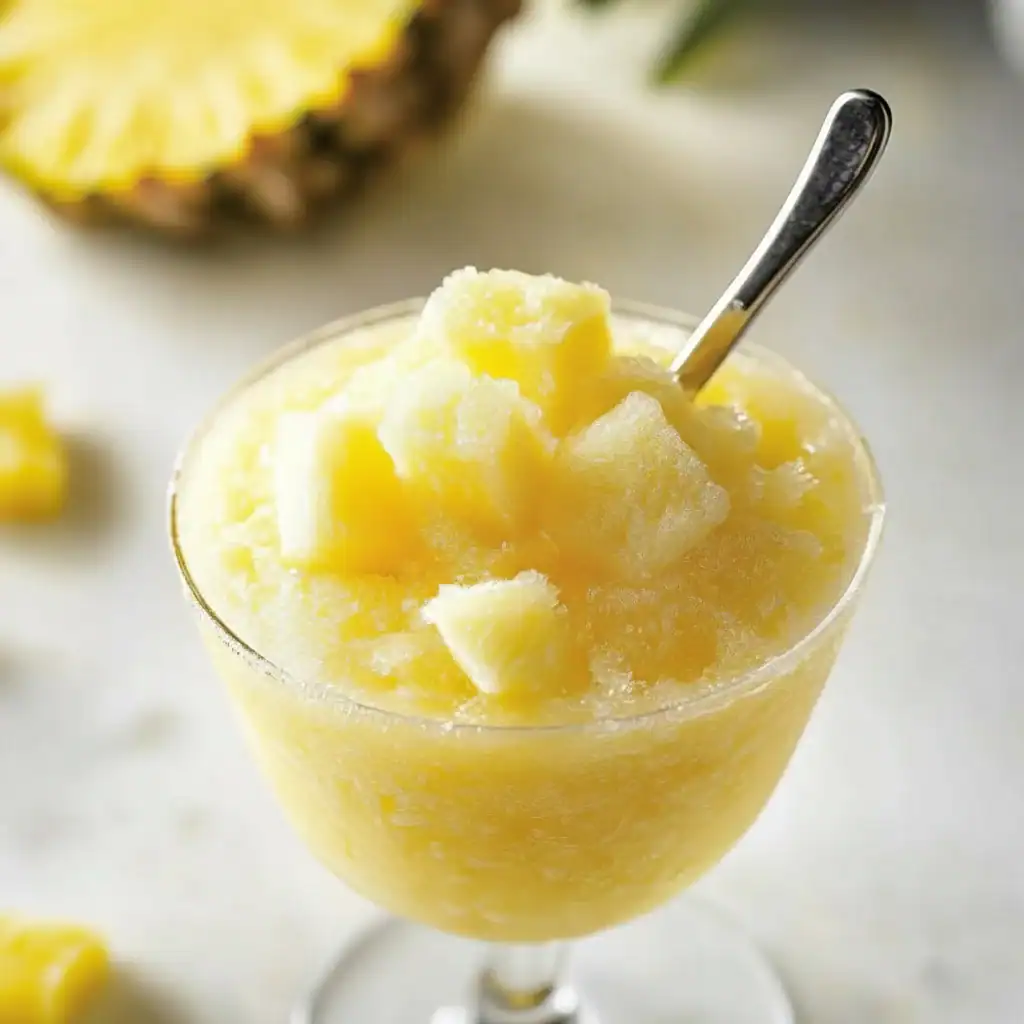
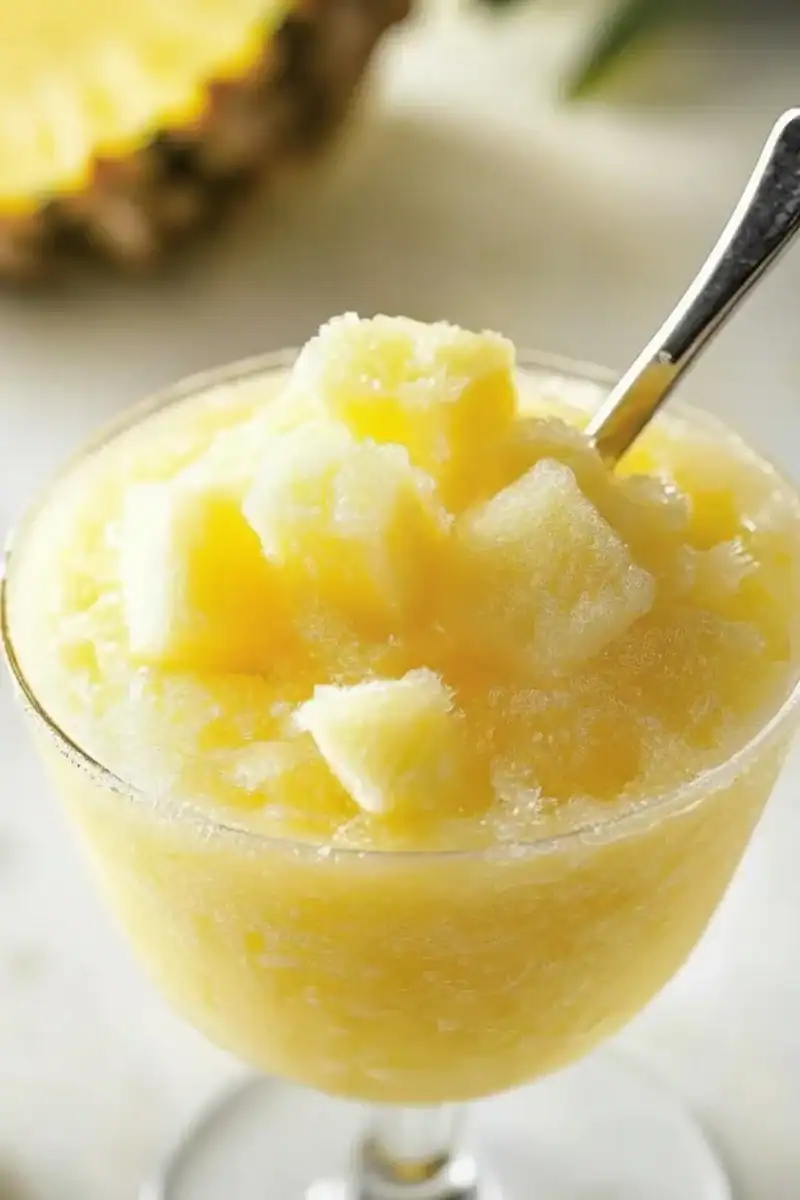
This isn’t just pineapple juice with some ice whizzed through it. What we’re making today is a genuinely luxurious frozen drink, with a texture that’s smooth, thick, and spoonable, almost like a sorbet. The secret is using frozen pineapple chunks, which create an intensely cold and creamy base without watering down the vibrant, sweet-tart flavour. It’s the kind of simple, brilliant recipe that makes you feel like a holiday is just a sip away.
This tropical drink is ideal for those lazy weekend afternoons in the garden, a brilliant non-alcoholic option for a barbecue, or even a delightful dessert to round off a light summer meal. The children love it, the grown-ups love it… honestly, it’s one of those recipes that always gets compliments. Let’s get the blender out and bring a little tropical breeze into our kitchens.
Recipe Overview
This Frozen Pineapple Slush recipe delivers a beautifully thick and frosty tropical drink with an intense, authentic pineapple flavour. It balances the natural sweetness of the fruit with a sharp, zesty kick from fresh lime. After a bit of trial and error, I found that adding a splash of coconut water not only helps with blending but also adds a subtle, creamy undertone that really elevates the whole experience. Expect a texture that’s much closer to a fine Italian ice than a gritty, watery slushie.
- Prep Time: 5 minutes
- Cook Time: 0 minutes
- Total Time: 5 minutes
- Servings: 2 large or 4 small glasses
- Difficulty: Easy
Why You’ll Love This Frozen Pineapple Slush
- Genuine Tropical Flavour: Using frozen pineapple chunks means you get a pure, undiluted taste of the fruit. It’s intensely sweet, with that characteristic tang that makes pineapple so refreshing. The fresh lime juice cuts through the sweetness, keeping it bright and zesty.
- Ready in 5 Minutes: From getting the ingredients out of the freezer and fridge to pouring the finished slush into a glass, the whole process is astonishingly fast. It’s a wonderful treat you can whip up on a whim.
- Flexible Recipe: This recipe is a fantastic starting point. You can add a handful of frozen mango for extra sweetness, a few fresh mint leaves for a cooling note, or even a splash of white rum or coconut liqueur for an adult version.
- Great for Summer Gatherings: This works beautifully for a garden party or a family barbecue. It’s a fantastic, visually appealing non-alcoholic option that feels special. My kids always ask for this when their friends come over to play in the paddling pool.
- Family Tested: I can personally vouch for this recipe’s success. It’s been a staple in our house every summer. Everyone seems to love the vibrant flavour and frosty texture, from my youngest nephew to my grandmother.
Ingredients You’ll Need
The beauty of this pineapple recipe lies in its simplicity. You only need a few key ingredients, so it’s worth getting good quality ones. I always use a bag of frozen pineapple chunks from the supermarket for convenience, but you can also freeze your own. For the coconut water, I find that brands like Vita Coco, which are 100% natural, provide the cleanest flavour without any added sugars.
- 500g frozen pineapple chunks
- 150-200ml unsweetened coconut water (start with 150ml and add more if needed)
- 1 whole lime, juice only (about 2 tablespoons)
- 1-2 tablespoons maple syrup or honey (optional, to taste)
- A few fresh mint leaves, for garnish (optional)
- Fresh pineapple wedges, for garnish (optional)
Adam’s Tip: If your pineapple isn’t very sweet, or if you prefer a less tart drink, don’t hesitate to add the maple syrup. Start with one tablespoon, blend, and taste. It’s much easier to add more sweetness than to take it away!
How to Make Frozen Pineapple Slush
The process for making this frozen drink is very straightforward, but the key is to work quickly to maintain that perfect frosty texture. Having a decent blender really helps here, as it can power through the frozen fruit without needing too much liquid.
- Prepare Your Blender: Place the jug of your blender onto its base. Make sure it’s clean and dry.
- Add the Ingredients: Add the 500g of frozen pineapple chunks directly into the blender jug. Pour over 150ml of coconut water and the juice of one lime. If you’re using a sweetener, add one tablespoon of maple syrup or honey now.
- Start Blending: Secure the lid on the blender. Start blending on a low speed to break up the big chunks of pineapple, then gradually increase the speed to high.
- Blend Until Smooth: Blend for about 45-60 seconds, or until the mixture is thick, smooth, and has a consistent sorbet-like texture. You might need to use the blender’s tamper (if it has one) to push the fruit down towards the blades. What works best for me is to pulse it a few times first before going to a full blend.
- Check Consistency: Stop the blender and check the texture. If it’s too thick for your blender to handle, add the remaining 50ml of coconut water and blend again for a few seconds. Be careful not to add too much liquid, or you’ll end up with a smoothie instead of a slush.
- Taste and Adjust: Give the slush a quick taste. If it’s too tart for your liking, now is the time to blend in another tablespoon of maple syrup.
- Serve Immediately: Pour the frozen pineapple slush into chilled glasses. Garnish with a fresh pineapple wedge on the rim and a sprig of mint, if you like. Serve right away with a spoon or a wide straw.
Tips From My Kitchen
- Start with Cold Ingredients: For the ultimate frosty texture, make sure not only your pineapple is frozen solid, but your coconut water and lime are well-chilled too. You can even pop your serving glasses in the freezer for 10 minutes before serving.
- The Secret Step: The order you add ingredients to the blender matters. I learned that adding the liquid first can sometimes make the blades spin without catching the fruit. By adding the frozen fruit first, then the liquid, the blades are forced to engage with the solid pieces right away. This technique is often recommended by experts on sites like Serious Eats for better blending.
- Make-Ahead: This slush is best served immediately. However, you can pour any leftovers into an ice lolly mould and freeze them for a brilliant pineapple ice lolly later in the week.
- Storage: If you absolutely must store it, you can transfer the slush to a freezer-safe container. It will freeze solid. To serve again, let it sit at room temperature for 10-15 minutes to soften slightly, then break it up and give it a quick re-blend to restore the slushy texture.
Equipment You’ll Need
You don’t need a lot of fancy kit for this recipe, but one item is non-negotiable.
- A high-powered blender: This is the most important tool. A powerful motor is needed to pulverise the frozen pineapple into a smooth consistency without struggling.
- Silicone spatula: Useful for scraping down the sides of the blender jug to ensure everything is well combined.
- Citrus juicer: To get the most juice out of your lime.
- Chilled serving glasses: Serving in cold glasses helps the slush stay frozen for longer.
Common Mistakes to Avoid
- Using Fresh Pineapple: Many people think they can just add ice to fresh pineapple. This will result in a separated, watery drink with a less intense flavour. The magic of this recipe comes from the frozen fruit itself providing the chill and the texture.
- Adding Too Much Liquid at Once: It’s tempting to pour in a lot of liquid to get the blender going, but this is the quickest way to ruin the slushy texture. Start with the minimum amount (150ml) and only add more if the blender is genuinely struggling. A thick slush is the goal.
- Not Blending for Long Enough: An under-blended slush will have unappetizing icy chunks. Let the blender run until the mixture is uniformly smooth and creamy. You should hear the sound of the motor change as the last chunks are broken down.
Delicious Variations to Try
Once you’ve mastered the basic recipe, it’s great fun to experiment. The pineapple base is very forgiving and pairs well with many other flavours.
- Creamy Coconut & Pineapple Slush: Swap the coconut water for 150ml of full-fat coconut milk from a tin. This creates an incredibly rich and decadent tropical drink, reminiscent of a Piña Colada.
- Mango Pineapple Twist: Replace 150g of the frozen pineapple with 150g of frozen mango chunks. The mango adds a lovely sweetness and a silky texture.
- Spicy Ginger & Lime Version: Add a 1cm piece of fresh, peeled ginger to the blender along with the other ingredients. It adds a wonderful, warming spice that contrasts beautifully with the cold slush.
What to Serve With This Frozen Pineapple Slush
While this is a fantastic standalone summer treat, it also works wonderfully alongside certain foods, especially those with complementary flavours.
- Spicy Barbecued Prawns: The sweet and cool slush is the perfect antidote to the heat of chilli and garlic-marinated prawns straight off the grill.
- Thai-Inspired Salads: The tropical notes of the pineapple slush are a natural fit for Southeast Asian flavours. It would be delicious alongside something like this Tangy and Refreshing Green Papaya Salad Recipe (Som Tam).
- Light Desserts: If you’re serving this after a meal, it pairs nicely with a simple dessert that isn’t too rich, like a slice of coconut cake or even a classic Banana Bread Recipe.
Frequently Asked Questions
Frozen Pineapple Slush
Ingredients
Method
- Prepare Your Blender: Place the jug of your blender onto its base. Make sure it's clean and dry.
- Add the Ingredients: Add the 500g of frozen pineapple chunks directly into the blender jug. Pour over 150ml of coconut water and the juice of one lime. If you're using a sweetener, add one tablespoon of maple syrup or honey now.
- Start Blending: Secure the lid on the blender. Start blending on a low speed to break up the big chunks of pineapple, then gradually increase the speed to high.
- Blend Until Smooth: Blend for about 45-60 seconds, or until the mixture is thick, smooth, and has a consistent sorbet-like texture. You might need to use the blender's tamper (if it has one) to push the fruit down towards the blades. What works best for me is to pulse it a few times first before going to a full blend.
- Check Consistency: Stop the blender and check the texture. If it's too thick for your blender to handle, add the remaining 50ml of coconut water and blend again for a few seconds. Be careful not to add too much liquid, or you'll end up with a smoothie instead of a slush.
- Taste and Adjust: Give the slush a quick taste. If it’s too tart for your liking, now is the time to blend in another tablespoon of maple syrup.
- Serve Immediately: Pour the frozen pineapple slush into chilled glasses. Garnish with a fresh pineapple wedge on the rim and a sprig of mint, if you like. Serve right away with a spoon or a wide straw.
Notes
I really hope you give this Frozen Pineapple Slush a go. It’s such a simple way to bring a bit of sunshine into your day, and it’s a recipe that has brought a lot of joy to my family on hot summer days. If you try it, please drop a comment below and let me know how it turned out. Cheers!
– Adam Henderson