Homemade Fire Cider Immune Booster
As the leaves begin to turn and a distinct chill creeps into the air, my kitchen routine shifts. Out come the slow cookers and the big pots for stews, and onto the counter goes a very large glass jar, ready to be filled with the ingredients for this potent Fire Cider Immune Booster. I’ve been making a batch of this fiery herbal tonic every autumn for over a decade, and its pungent, spicy-sweet kick has become a welcome ritual to usher in the colder months. This isn’t just a recipe; it’s a project, a slow infusion that transforms a handful of powerful, everyday ingredients into a vibrant, warming elixir.
What we’re making is a modern take on a traditional folk remedy. It’s a powerful infusion of warming herbs and spices in a base of raw cider vinegar. The resulting liquid is a symphony of pungent flavours – the sharp heat of horseradish and ginger, the deep burn from garlic and onion, a fiery kick from chillies, all mellowed slightly by the sweetness of honey. It’s an invigorating concoction that’s brilliant for anyone looking to incorporate more natural, whole-food remedies into their wellness routine.
This Fire Cider Immune Booster is a fantastic project for a quiet weekend afternoon. The hands-on time is minimal, but the reward after a few weeks of patient waiting is a truly special herbal tonic that will see you through the winter season. It’s a tradition in our house, and one I’m delighted to share with you.
Recipe Overview
This recipe creates a powerful, spicy, and tangy herbal tonic. The process involves chopping a variety of pungent ingredients, steeping them in apple cider vinegar for several weeks, and then straining the liquid before adding honey. I’ve found that giving the jar a vigorous shake every single day really helps to extract the maximum goodness from the ingredients. Expect a liquid that’s both fiery and invigorating, with a deep, complex flavour profile.
- Prep Time: 30 minutes
- Infusion Time: 4-6 weeks
- Total Time: 4-6 weeks
- Yields: Approx 900ml
- Difficulty: Easy
Why You’ll Love This Fire Cider Immune Booster
- Potent & Warming Flavour: This tonic delivers a powerful kick. You get the immediate, sharp heat from the horseradish, followed by the slow, lingering burn of cayenne and ginger, all balanced by the sour tang of the vinegar and a smooth, sweet honey finish.
- Minimal Active Time: The hands-on preparation comes together in about 30 minutes. The rest of the time is simply letting nature do its work as the ingredients infuse.
- Wonderfully Adaptable: You can easily adjust the ingredients to your liking. Add a few sprigs of rosemary for a piney note, some turmeric for earthy depth, or a sliced lemon for extra citrus brightness.
- Great for Wellness Routines: A small daily shot of this works beautifully for a morning wellness ritual or whenever you feel you need a little boost during the winter months.
- A Household Staple: My whole family (the adults, at least!) has come to appreciate this tonic. It’s our go-to for adding a bit of fire to our wellness routine, and everyone seems to love the ritual of making it.
Ingredients You’ll Need
The quality of your ingredients really matters here, as their properties are being directly infused into the vinegar. I always opt for organic produce where possible, especially for the ginger and horseradish. For the vinegar, it’s essential to use a raw, unpasteurised apple cider vinegar that contains “the mother.” I find that Bragg’s is consistently reliable and gives the best results.
- 1 litre raw, unpasteurised apple cider vinegar
- 1 medium onion (approx. 150g), roughly chopped
- 1 head of garlic (approx. 10-12 cloves), roughly chopped
- 100g fresh ginger root, grated or finely chopped
- 100g fresh horseradish root, grated or finely chopped
- 2 medium red chillies, sliced
- 1 orange, washed and sliced
- 2 sprigs fresh rosemary
- 1 tbsp black peppercorns
- 1 tsp cayenne pepper (or more, to your taste)
- 150ml runny honey, or to taste
Adam’s Tip: Don’t bother peeling the ginger or horseradish if they’re organic and well-scrubbed. A lot of the beneficial compounds are found in or just under the skin, so you want to keep them in the mix.
How to Make This Fire Cider Immune Booster
The process is more of an assembly job than cooking. Your main task is to chop and grate everything before letting the vinegar work its magic over the next month. Make sure your jar is spotlessly clean before you begin.
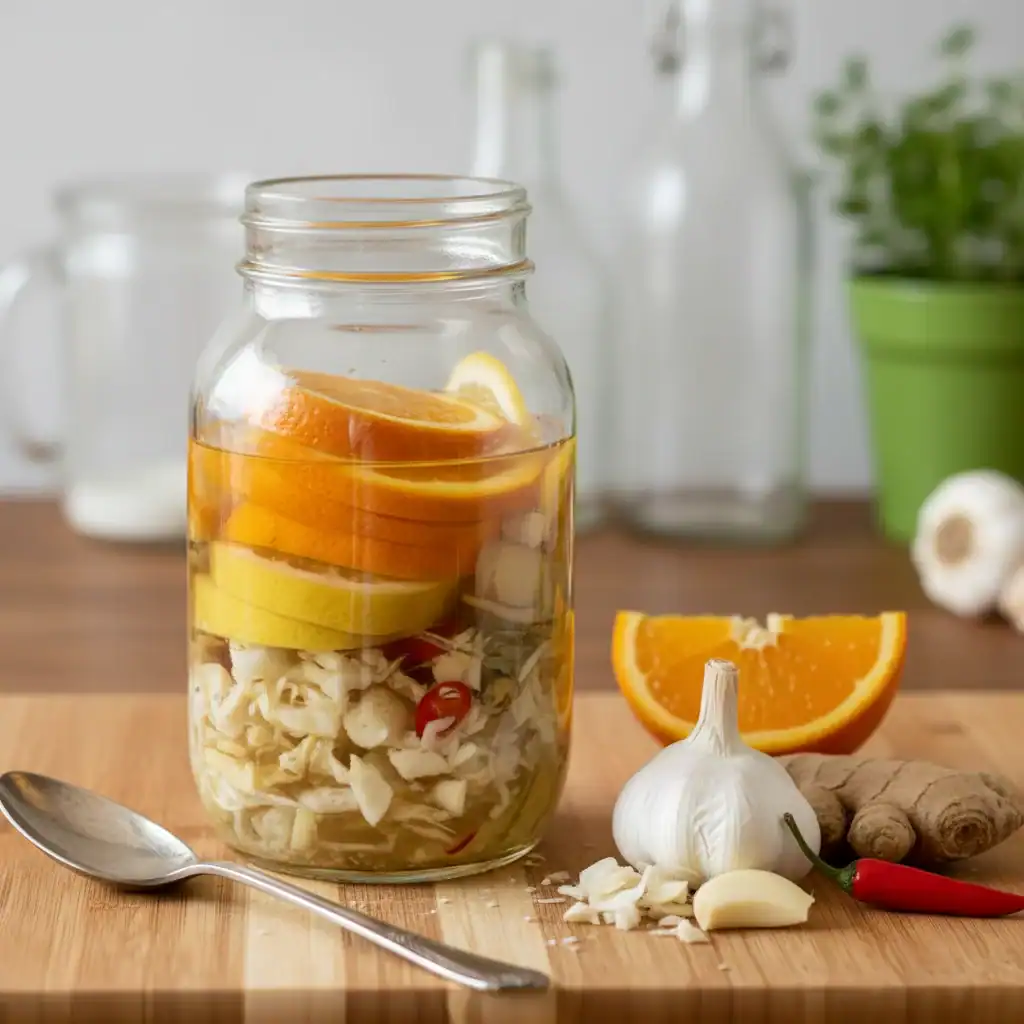
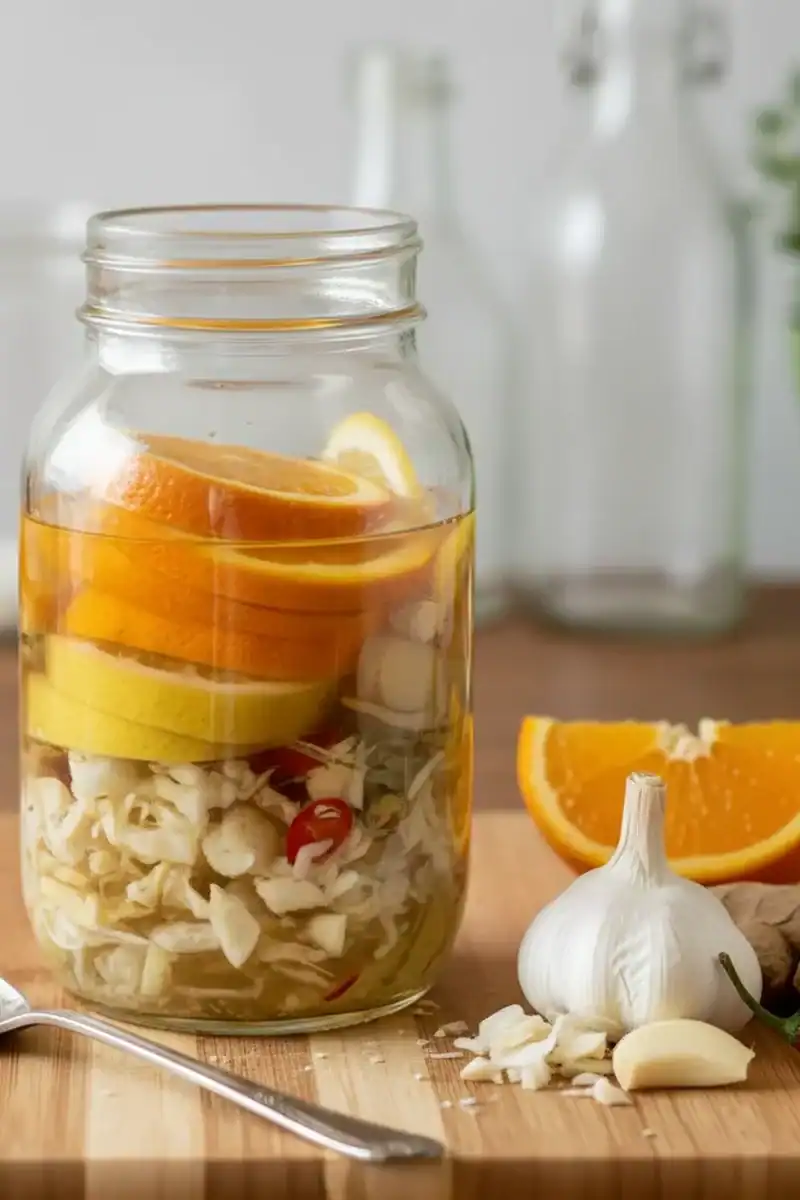
- Prepare Your Ingredients: Roughly chop the onion and garlic. Grate the fresh ginger and horseradish – you can use a food processor with a grating attachment to make this part much faster. Slice the chillies and the orange.
- Layer the Jar: Place all your chopped and grated ingredients—onion, garlic, ginger, horseradish, chillies, orange slices, rosemary sprigs, and peppercorns—into a large, clean 1.5-litre glass jar.
- Add the Vinegar: Pour the apple cider vinegar over the ingredients in the jar. Make sure everything is completely submerged. Use a spoon to press down on the contents to release any trapped air bubbles. The vinegar should cover the solids by at least an inch.
- Seal the Jar: If you are using a metal lid, place a piece of baking parchment between the jar and the lid to prevent the vinegar from corroding the metal. I find that using a plastic screw-top lid is the best solution here. Seal the jar tightly.
- Infuse: Store the jar in a cool, dark place (like a kitchen cupboard) for 4 to 6 weeks. Give the jar a vigorous shake once a day to help with the infusion process.
- Strain the Mixture: After the infusion period, line a sieve with a piece of muslin or cheesecloth and place it over a large bowl or jug. Pour the contents of the jar through the sieve, and then squeeze the cloth tightly to extract every last drop of liquid.
- Add Honey: Whisk the honey into the strained liquid until it is fully dissolved. You can adjust the amount of honey to your personal taste – start with a little less and add more if needed.
- Bottle and Store: Pour your finished Fire Cider Immune Booster into clean glass bottles or jars. It will keep in a cool, dark cupboard for up to a year.
Tips From My Kitchen
- Protect Your Lids: Vinegar is acidic and will corrode metal lids over time, spoiling your tonic. Always use a barrier like baking parchment or, even better, a non-reactive plastic lid.
- The Secret is the Shake: The daily shake is crucial. It agitates the ingredients, prevents them from just sitting at the bottom, and ensures a much more potent and flavourful infusion. I learned that just letting it sit doesn’t produce nearly as powerful a result.
- Make-Ahead Mastery: This recipe is the definition of make-ahead! The whole point is to make it weeks before you need it. I start a batch in late September so it’s ready by the time the first frosts arrive.
- Storage Savvy: Once strained and bottled, the fire cider is shelf-stable and doesn’t need to be refrigerated. Store it in a dark cupboard away from direct sunlight, and it will easily last for 12 months.
Equipment You’ll Need
- A large 1.5-litre glass preserving jar with a non-metallic lid (or parchment paper)
- Sharp knife and cutting board
- Box grater or food processor
- Sieve and muslin cloth (or cheesecloth)
- Large bowl or jug
- Funnel and storage bottles
Common Mistakes to Avoid
- Ingredients Floating: Ensure all your solid ingredients are fully submerged beneath the vinegar. Anything exposed to air can develop mould, which will ruin the entire batch. Use a fermentation weight or even a small glass dish to keep everything down if needed.
- Using Powdered Spices: While you can use them in a pinch, fresh ingredients like ginger, garlic, and horseradish have a much more vibrant and potent flavour. The fresh versions contain volatile oils that are key to this tonic’s character.
- Straining Too Soon: Patience is key. Four weeks is the minimum infusion time to get a good extraction of flavours and beneficial compounds. I often leave mine for a full six weeks for maximum potency.
Delicious Variations to Try
One of the best things about making your own fire cider is that you can customise it completely. Think of this recipe as a fantastic starting point.
- Extra-Spicy Version: Add a habanero or scotch bonnet pepper along with the red chillies for a serious dose of heat. You could also increase the amount of cayenne pepper.
- Herbal Additions: Add other herbs for different flavour notes and properties. A few tablespoons of dried elderberries, some fresh thyme sprigs, or a teaspoon of turmeric powder are all wonderful additions.
- Citrus Twist: Swap the orange for a lemon or a grapefruit for a different kind of citrus tang that works beautifully with the other ingredients.
What to Serve With This Fire Cider Immune Booster
As a tonic, it’s typically taken on its own, but its intense flavour can be used in the kitchen too. A splash of this can liven up many dishes.
- As a Wellness Shot: The most common way is to take 1-2 tablespoons neat, first thing in the morning or whenever you feel you need it.
- In a Salad Dressing: Use it in place of vinegar to make an incredibly zesty vinaigrette. It would be fantastic drizzled over a simple green salad like this Classic House Salad with Red Wine Vinaigrette.
- In Hot Water: Add a tablespoon to a mug of hot water with an extra squeeze of lemon for a soothing, warming drink.
- For a Hearty Meal Follow-up: After a fiery shot of this tonic, a comforting and robust meal can be just the ticket. A dish like my Crockpot Garlic Parmesan Chicken Pasta would be a great contrast.
Frequently Asked Questions
Fire Cider Immune Booster
Ingredients
Method
- Prepare Your Ingredients: Roughly chop the onion and garlic. Grate the fresh ginger and horseradish – you can use a food processor with a grating attachment to make this part much faster. Slice the chillies and the orange.
- Layer the Jar: Place all your chopped and grated ingredients—onion, garlic, ginger, horseradish, chillies, orange slices, rosemary sprigs, and peppercorns—into a large, clean 1.5-litre glass jar.
- Add the Vinegar: Pour the apple cider vinegar over the ingredients in the jar. Make sure everything is completely submerged. Use a spoon to press down on the contents to release any trapped air bubbles. The vinegar should cover the solids by at least an inch.
- Seal the Jar: If you are using a metal lid, place a piece of baking parchment between the jar and the lid to prevent the vinegar from corroding the metal. I find that using a plastic screw-top lid is the best solution here. Seal the jar tightly.
- Infuse: Store the jar in a cool, dark place (like a kitchen cupboard) for 4 to 6 weeks. Give the jar a vigorous shake once a day to help with the infusion process.
- Strain the Mixture: After the infusion period, line a sieve with a piece of muslin or cheesecloth and place it over a large bowl or jug. Pour the contents of the jar through the sieve, and then squeeze the cloth tightly to extract every last drop of liquid.
- Add Honey: Whisk the honey into the strained liquid until it is fully dissolved. You can adjust the amount of honey to your personal taste – start with a little less and add more if needed.
- Bottle and Store: Pour your finished Fire Cider Immune Booster into clean glass bottles or jars. It will keep in a cool, dark cupboard for up to a year.
Notes
I hope you embrace the process of making this Fire Cider Immune Booster. It’s a wonderfully rewarding kitchen project that connects us to the seasons and traditional herbal wisdom. The slow, patient infusion is part of its charm, and the final product is something truly special. Let me know in the comments how your batch turns out!
– Adam Henderson