
No Bake Chocolate Peanut Butter Balls
There are some flavour combinations that are simply timeless, and for me, chocolate and peanut butter sit right at the top of that list. There’s something about the way the salty, creamy peanut butter complements the rich, slightly bitter dark chocolate that is just so satisfying. These Chocolate Peanut Butter Balls are the ultimate expression of that pairing. I’ve been making this particular recipe for over six years, and it never disappoints; in fact, it has become one of my most requested treats for family get-togethers and casual gatherings with friends. It’s a no-bake dessert that delivers on every level.
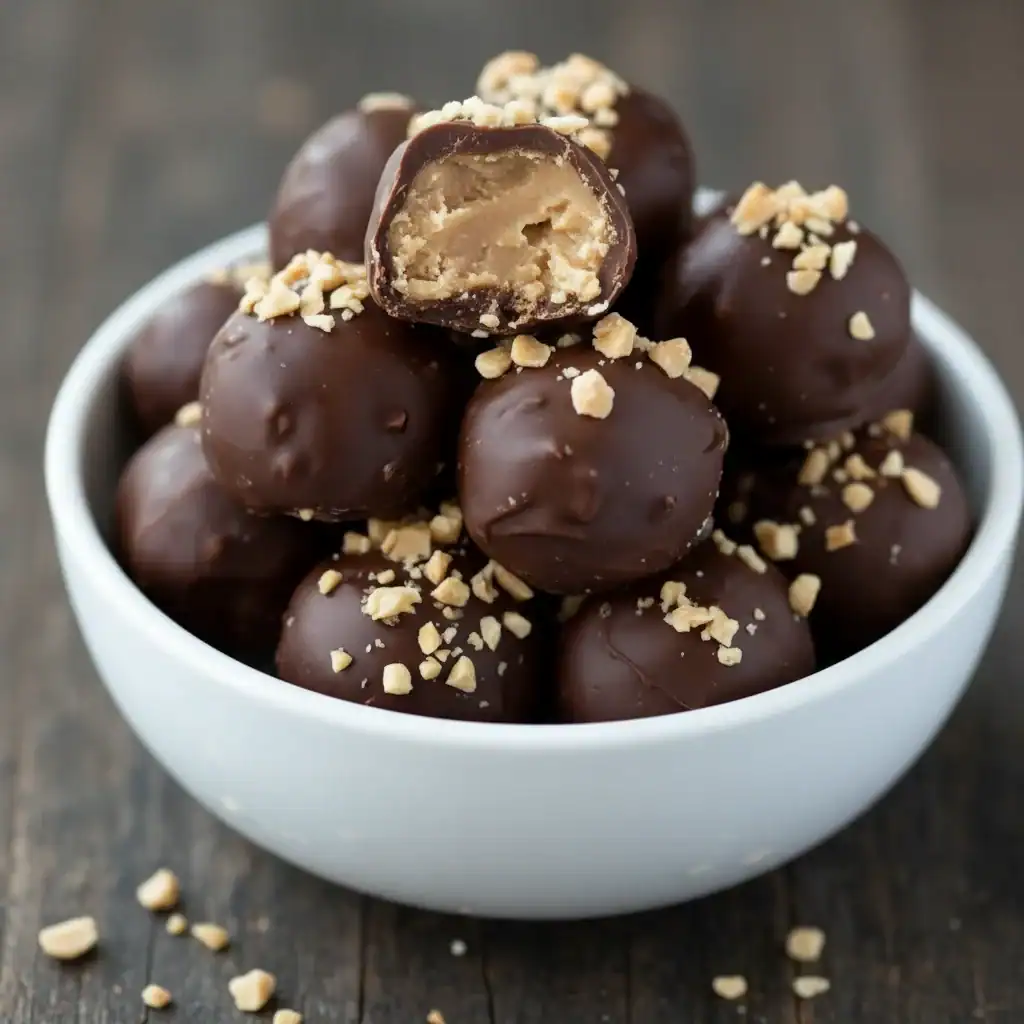
What makes this candy recipe so special is the texture. We’re not just making a simple mixture; we’re creating a peanut butter centre that is dense, fudgy, and melts in your mouth, thanks to a careful balance of smooth peanut butter, icing sugar, and a touch of melted butter for richness. This glorious filling is then chilled until firm before being dipped into a generous coating of melted dark chocolate. The result is a crisp chocolate shell that snaps perfectly when you bite into it, revealing the soft, luscious peanut butter filling inside. It’s a contrast that is utterly compelling.
This recipe is ideal when you need a fantastic homemade treat without turning on the oven. It works wonderfully for holiday sweet trays, as a thoughtful homemade gift, or simply for those moments when you need a little something special with your afternoon cuppa. They always get compliments, and because the process is so straightforward, you’ll find yourself making them again and again. If you’re a fan of peanut butter, you’re going to adore these.
Recipe Overview
This no-bake dessert brings together a soft, sweet, and slightly salty peanut butter filling with a crisp dark chocolate shell. The process is simple: mix, chill, roll, and dip. The most important part is allowing enough chilling time, which ensures the peanut butter balls are firm enough to handle the warm chocolate dip without losing their shape. I’ve tested this with both crunchy and smooth peanut butter, and while both work, smooth peanut butter gives you that classic, velvety centre that I prefer.
- Prep Time: 25 minutes
- Cook Time: 5 minutes (for melting)
- Chilling Time: 1 hour 30 minutes
- Total Time: 2 hours
- Servings: Makes approx. 30 balls
- Difficulty: Easy
Why You’ll Love These Chocolate Peanut Butter Balls
- Unbeatable Flavour and Texture: The filling is intensely peanut-buttery, sweet but not cloying, with a rich, fudgy consistency. The dark chocolate shell provides a satisfying snap and a deep cocoa flavour that balances the sweetness perfectly.
- A Straightforward No-Bake Recipe: This candy recipe comes together with minimal effort and no oven required. The active preparation time is under 30 minutes, with the rest of the time dedicated to chilling.
- Wonderfully Flexible: You can easily adapt these to your taste. Swap dark chocolate for milk or white, add a pinch of sea salt on top, or mix in some finely chopped nuts for extra crunch.
- Great for Gifting and Parties: These little treats look so professional when packed into a small box or arranged on a platter. They are always the first to vanish at birthday parties, Christmas gatherings, or bake sales.
- Family Tested and Approved: My nephew, who is a notoriously picky eater, can’t get enough of these. Seeing his face light up when he sees a fresh batch is one of the main reasons I keep making them!

Ingredients You’ll Need
For the best results, use good quality ingredients. I always opt for a commercial smooth peanut butter like Sun-Pat rather than a natural, oily one, as it provides a more stable and consistent texture for the filling. The fat content is crucial for the right consistency.
- For the Peanut Butter Filling:
- 250g smooth peanut butter
- 200g icing sugar, sifted
- 60g unsalted butter, melted
- 1 tsp vanilla extract
- ¼ tsp fine sea salt
- For the Chocolate Coating:
- 250g good quality dark chocolate (at least 70% cocoa solids), chopped
- 1 tbsp coconut oil or vegetable shortening (optional, for a glossy finish)
- Flaky sea salt, for sprinkling (optional)
Adam’s Tip: Don’t be tempted to use natural peanut butter that separates. The stabilisers in conventional peanut butter are your friend here, preventing the filling from becoming too greasy or soft at room temperature.
How to Make Chocolate Peanut Butter Balls
The key to success with this no-bake dessert is patience during the chilling stages. This ensures your peanut butter balls are firm and easy to work with, resulting in a clean, professional finish. Let’s walk through it together.
- Prepare Your Workstation: Line a large baking tray or a couple of large plates with baking parchment. This is essential to prevent the balls from sticking.
- Make the Peanut Butter Mixture: In a large mixing bowl, combine the smooth peanut butter, sifted icing sugar, melted unsalted butter, vanilla extract, and fine sea salt. Use a sturdy wooden spoon or a spatula to mix everything together until it’s well combined and forms a thick, dough-like consistency. At first, it might look a bit crumbly, but keep mixing and it will come together.
- First Chill: Cover the bowl with cling film and place it in the refrigerator to chill for at least 30-45 minutes. This step is crucial as it firms up the mixture, making it much easier to roll into balls.
- Roll the Balls: Once chilled, remove the mixture from the fridge. Scoop out portions using a teaspoon or a small cookie scoop (about 2-3cm in diameter). Roll each portion between the palms of your hands to form a smooth ball. Place the rolled balls onto your prepared baking tray.
- Second Chill (The Important One!): Place the tray of rolled peanut butter balls into the freezer for at least 1 hour, or in the refrigerator for 2 hours. They need to be very firm and cold. This prevents them from melting or falling apart when you dip them into the warm chocolate. I used to struggle with this dish until I discovered that a proper freeze is the secret to a perfect coating.
- Melt the Chocolate: Just before the chilling time is up, prepare the chocolate coating. Place the chopped dark chocolate and the optional coconut oil in a microwave-safe bowl. Microwave in 30-second bursts, stirring well between each one, until the chocolate is almost completely melted. Stir until smooth. Alternatively, melt the chocolate in a heatproof bowl set over a saucepan of barely simmering water (a bain-marie).
- Dip the Balls: Working quickly, remove the peanut butter balls from the freezer. Drop one ball at a time into the melted chocolate. I find that using two forks works best: one to lift the ball out of the chocolate and the other to help scrape off the excess from the bottom. This gives you a neater finish.
- Final Set: Place the chocolate-covered ball back onto the parchment-lined tray. If you’re using it, immediately sprinkle a few flakes of sea salt on top before the chocolate sets. Repeat with the remaining balls.
- Final Chill: Let the chocolate peanut butter balls sit at room temperature for about 30 minutes or place them in the refrigerator for 10-15 minutes until the chocolate shell is completely firm and set.
Tips From My Kitchen
- Chocolate Temperature Control: Your melted chocolate should be warm, not scorching hot. If it’s too hot, it will melt the peanut butter balls on contact. Let it cool for a few minutes after melting, stirring occasionally, until it’s just slightly warm to the touch.
- The Secret to a Smooth Coat: The double-fork method is a game-changer. I learned that trying to use a spoon or just one fork leads to a thick, uneven coating and a messy pool of chocolate at the base. Gently tap the fork holding the ball against the side of the bowl to let excess chocolate drip off. For a more in-depth guide, check out this excellent resource on how to work with melted chocolate.
- Make-Ahead Magic: The peanut butter balls can be rolled and stored in an airtight container in the freezer for up to a month before you dip them in chocolate. This is great for party prep! You can dip them straight from frozen when you’re ready.
- Proper Storage: Once fully set, store your finished chocolate peanut butter balls in an airtight container in the refrigerator. They will keep well for up to 2 weeks. They are best served slightly chilled, but let them sit out for 5 minutes before eating for the best texture.
Equipment You’ll Need
- Large baking tray
- Parchment paper
- Large mixing bowl
- Microwave-safe bowl (or a small saucepan and heatproof bowl)
- Spatula or wooden spoon
- Two forks for dipping
Delicious Variations to Try
Once you’ve mastered the basic recipe, it’s fun to experiment with different flavours and textures. Here are a few ideas that have worked well for me:
- The Crunchy Version: For a delightful textural contrast, add 75g of crispy rice cereal (like Rice Krispies) to the peanut butter mixture. This adds a fantastic crunch that works so well with the smooth filling and crisp shell.
- Alternative Nut Butters: This recipe works beautifully with other nut butters. Try using smooth almond butter for a more subtle, nutty flavour, or cashew butter for an even creamier result. You may need to adjust the icing sugar slightly depending on the sweetness of the butter.
- Vegan Chocolate Peanut Butter Balls: This is a simple swap. Use a dairy-free butter alternative (a block-style one works best) instead of unsalted butter and ensure your dark chocolate is dairy-free. Most high-quality dark chocolates (70% cocoa and above) are naturally vegan, but always check the label.
–
What to Serve With These Chocolate Peanut Butter Balls
While they are magnificent on their own, here are a few ways we enjoy them in our house:
- With Coffee or Tea: They are a sublime treat alongside a strong black coffee or a classic English breakfast tea. The bitterness of the drink cuts through the richness beautifully.
- On a Dessert Platter: Arrange them with fresh berries, other small cakes, and perhaps some simple shortbread. They look very impressive and offer a rich, chocolatey option. A nice addition could be slices of my Chocolate Peanut Butter Banana Bread for a full-on themed platter.
- As a Topping: Roughly chop one or two balls and sprinkle them over a scoop of good-quality vanilla ice cream for an instant dessert upgrade.
Frequently Asked Questions
Chocolate Peanut Butter Balls
Ingredients
Method
- Prepare Your Workstation: Line a large baking tray or a couple of large plates with baking parchment. This is essential to prevent the balls from sticking.
- Make the Peanut Butter Mixture: In a large mixing bowl, combine the smooth peanut butter, sifted icing sugar, melted unsalted butter, vanilla extract, and fine sea salt. Use a sturdy wooden spoon or a spatula to mix everything together until it's well combined and forms a thick, dough-like consistency. At first, it might look a bit crumbly, but keep mixing and it will come together.
- First Chill: Cover the bowl with cling film and place it in the refrigerator to chill for at least 30-45 minutes. This step is crucial as it firms up the mixture, making it much easier to roll into balls.
- Roll the Balls: Once chilled, remove the mixture from the fridge. Scoop out portions using a teaspoon or a small cookie scoop (about 2-3cm in diameter). Roll each portion between the palms of your hands to form a smooth ball. Place the rolled balls onto your prepared baking tray.
- Second Chill (The Important One!): Place the tray of rolled peanut butter balls into the freezer for at least 1 hour, or in the refrigerator for 2 hours. They need to be very firm and cold. This prevents them from melting or falling apart when you dip them into the warm chocolate. I used to struggle with this dish until I discovered that a proper freeze is the secret to a perfect coating.
- Melt the Chocolate: Just before the chilling time is up, prepare the chocolate coating. Place the chopped dark chocolate and the optional coconut oil in a microwave-safe bowl. Microwave in 30-second bursts, stirring well between each one, until the chocolate is almost completely melted. Stir until smooth. Alternatively, melt the chocolate in a heatproof bowl set over a saucepan of barely simmering water (a bain-marie).
- Dip the Balls: Working quickly, remove the peanut butter balls from the freezer. Drop one ball at a time into the melted chocolate. I find that using two forks works best: one to lift the ball out of the chocolate and the other to help scrape off the excess from the bottom. This gives you a neater finish.
- Final Set: Place the chocolate-covered ball back onto the parchment-lined tray. If you're using it, immediately sprinkle a few flakes of sea salt on top before the chocolate sets. Repeat with the remaining balls.
- Final Chill: Let the chocolate peanut butter balls sit at room temperature for about 30 minutes or place them in the refrigerator for 10-15 minutes until the chocolate shell is completely firm and set.
Notes
I really hope you give this chocolate peanut butter balls recipe a go. It’s a staple in my no-bake dessert repertoire for a reason, and it’s a wonderful way to create something truly special with just a handful of ingredients. Let me know how you get on in the comments below – I’d love to hear about it!
Happy cooking,
Adam Henderson


