
Strawberry Crunch Cheesecake Cones Recipe
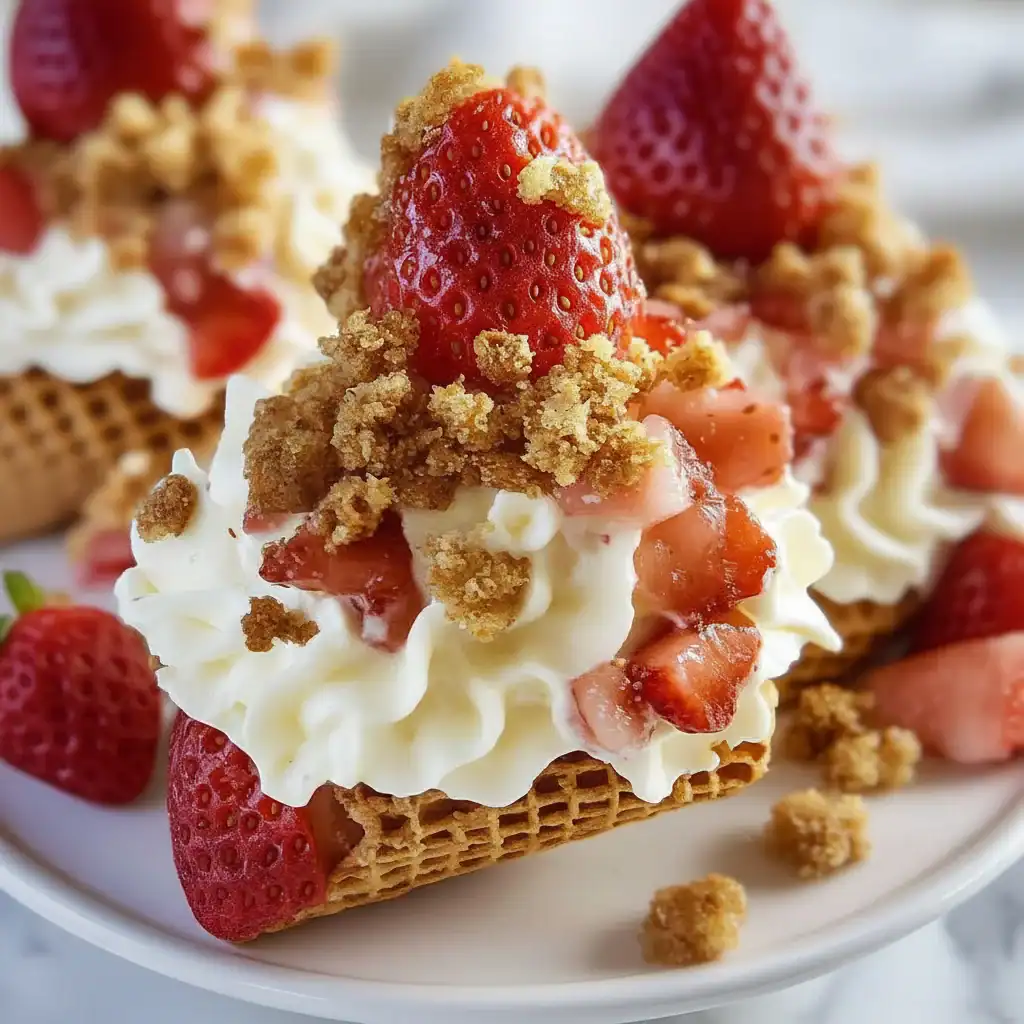
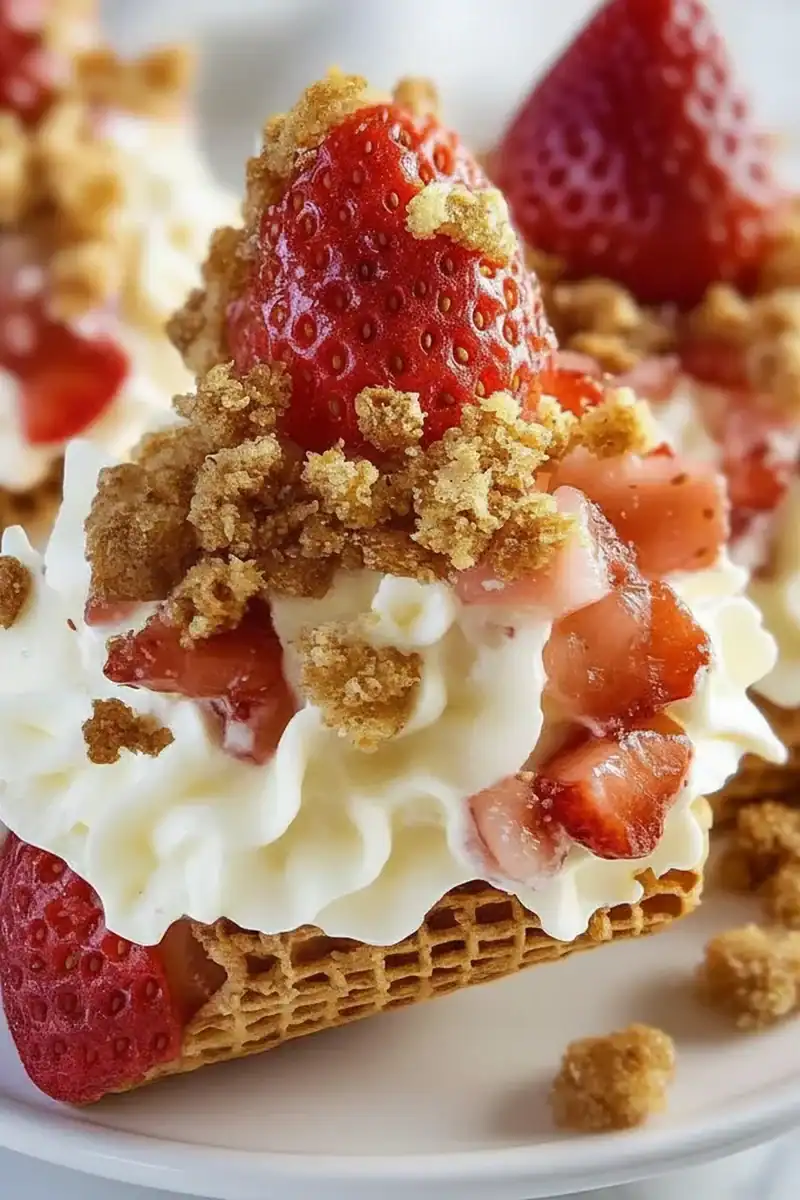
There are some desserts that just scream “summer,” and for me, this is one of them. Imagine the nostalgic joy of a classic ice cream cone, but instead of melting ice cream, it’s filled with a rich, tangy, no-bake cheesecake filling. Then, we take it a step further by encasing it in a sweet, buttery strawberry crunch topping. My kids absolutely devour this every time I make it, and honestly, so do the adults. It’s that wonderful combination of textures – the crisp waffle cone, the velvety smooth cheesecake, and the delightful crumble of the strawberry coating – that makes it utterly memorable.
This Strawberry Crunch Cheesecake Cones recipe is the result of many happy experiments in my kitchen. We wanted to capture the essence of those popular strawberry shortcake ice cream bars but in a more unique format. The result is a stunning no-bake treat that looks like you’ve spent hours in the kitchen but actually comes together with straightforward steps. It works beautifully for garden parties, weekend family gatherings, or just when you fancy a truly special dessert on a warm evening. This is more than just a recipe; it’s a way to create a bit of fun and a lot of deliciousness.
Recipe Overview
This recipe guides you through creating individual cheesecake cones with a signature strawberry crunch topping. The filling is a simple yet luscious no-bake cheesecake mixture, lightened with whipped double cream for a smooth, pipeable consistency. The star is the strawberry crunch, made from crushed biscuits, freeze-dried strawberries, and melted butter. When testing this, I found that adding a little white chocolate to the cone rim not only helps the crunch topping stick but also adds an extra layer of creamy sweetness that balances the tangy cheesecake perfectly.
- Prep Time: 35 minutes
- Chill Time: 2 hours
- Total Time: 2 hours 35 minutes
- Servings: 12 cones
- Difficulty: Easy
Why You’ll Love This Strawberry Crunch Cheesecake Cones Recipe
- Wonderful Textures & Flavours: You get the crisp bite of the waffle cone, the silky, tangy cream cheese filling, and the sweet, buttery texture of the strawberry crunch in every single bite. The freeze-dried strawberries lend a genuinely intense fruit flavour.
- A No-Bake Summer Dessert: Apart from melting a little butter and chocolate, there’s no oven required. This makes it an ideal dessert for those hot summer days when you can’t bear to turn on the heat. The whole active process is done in about 35 minutes.
- Customisable to Your Liking: You can easily swap the biscuits in the crunch topping. Shortbread works wonderfully, but you could try digestive biscuits or even Biscoff for a different flavour profile. You could also use different freeze-dried fruits, like raspberry.
- Great for Social Gatherings: These individual cheesecake cones are brilliant for barbecues, birthday parties, or any casual get-together. They are easy for guests to hold and eat without needing a plate and fork.
- Family-Tested and Approved: This is one of those desserts that always gets compliments. My husband, who’s usually picky about cheesecake, asked for seconds the first time he tried these! It’s a fun and approachable dessert that both children and adults enjoy.
Ingredients You’ll Need
For this recipe, using full-fat cream cheese is non-negotiable; it’s essential for achieving that firm, rich texture. I always use Philadelphia Original as I find it gives the most consistent results. The freeze-dried strawberries can usually be found in the baking or health food aisle of larger supermarkets.
- For the Strawberry Crunch Topping:
- 150g shortbread biscuits
- 100g digestive biscuits
- 15g freeze-dried strawberries
- 90g unsalted butter, melted
- 1 tsp vanilla extract
- For the Cheesecake Filling:
- 500g full-fat cream cheese, at room temperature
- 120g icing sugar, sifted
- 1 tsp vanilla extract
- 300ml double cream, cold
- For Assembly:
- 12 flat-bottomed waffle cones (ice cream cones)
- 150g white chocolate, finely chopped or chips
Adam’s Tip: Make sure your double cream is very cold, straight from the fridge. This helps it whip up to stiff peaks much more effectively, which is crucial for a stable cheesecake filling that holds its shape in the cone. You can even chill your mixing bowl for 10 minutes beforehand for extra assurance.
How to Make Strawberry Crunch Cheesecake Cones
The process is broken down into three main parts: making the crunch, whipping up the cheesecake filling, and assembling the cones. We’ll work methodically to ensure everything is ready when we need it. It’s a straightforward process that is quite enjoyable.
- Make the Strawberry Crunch: Place the shortbread biscuits, digestive biscuits, and freeze-dried strawberries into a food processor. Blitz until you have coarse crumbs. If you don’t have a food processor, place them in a sealed plastic bag and bash them with a rolling pin. Transfer the crumbs to a medium bowl.
- Combine the Crunch Topping: Pour the melted butter and vanilla extract over the crumb mixture. Stir with a fork until all the crumbs are evenly coated and clump together slightly. Spread this mixture out on a baking tray lined with parchment paper and set aside.
- Prepare the Cheesecake Filling: In a large bowl, using a stand mixer or an electric hand mixer, beat the room-temperature cream cheese and sifted icing sugar together on a medium speed until completely smooth and free of lumps, about 2-3 minutes. Scrape down the sides of the bowl to ensure everything is incorporated. Beat in the vanilla extract.
- Whip the Double Cream: In a separate, clean bowl, whip the cold double cream until it forms stiff peaks. You’ll know it’s ready when you can lift the beaters out and the cream holds its shape. This is a key step explained well on BBC Good Food.
- Fold to Combine: Gently fold about one-third of the whipped cream into the cream cheese mixture using a spatula to lighten it. Then, add the remaining whipped cream and fold carefully until just combined. Be careful not to overmix, as this will knock the air out. The final mixture should be thick and pipeable.
- Prepare the Cones: Melt the white chocolate in a microwave-safe bowl in 30-second bursts, stirring in between, until smooth. Dip the rim of each waffle cone into the melted white chocolate, letting any excess drip off. Immediately dip the chocolate-coated rim into the bowl of strawberry crunch topping, turning to coat it evenly. Place the cones upright in a cone holder or in the cups of a muffin tin to set.
- Fill the Cones: Transfer the cheesecake filling to a large piping bag fitted with a large star or round nozzle. What works best for me is to stand the piping bag in a tall glass to make it easier to fill. Carefully pipe the filling into each prepared cone, creating a generous swirl on top.
- Final Garnish and Chill: Sprinkle some of the remaining strawberry crunch topping over the cheesecake swirl on each cone. Place the assembled cones back into your holder or muffin tin and transfer them to the refrigerator to chill and set for at least 2 hours. This step is crucial for the filling to firm up properly.
Tips From My Kitchen
- Room Temperature is Key: For the smoothest cheesecake filling, your cream cheese absolutely must be at room temperature. Cold cream cheese will result in a lumpy filling that’s impossible to smooth out, no matter how much you beat it.
- The Gentle Fold: When combining the whipped cream and cream cheese mixture, use a gentle hand. I learned that aggressively stirring deflates the cream, leading to a runny filling. Use a large spatula and a figure-of-eight motion to fold it in.
- Make-Ahead Components: You can prepare the strawberry crunch topping a day or two in advance. Just store it in an airtight container at room temperature. The cheesecake filling can also be made a day ahead and kept covered in the fridge. Just give it a gentle stir before piping.
- Storage: These cheesecake cones are best enjoyed on the day they are made. However, you can store any leftovers in an airtight container in the fridge for up to 2 days. The cones may soften slightly over time.
Equipment You’ll Need
- Stand mixer or hand mixer
- Food processor (or a rolling pin and plastic bag)
- Large piping bag with a star nozzle
- Baking tray
- Parchment paper
- Muffin tin or cone holder
What to Serve With Strawberry Crunch Cheesecake Cones
These cones are a complete dessert on their own, but if you’re serving them as part of a larger spread, here are a few ideas that work well:
- Fresh Berry Coulis: A simple raspberry or strawberry coulis drizzled over the top just before serving adds an extra pop of fresh fruit flavour and looks beautiful.
- A Light Main Course: Since this is quite a rich dessert, it’s a great follow-up to a lighter meal. Something like our Garlic Parmesan Chicken Pasta would be a lovely preceding dish.
- A Glass of Prosecco: For the adults, a crisp, cold glass of Prosecco or a sparkling rosé cuts through the richness of the cheesecake beautifully. For a non-alcoholic option, a sparkling elderflower pressé is delightful.
Frequently Asked Questions
Strawberry Crunch Cheesecake Cones
Ingredients
Method
- Make the Strawberry Crunch: Place the shortbread biscuits, digestive biscuits, and freeze-dried strawberries into a food processor. Blitz until you have coarse crumbs. If you don't have a food processor, place them in a sealed plastic bag and bash them with a rolling pin. Transfer the crumbs to a medium bowl.
- Combine the Crunch Topping: Pour the melted butter and vanilla extract over the crumb mixture. Stir with a fork until all the crumbs are evenly coated and clump together slightly. Spread this mixture out on a baking tray lined with parchment paper and set aside.
- Prepare the Cheesecake Filling: In a large bowl, using a stand mixer or an electric hand mixer, beat the room-temperature cream cheese and sifted icing sugar together on a medium speed until completely smooth and free of lumps, about 2-3 minutes. Scrape down the sides of the bowl to ensure everything is incorporated. Beat in the vanilla extract.
- Whip the Double Cream: In a separate, clean bowl, whip the cold double cream until it forms stiff peaks. You'll know it's ready when you can lift the beaters out and the cream holds its shape. This is a key step explained well on BBC Good Food.
- Fold to Combine: Gently fold about one-third of the whipped cream into the cream cheese mixture using a spatula to lighten it. Then, add the remaining whipped cream and fold carefully until just combined. Be careful not to overmix, as this will knock the air out. The final mixture should be thick and pipeable.
- Prepare the Cones: Melt the white chocolate in a microwave-safe bowl in 30-second bursts, stirring in between, until smooth. Dip the rim of each waffle cone into the melted white chocolate, letting any excess drip off. Immediately dip the chocolate-coated rim into the bowl of strawberry crunch topping, turning to coat it evenly. Place the cones upright in a cone holder or in the cups of a muffin tin to set.
- Fill the Cones: Transfer the cheesecake filling to a large piping bag fitted with a large star or round nozzle. What works best for me is to stand the piping bag in a tall glass to make it easier to fill. Carefully pipe the filling into each prepared cone, creating a generous swirl on top.
- Final Garnish and Chill: Sprinkle some of the remaining strawberry crunch topping over the cheesecake swirl on each cone. Place the assembled cones back into your holder or muffin tin and transfer them to the refrigerator to chill and set for at least 2 hours. This step is crucial for the filling to firm up properly.
Notes
I really hope you enjoy making this Strawberry Crunch Cheesecake Cones recipe. It’s become a firm favourite in our house, bringing a little bit of playful charm to our dessert table. If you’re looking for another family-friendly bake, our classic Banana Bread Recipe is always a hit. Let me know how you get on with these cones in the comments below – I love hearing about your kitchen adventures!


