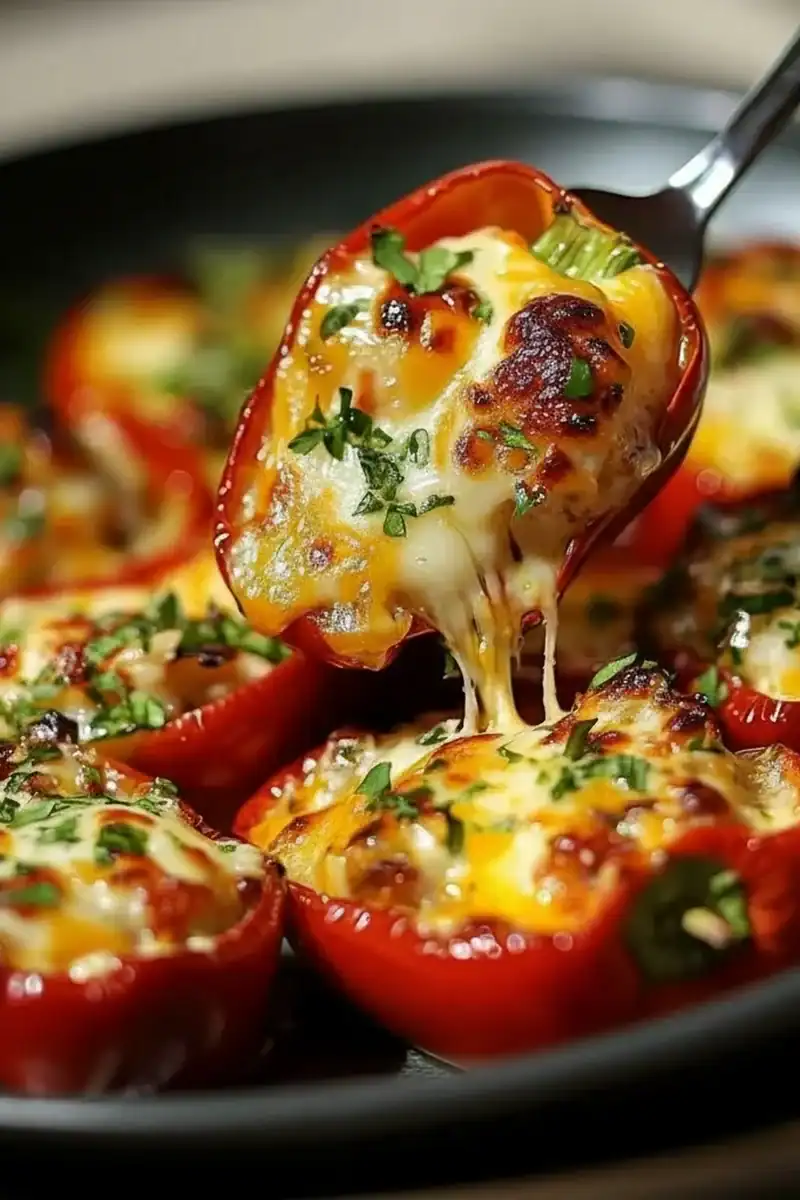
Stuffed Peppers Halal Cheese
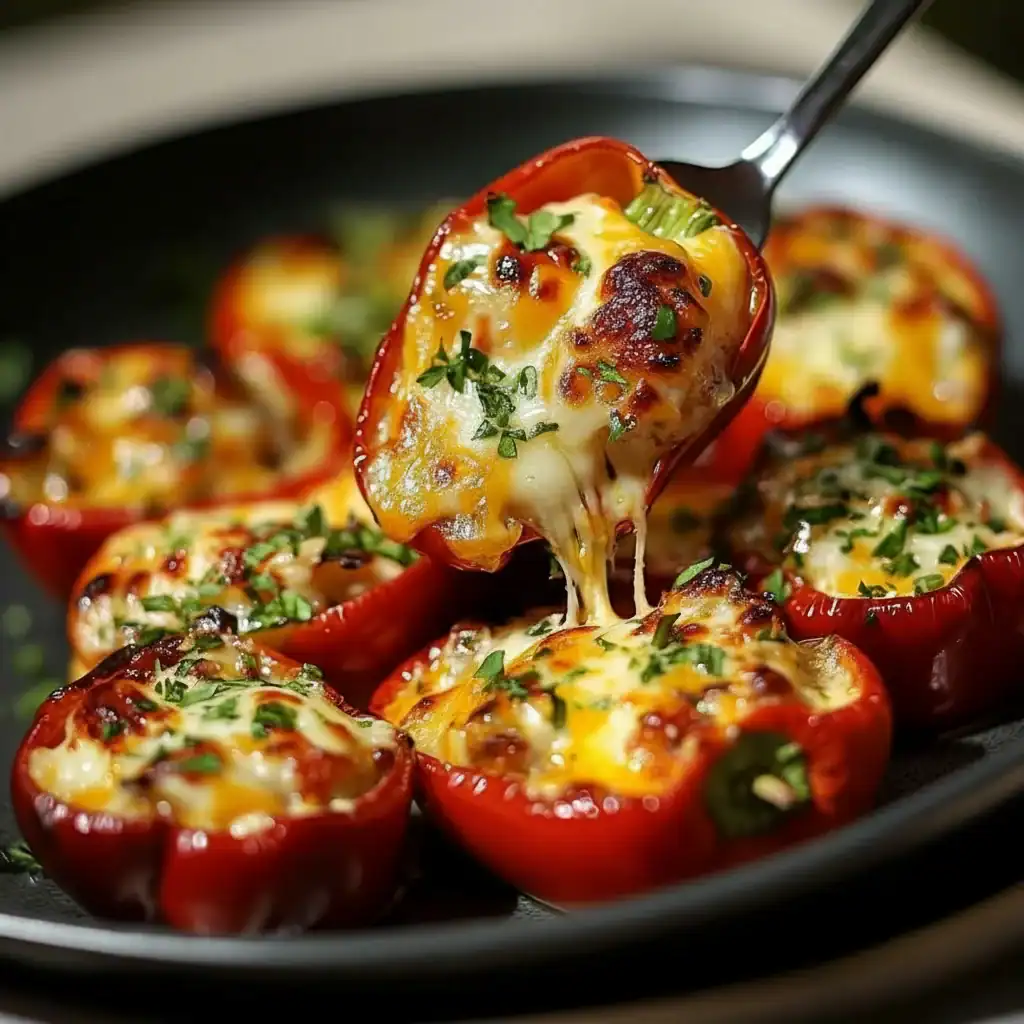
There’s something wonderfully satisfying about a meal that’s both hearty and wholesome, colourful and comforting. These Stuffed Peppers with Halal Cheese tick every single box. We’re talking sweet, tender bell peppers roasted to perfection, cradling a rich, savoury filling of spiced Halal beef and rice, all blanketed under a layer of gloriously melty, bubbling cheese. It’s a complete meal in one neat, edible package. This is my go-to recipe when I need something that feels a bit special for a weeknight dinner but is genuinely straightforward to pull together.
What I love most about this dish is its adaptability. It’s a fantastic way to use up leftover rice, and you can tweak the spices to your heart’s content. The combination of the sweet roasted pepper, the earthy cumin and paprika in the filling, and the sharp, creamy Halal cheddar on top is just phenomenal. We’re not just stuffing peppers here; we’re creating individual little parcels of flavour that look as good as they taste.
This halal recipe is ideal for family dinners where you want everyone to feel nourished and satisfied. It also works beautifully for a casual get-together with friends. The prep is minimal, and once they’re in the oven, you have time to toss a quick salad or just relax. It’s a dish that brings warmth and generosity to the table, and it’s one that always gets compliments.
Recipe Overview
This recipe guides you through creating perfectly tender baked peppers with a flavour-packed halal beef and rice filling, crowned with a generous layer of melted cheese. The key is to slightly pre-bake the peppers to ensure they are soft and sweet, not crunchy. I found through testing that this extra 10-minute step makes a world of difference to the final texture.
- Prep Time: 20 minutes
- Cook Time: 40 minutes
- Total Time: 1 hour
- Servings: 4 people (makes 8 halves)
- Difficulty: Easy
Why You’ll Love This Stuffed Peppers Halal Cheese Recipe
- Robust, Savoury Flavour: The filling is rich with browned Halal beef, aromatic garlic and onions, and warmed with cumin and paprika. The tomato base adds a gentle sweetness that complements the roasted peppers.
- Ready in an Hour: From chopping board to dinner table, this satisfying meal comes together in just 60 minutes, making it a great option for a healthy dinner any night of the week.
- Flexible and Forgiving: Don’t have long-grain rice? Use basmati or even quinoa. Want to use a different mince? Halal lamb or chicken would be delicious. This recipe is a fantastic template.
- Works Brilliantly for Meal Prep: These peppers are fantastic for lunch the next day. They reheat beautifully in the microwave or oven, making them a superb choice for planned leftovers.
- Family Tested: This is a firm favourite in my house. My kids, who can be fussy about vegetables, will happily eat their entire pepper boat, filling and all!
Ingredients You’ll Need
For this recipe, selecting good-quality, firm bell peppers is key, as they form the vessel for our delicious filling. I always opt for a Halal-certified mature cheddar cheese; the sharp flavour holds its own against the spiced beef. I often use the Seriously Strong cheddar, as its rennet is vegetarian, making it suitable.
- 4 large bell peppers (I like using a mix of red and yellow for colour)
- 1 tbsp olive oil
- 1 large onion, finely chopped
- 2 cloves garlic, minced
- 500g Halal lean ground beef
- 1 tsp smoked paprika
- 1 tsp ground cumin
- 1/2 tsp dried oregano
- 400g tin of chopped tomatoes
- 1 tbsp tomato purée
- 200g cooked long-grain white rice
- 150g Halal mature cheddar cheese, grated
- A small bunch of fresh parsley, chopped
- Sea salt and freshly ground black pepper, to taste
Adam’s Tip: Look for peppers that are wide and blocky with a flat base. They will sit more steadily in the baking dish and are much easier to stuff without tipping over during baking.
How to Make Stuffed Peppers Halal Cheese
The process for these cheesy baked peppers is simple. We create a rich, savoury filling on the hob, stuff our prepared peppers, and then let the oven do the rest of the work, melting the cheese into a perfect golden crust.
- Preheat and Prep Peppers: Preheat your oven to 200°C (180°C fan). Slice the peppers in half lengthways, from stem to base. Remove the seeds and white membranes. Place the pepper halves cut-side up in a large baking dish and bake for 10-15 minutes to soften slightly. This head start is crucial for a tender result.
- Sauté the Aromatics: While the peppers are pre-baking, heat the olive oil in a large frying pan or skillet over a medium heat. Add the chopped onion and cook for 5-7 minutes, until soft and translucent. Add the minced garlic and cook for another minute until fragrant.
- Brown the Beef: Add the Halal ground beef to the pan. Break it up with a wooden spoon and cook until it’s browned all over. Make sure to drain off any excess fat. This browning step is where so much flavour is developed, as explained well by cooking experts at BBC Good Food.
- Build the Filling Flavour: Stir in the smoked paprika, ground cumin, and dried oregano, and cook for a minute until the spices are aromatic. Pour in the chopped tomatoes and stir in the tomato purée. Season generously with salt and pepper.
- Simmer and Combine: Bring the mixture to a gentle simmer and let it cook for about 10 minutes, allowing the sauce to reduce and the flavours to meld together. What works best for me is to let it get quite thick, so it doesn’t make the peppers soggy.
- Finish the Filling: Remove the pan from the heat and stir in the cooked rice and most of the chopped fresh parsley (save a little for garnish). Mix everything together until well combined.
- Stuff and Bake: Carefully remove the pre-baked peppers from the oven. Spoon the beef and rice mixture evenly into each pepper half, packing it in gently. I find that adding a splash of water (about 100ml) to the bottom of the baking dish helps the peppers to steam and become extra tender.
- Add Cheese and Final Bake: Top each stuffed pepper generously with the grated Halal cheddar cheese. Return the dish to the oven and bake for a further 20-25 minutes, or until the filling is piping hot and the cheese is melted, golden brown, and bubbling.
- Rest and Garnish: Let the peppers rest for a few minutes before serving. This helps the filling to set slightly. Garnish with the remaining fresh parsley and serve immediately.
Tips From My Kitchen
- Temperature Control: Resist the urge to crank up the oven temperature to speed things up. A steady 180°C fan oven ensures the peppers cook through and become sweet without the cheesy topping burning.
- The Secret Step: Don’t skip the initial 10-15 minute pre-bake of the empty peppers. I learned that without this step, the peppers can remain a little too firm, even when the filling is fully cooked. This guarantees a perfectly soft and scoopable result.
- Make-Ahead Magic: You can prepare the entire beef and rice filling up to 2 days in advance and store it in an airtight container in the fridge. When you’re ready to eat, simply stuff the peppers, top with cheese, and bake as directed.
- Storage: Leftovers are a delight! Store any remaining stuffed peppers in an airtight container in the refrigerator for up to 3 days. Reheat in the oven at 180°C for 15 minutes or in the microwave until hot.
Common Mistakes to Avoid
- Overcrowding the Dish: Give your peppers some space in the baking dish. If they are packed in too tightly, they will steam rather than roast, preventing the edges from getting that lovely, slightly caramelised finish. Use two dishes if necessary.
- Using Cold Rice: If you’re using leftover rice from the fridge, make sure you stir it into the hot meat mixture thoroughly to warm it through. This ensures the filling heats evenly in the oven. The same principle applies in other rice-based dishes like my Parmesan Garlic Beef Bowtie Pasta where even heating is key.
- Skipping the Rest Time: Letting the peppers sit for 5 minutes after they come out of the oven is important. It allows the molten cheese and filling to set up a little, making them easier to serve without falling apart.
Delicious Variations to Try
This recipe is a wonderful starting point. Once you’ve mastered the basic version, feel free to experiment with these delicious twists.
- Spicy Kick: For those who like a bit of heat, add 1/2 teaspoon of chilli flakes or one finely chopped fresh red chilli along with the garlic.
- Vegetarian Option: Swap the Halal beef for a 400g tin of drained green or brown lentils, or a mixture of black beans and corn. You may need to add a little extra seasoning to boost the umami flavour.
- Different Protein: This recipe works wonderfully with Halal ground lamb, which adds a slightly richer flavour. Finely diced Halal chicken breast or thigh meat is also a great, leaner alternative.
What to Serve With Stuffed Peppers Halal Cheese
While these cheesy peppers are a complete meal on their own, a few simple sides can elevate them further. Here are some of my favourite pairings:
- A Crisp Green Salad: The freshness of a simple salad provides a lovely contrast to the rich, baked peppers. A light vinaigrette dressing is all you need. Our Classic House Salad with Red Wine Vinaigrette is an excellent match.
- Garlic Bread: Perfect for mopping up any delicious juices and sauce from the bottom of the dish.
- A Cool Drink: A glass of sparkling water with a squeeze of lemon or a traditional chilled yogurt drink like Ayran balances the warmth of the dish beautifully.
Frequently Asked Questions
Stuffed Peppers Halal Cheese
Ingredients
Method
- Preheat and Prep Peppers: Preheat your oven to 200°C (180°C fan). Slice the peppers in half lengthways, from stem to base. Remove the seeds and white membranes. Place the pepper halves cut-side up in a large baking dish and bake for 10-15 minutes to soften slightly. This head start is crucial for a tender result.
- Sauté the Aromatics: While the peppers are pre-baking, heat the olive oil in a large frying pan or skillet over a medium heat. Add the chopped onion and cook for 5-7 minutes, until soft and translucent. Add the minced garlic and cook for another minute until fragrant.
- Brown the Beef: Add the Halal ground beef to the pan. Break it up with a wooden spoon and cook until it's browned all over. Make sure to drain off any excess fat. This browning step is where so much flavour is developed, as explained well by cooking experts at BBC Good Food.
- Build the Filling Flavour: Stir in the smoked paprika, ground cumin, and dried oregano, and cook for a minute until the spices are aromatic. Pour in the chopped tomatoes and stir in the tomato purée. Season generously with salt and pepper.
- Simmer and Combine: Bring the mixture to a gentle simmer and let it cook for about 10 minutes, allowing the sauce to reduce and the flavours to meld together. What works best for me is to let it get quite thick, so it doesn't make the peppers soggy.
- Finish the Filling: Remove the pan from the heat and stir in the cooked rice and most of the chopped fresh parsley (save a little for garnish). Mix everything together until well combined.
- Stuff and Bake: Carefully remove the pre-baked peppers from the oven. Spoon the beef and rice mixture evenly into each pepper half, packing it in gently. I find that adding a splash of water (about 100ml) to the bottom of the baking dish helps the peppers to steam and become extra tender.
- Add Cheese and Final Bake: Top each stuffed pepper generously with the grated Halal cheddar cheese. Return the dish to the oven and bake for a further 20-25 minutes, or until the filling is piping hot and the cheese is melted, golden brown, and bubbling.
- Rest and Garnish: Let the peppers rest for a few minutes before serving. This helps the filling to set slightly. Garnish with the remaining fresh parsley and serve immediately.
Notes
I really hope you enjoy making these Stuffed Peppers with Halal Cheese as much as I do. It’s a dish full of honest, good flavours that brings a bit of sunshine to the dinner table, no matter the weather. It’s a true staple in my kitchen, and I’m thrilled to share it with you. Please let me know in the comments how yours turn out – I love hearing about your cooking adventures!
Happy cooking,
Adam Henderson