Tangy Pickled Red Onions For Tacos

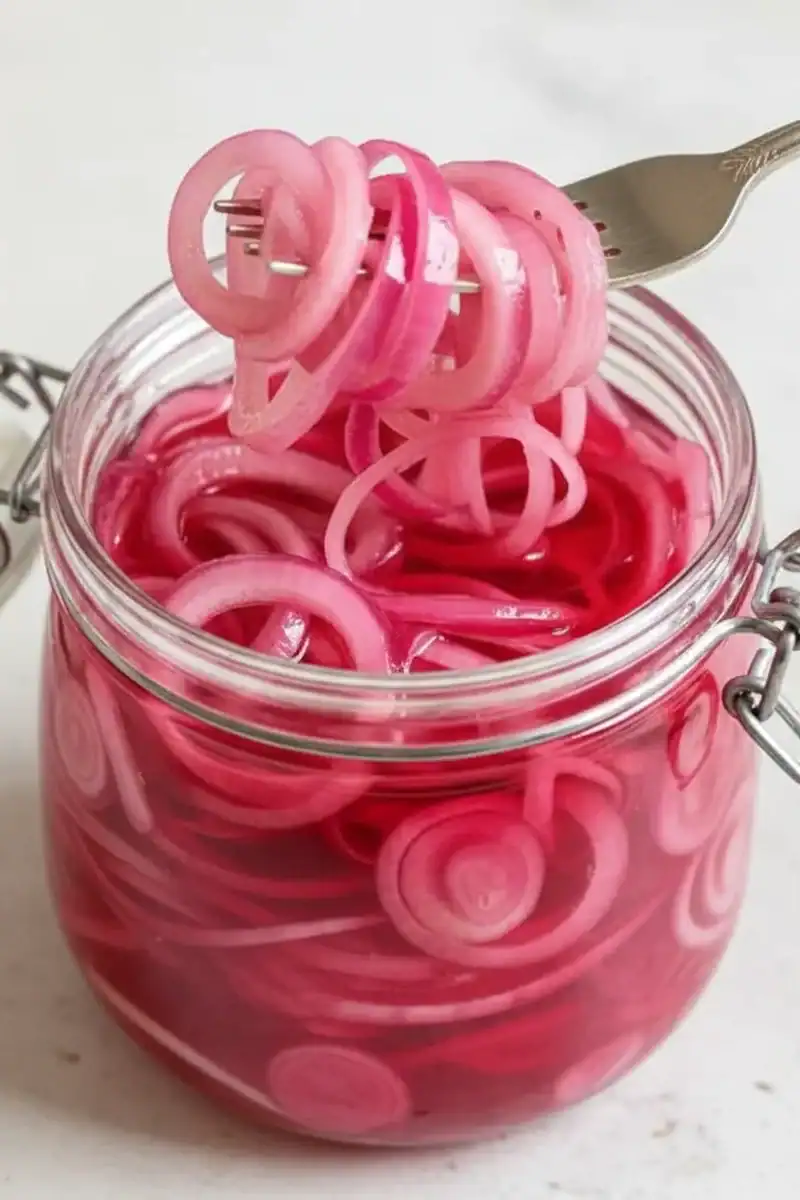
There are some things in the kitchen that offer a truly disproportionate return on your effort. A jar of homemade pickled red onions is right at the top of that list. For about fifteen minutes of active time, you get a condiment that can elevate countless meals for weeks to come. Forget the bland, overly sharp pickled onions you find in supermarket jars. What we’re making here is something else entirely: crisp, tangy, slightly sweet, and with a stunning, jewel-like magenta hue that brightens up any plate it graces.
I used to think making pickles was a complicated, day-long affair involving special equipment and lots of patience. But this red onion recipe uses a quick-brine method, meaning you can be enjoying them in under an hour. The magic happens when you pour a hot, seasoned brine over thinly sliced onions. The heat gently softens their fiery bite, while the vinegar and sugar work to preserve their crunch and transform them into something wonderfully zesty. They are a game-changer for tacos, a brilliant addition to salads, and the secret weapon your sandwiches have been missing.
This recipe is for anyone who loves that bright, acidic counterpoint to rich or savoury foods. It’s a staple in my fridge, and once you see how straightforward it is to prepare a batch, I’m sure it will become one in yours too. We’re not just making a topping; we’re creating a jar of vibrant potential that makes everyday food just that little bit more special.
Recipe Overview
This recipe produces a jar of beautifully pink, crisp-tender pickled red onions. The flavour profile is a carefully crafted balance of sharp tang from the vinegars, a subtle sweetness from the sugar, and a clean saltiness that enhances the onion’s natural character. I’ve tested this with various vinegar combinations, and I find that a mix of white wine and apple cider vinegar gives the most well-rounded flavour – bright but not harsh. They’re ready to eat quickly but develop a deeper, more complex taste after a night in the fridge.
- Prep Time: 10 minutes
- Cook Time: 5 minutes
- Total Time: 15 minutes (plus 30 minutes for cooling/pickling)
- Servings: Makes 1 x 500ml jar
- Difficulty: Easy
Why You’ll Love This Pickled Red Onions Recipe
- Genuine Flavour: The sharp, raw bite of the onion is mellowed into a delightful, zesty tang. They provide an acidic crunch that cuts through rich foods like cheese and grilled meats without ever being overpowering.
- Ready in 30 Minutes: While the flavour improves overnight, these onions are ready to be scattered on your tacos or salads just 30 minutes after you pour the brine over them.
- A Flexible Recipe: This is a brilliant base recipe. You can add a few black peppercorns, a couple of peeled garlic cloves, a bay leaf, or even a sliced red chilli to the jar to create your own signature version.
- Great for Everyday Meals: This isn’t just for special occasions. It works wonderfully for livening up a weekday lunch sandwich, a weeknight burrito bowl, or a simple avocado on toast.
- Family Tested: My kids absolutely devour these every time I make them, especially piled high on homemade burgers. They add a pop of colour and flavour that even the fussiest eaters seem to enjoy.
Ingredients You’ll Need
The beauty of this red onion recipe lies in its simple, accessible ingredients. The key is to use fresh, firm red onions. I always choose the ones that feel heavy for their size, as they tend to be juicier. For the vinegar, a combination of two types adds a bit more depth, but you can certainly use all of one kind if that’s what you have on hand.
- 2 large red onions (approximately 400g)
- 175ml white wine vinegar
- 175ml apple cider vinegar
- 150ml water
- 2 tablespoons caster sugar
- 1 ½ teaspoons fine sea salt
- Optional Aromatics:
- 1 teaspoon black peppercorns
- 2 cloves of garlic, lightly crushed
- 1 bay leaf
Adam’s Tip: For the most vibrant colour, ensure your onions are a deep, rich red. The natural anthocyanin pigments that give them their colour are the same ones that react with the vinegar to create that stunning fuchsia pink. The more pigment to start with, the brighter the result!
How to Make Pickled Red Onions
The process is very straightforward. We’re essentially just slicing the onions, making a simple brine on the hob, and then combining the two. The hot liquid does most of the work for you, tenderising the onions just enough while they soak up all that tangy flavour.
- Prepare Your Jar and Onions: First, ensure you have a clean 500ml glass jar with a tight-fitting lid. Wash it thoroughly in hot, soapy water and rinse well. While it air-dries, prepare your onions. Peel them, slice off the top and root, and then cut them in half from pole to pole.
- Slice the Onions: Using a very sharp knife or a mandoline (be careful!), slice the onion halves as thinly as you can. I aim for slices around 1-2mm thick. Uniformly thin slices will pickle more evenly.
- Pack the Jar: Gently separate the onion slices into rings and pack them into your clean jar. Don’t press them down too hard, but you want the jar to be quite full as they will settle a bit. If you’re using any optional aromatics like garlic or peppercorns, add them now.
- Make the Brine: In a small, non-reactive saucepan (stainless steel is ideal), combine the white wine vinegar, apple cider vinegar, water, caster sugar, and sea salt.
- Heat the Brine: Place the saucepan over a medium heat. Stir occasionally until the sugar and salt have completely dissolved. You want the mixture to be hot and steaming, but there’s no need to bring it to a rolling boil. This should take about 3-4 minutes.
- Pour and Pickle: Carefully pour the hot brine directly over the onions in the jar, making sure they are fully submerged. You should see them start to turn a beautiful bright pink almost instantly. What works best for me is using a small funnel to avoid any spills.
- Cool and Seal: Use a spoon to gently push down any onions sticking out of the liquid. Let the jar sit on the counter with the lid off for about 20-30 minutes to cool down slightly.
- Refrigerate: Once cooled, screw the lid on tightly and place the jar in the refrigerator. They are ready to eat in as little as 30 minutes, but for the best flavour and texture, leave them for at least a few hours or, ideally, overnight.
Tips From My Kitchen
- Mind the Brine Temperature: Pouring the brine over the onions while it’s hot is key to the quick-pickling process. It helps to slightly cook the onions, removing their raw harshness while allowing them to stay crisp. A vigorously boiling brine can make them mushy, so just aim for hot and steamy.
- The Slicing Secret: I learned that a mandoline is your best friend for this recipe. It creates consistently paper-thin slices that pickle evenly and have the most pleasant texture. If using a knife, take your time to get them as thin as you can.
- Make-Ahead Magic: These are designed to be made ahead. I often make a jar on a Sunday to use throughout the week. The flavour only gets better after a day or two in the fridge.
- Storage Savvy: Kept in a sealed jar in the coldest part of your fridge, your pickled red onions will last for up to 3 weeks. They will lose a little of their crispness over time but will remain delicious. Always use a clean fork to remove them from the jar.
Delicious Variations to Try
Once you’ve mastered the basic recipe, it’s great fun to experiment. The brine is a blank canvas for other flavours that you enjoy. Here are a few ideas to get you started:
- Spicy Pickled Onions: Add one thinly sliced jalapeño or a habanero pepper to the jar along with the onions. Alternatively, a teaspoon of dried red pepper flakes will give a gentle, warming heat.
- Herbaceous Notes: Tuck a few sprigs of fresh herbs into the jar before you add the brine. Dill, thyme, and oregano all work wonderfully and infuse the onions with a lovely aromatic quality.
- Sweet and Spiced: For a warmer flavour, add a cinnamon stick, a few whole cloves, and a star anise to the brine as it heats. This version is fantastic with pork or on a festive cheese board.
What to Serve With Pickled Red Onions
Their versatility is their greatest strength. They add a bright, acidic lift to so many dishes. Here are a few of my favourite ways to use them:
- Tacos, Burritos, and Nachos: They are a non-negotiable topping for any Mexican-inspired dish, cutting through the richness of the meat and cheese.
- Salads: They add a punch of flavour and stunning colour to any salad. They are particularly good in our Crunchy Asian Chicken Salad with Peanut Dressing or a simple green salad.
- Sandwiches and Burgers: Layer them into a grilled cheese sandwich, a pulled pork bun, or on top of a juicy burger. They prevent everything from tasting too heavy.
- Rich Pasta Dishes: A scattering of pickled onions over a creamy pasta, like our Garlic Parmesan Chicken Pasta, provides a fantastic and welcome contrast.
- Drink Pairing: The zesty nature of the onions pairs well with a crisp, dry white wine like a Sauvignon Blanc or a light, refreshing lager.
Frequently Asked Questions
Pickled Red Onions
Ingredients
Method
- Prepare Your Jar and Onions: First, ensure you have a clean 500ml glass jar with a tight-fitting lid. Wash it thoroughly in hot, soapy water and rinse well. While it air-dries, prepare your onions. Peel them, slice off the top and root, and then cut them in half from pole to pole.
- Slice the Onions: Using a very sharp knife or a mandoline (be careful!), slice the onion halves as thinly as you can. I aim for slices around 1-2mm thick. Uniformly thin slices will pickle more evenly.
- Pack the Jar: Gently separate the onion slices into rings and pack them into your clean jar. Don't press them down too hard, but you want the jar to be quite full as they will settle a bit. If you're using any optional aromatics like garlic or peppercorns, add them now.
- Make the Brine: In a small, non-reactive saucepan (stainless steel is ideal), combine the white wine vinegar, apple cider vinegar, water, caster sugar, and sea salt.
- Heat the Brine: Place the saucepan over a medium heat. Stir occasionally until the sugar and salt have completely dissolved. You want the mixture to be hot and steaming, but there's no need to bring it to a rolling boil. This should take about 3-4 minutes.
- Pour and Pickle: Carefully pour the hot brine directly over the onions in the jar, making sure they are fully submerged. You should see them start to turn a beautiful bright pink almost instantly. What works best for me is using a small funnel to avoid any spills.
- Cool and Seal: Use a spoon to gently push down any onions sticking out of the liquid. Let the jar sit on the counter with the lid off for about 20-30 minutes to cool down slightly.
- Refrigerate: Once cooled, screw the lid on tightly and place the jar in the refrigerator. They are ready to eat in as little as 30 minutes, but for the best flavour and texture, leave them for at least a few hours or, ideally, overnight.
Notes
Having a jar of these pickled red onions in the fridge is like having a little culinary secret weapon. They are such a simple way to add a burst of flavour and visual appeal to your meals. I truly hope you give this red onion recipe a try. Once you do, you’ll find yourself scattering them on just about everything. I’d love to hear what delicious creations you use them on – let me know in the comments below!