
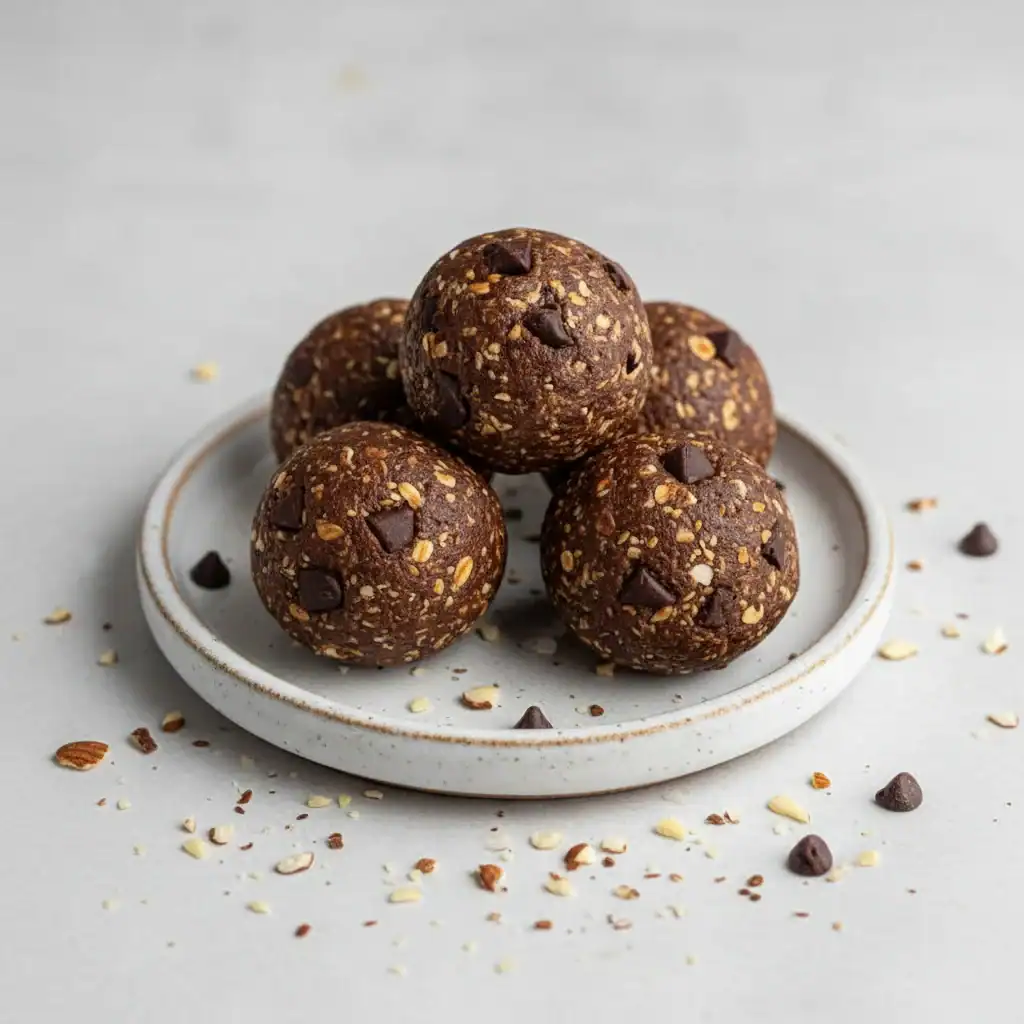
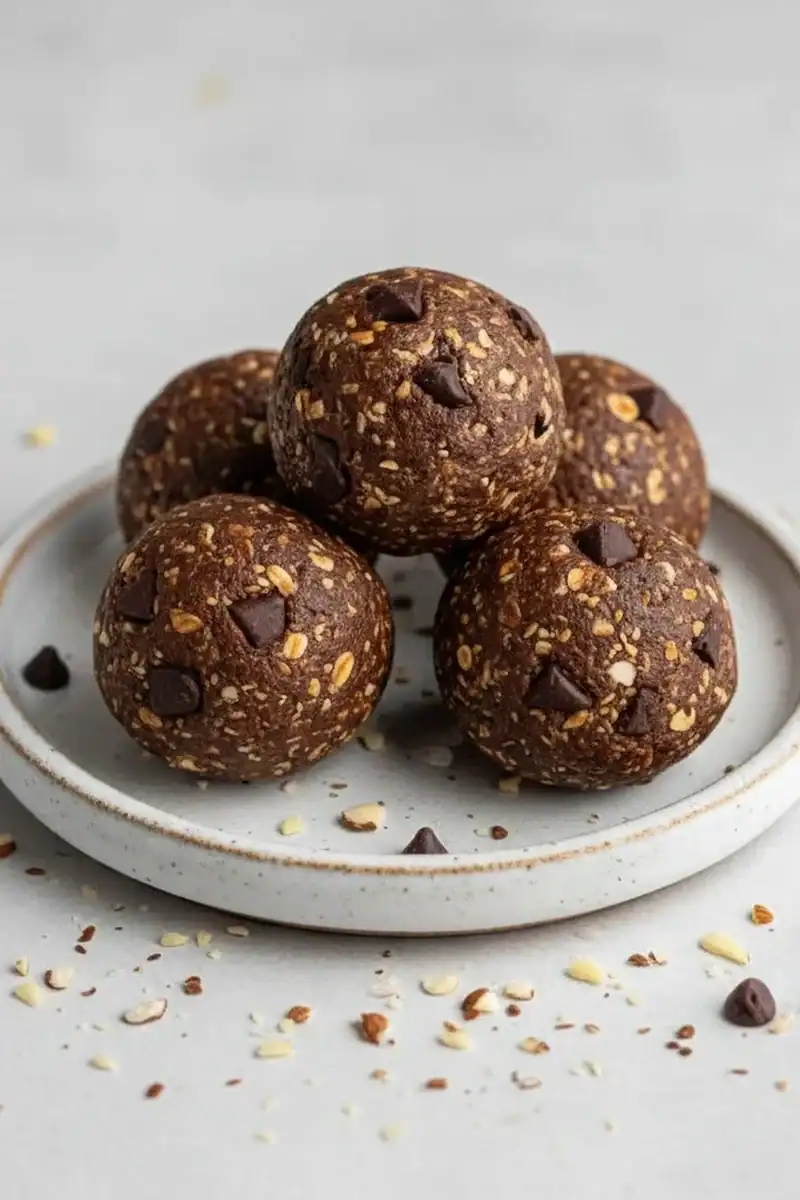
Chocolate Almond Butter Protein Balls
There comes a point in most afternoons, usually around 3 pm, when my energy levels take a nosedive. It’s that familiar slump where the kettle calls, but so does the biscuit tin. For years, I searched for a healthier alternative that still felt like a proper treat, something to power me through until dinner without the sugar crash. That search led me to create these Chocolate Almond Protein Balls, and honestly, they’ve been a game-changer in our house. My kids absolutely devour these every time I make them, thinking they’re getting a sweet treat while I know they’re packed with goodness.
What makes these little energy bites so special is the balance of flavour and texture. We’re not just throwing ingredients into a bowl; we’re creating something genuinely satisfying. The rich, slightly bitter notes of dark cocoa powder are perfectly offset by the creamy, nutty depth of almond butter. Rolled oats provide a wonderful, chewy structure, while a touch of maple syrup adds just enough sweetness to make them feel indulgent. They are the ideal snack for anyone leading a busy life, whether you need a post-workout refuel, a healthy addition to a lunchbox, or simply a smarter way to tackle that mid-afternoon craving.
Recipe Overview
These no-bake Chocolate Almond Protein Balls are a straightforward way to create a batch of healthy, satisfying snacks. The final result is a batch of dense, chewy chocolate balls with a deep nutty flavour from the almond butter. I’ve found that letting them chill for at least 30 minutes is non-negotiable; it allows the oats to soften slightly and the flavours to meld together, creating a much better texture.
- Prep Time: 15 minutes
- Cook Time: 0 minutes
- Total Time: 45 minutes (including chilling)
- Servings: Makes 18-20 balls
- Difficulty: Easy
Why You’ll Love These Chocolate Almond Protein Balls
- Genuine Flavour: The taste is rich and complex. You get the deep chocolate hit from a good quality cocoa powder, the creamy, savoury notes from the almond butter, and a gentle sweetness from maple syrup that doesn’t overwhelm. The hint of salt is crucial—it really makes the chocolate flavour pop.
- Ready in Under 20 Minutes: From gathering your ingredients to having the balls rolled and ready for the fridge, the whole process takes about 15 minutes. It’s a brilliant recipe when you’re short on time but want to prep something healthy for the week ahead.
- Flexible Recipe: This recipe is wonderfully adaptable. You can swap the almond butter for peanut or cashew butter, use honey instead of maple syrup, or add in a tablespoon of chia seeds or ground flaxseed for an extra nutritional boost.
- Great for On-the-Go Snacking: These energy bites are brilliant for so many occasions. They work wonderfully as a pre- or post-gym snack, a healthy lunchbox filler for kids and adults, or simply as a satisfying bite to have with your afternoon cuppa.
- Family Tested: This is one of those recipes that everyone seems to love. Friends always ask me for this recipe after trying them when they pop over for a coffee. They are simple, wholesome, and taste like a real treat.
Ingredients You’ll Need
For these protein balls, the quality of your ingredients really shines through, especially the almond butter and cocoa powder. I prefer using a smooth, runny almond butter made from 100% almonds, as thicker, over-processed versions can make the mixture dry. My go-to is often Pip & Nut for its excellent consistency.
- 150g rolled oats (porridge oats work perfectly)
- 120g smooth almond butter
- 80ml maple syrup
- 60g chocolate protein powder (whey or plant-based)
- 30g unsweetened cocoa powder
- 2 tbsp ground flaxseed
- 1 tsp vanilla extract
- 1/4 tsp sea salt
- 2-4 tbsp milk of your choice (dairy or plant-based, as needed)
- 50g dark chocolate chips (optional, but recommended!)
Adam’s Tip: If your almond butter is quite thick and stiff (especially if it’s been in the fridge), warm it gently in the microwave for 15-20 seconds. This will make it much easier to mix everything together evenly.
How to Make Chocolate Almond Protein Balls
This process is all about combining and rolling. There’s no cooking involved, which makes it a fantastic recipe to get kids involved with. The key is to get the consistency just right before you start rolling.
- Combine Dry Ingredients: In a large mixing bowl, add the rolled oats, protein powder, cocoa powder, ground flaxseed, and sea salt. Give it a good stir with a fork or a whisk to ensure everything is evenly distributed. This prevents getting clumps of cocoa or salt in the final balls.
- Combine Wet Ingredients: In a separate, smaller bowl, mix together the smooth almond butter, maple syrup, and vanilla extract. Stir until the mixture is smooth and well-combined.
- Mix Wet and Dry: Pour the wet almond butter mixture into the large bowl with the dry ingredients. Using a sturdy spatula or wooden spoon, mix everything together. It will be quite stiff and seem a bit dry at first, but keep mixing until it starts to come together into a thick, sticky dough.
- Add Chocolate Chips: If you’re using them, fold in the dark chocolate chips until they are evenly spread throughout the mixture.
- Adjust Consistency: Check the texture of the mixture. It should be slightly sticky but hold its shape when you squeeze a piece in your hand. If it feels too dry and crumbly, add the milk one tablespoon at a time, mixing well after each addition, until it holds together easily. I find that different protein powders can absorb liquid differently, so you might need more or less milk.
- Roll the Balls: Take about a tablespoon of the mixture and roll it firmly between your palms to form a ball about 1-inch in diameter. What works best for me is to have slightly damp hands, as this stops the mixture from sticking. Place the rolled ball onto a baking tray lined with parchment paper.
- Repeat and Chill: Continue rolling until you have used all the mixture. You should get between 18 and 20 balls. Place the baking tray in the refrigerator and chill for at least 30 minutes. This step is essential as it helps the balls to firm up and hold their shape perfectly.
Tips From My Kitchen
- Mind the Stickiness: If the mixture feels too sticky to roll, pop the entire bowl in the fridge for 15-20 minutes before rolling. This will firm up the almond butter and make it much more manageable.
- The Secret Step: I learned that pressing the mixture down firmly in the bowl with the back of a spoon before you start rolling helps to compact it. This ensures the balls hold together better and don’t crumble later on.
- Make-Ahead Magic: These are ideal for meal prep. You can make a double batch at the weekend and have healthy snacks ready for the entire week. They are a lifesaver on busy weekday mornings.
- Storage Savvy: Store the protein balls in an airtight container in the refrigerator for up to one week. For longer storage, you can freeze them for up to 3 months. Just lay them on a baking tray to freeze individually, then transfer them to a freezer bag. They thaw in about 15-20 minutes at room temperature.
Equipment You’ll Need
- Large mixing bowl
- Small mixing bowl
- Measuring cups and spoons
- Sturdy spatula or wooden spoon
- Baking tray lined with parchment paper
Common Mistakes to Avoid
- Using the Wrong Almond Butter: Avoid using “natural” almond butter that has a thick, dry layer at the bottom of the jar. You need a well-mixed, smooth, and slightly runny consistency to bind the ingredients. If yours is separated, make sure to stir it extremely well before measuring.
- Adding Too Much Liquid at Once: If your mixture is dry, it can be tempting to pour in a lot of milk. Resist! Add it just one tablespoon at a time. It’s very easy to go from too dry to too wet, which results in mushy balls that won’t hold their shape.
- Skipping the Chill Time: I know it’s tempting to eat them straight away, but chilling is crucial. It gives the oats time to absorb some of the moisture, which creates that lovely chewy texture and allows the flavours to develop. They will be much firmer and more satisfying after a rest in the fridge.
Delicious Variations to Try
Once you’ve mastered the base recipe, it’s great fun to experiment with different flavours and textures. Here are a few ideas we love in our house:
- Nut-Free Version: For a nut-free alternative suitable for school lunchboxes, swap the almond butter for sunflower seed butter or tahini. The flavour will be different but just as delicious.
- Coconut & Cherry: Add 30g of desiccated coconut and 40g of chopped dried cherries to the dry ingredients for a wonderfully chewy, fruity twist. You can also roll the finished balls in extra coconut.
- Salted Caramel Flavour: Use a salted caramel flavoured protein powder and add a few extra flakes of sea salt on top of each ball before chilling. This is a truly decadent-tasting variation. For another sweet and satisfying bake, you could try my Classic Banana Bread Recipe.
What to Serve With Chocolate Almond Protein Balls
These energy bites are designed to be a standalone snack, but they pair beautifully with a few things to round them out.
- A Hot Drink: They are absolutely fantastic with a strong cup of coffee in the morning or a calming herbal tea in the afternoon. The rich chocolate flavour is a natural partner for a hot beverage.
- Fresh Fruit: For a more substantial snack, have two or three protein balls alongside a banana or a handful of fresh raspberries. The fruit adds a lovely freshness that cuts through the richness.
- After a Light Meal: Sometimes, after a healthy lunch like my Crunchy Asian Chicken Salad, you just want a little something sweet. One of these is the perfect portion-controlled dessert.
Frequently Asked Questions
Chocolate Almond Protein Balls
Ingredients
Method
- Combine Dry Ingredients: In a large mixing bowl, add the rolled oats, protein powder, cocoa powder, ground flaxseed, and sea salt. Give it a good stir with a fork or a whisk to ensure everything is evenly distributed. This prevents getting clumps of cocoa or salt in the final balls.
- Combine Wet Ingredients: In a separate, smaller bowl, mix together the smooth almond butter, maple syrup, and vanilla extract. Stir until the mixture is smooth and well-combined.
- Mix Wet and Dry: Pour the wet almond butter mixture into the large bowl with the dry ingredients. Using a sturdy spatula or wooden spoon, mix everything together. It will be quite stiff and seem a bit dry at first, but keep mixing until it starts to come together into a thick, sticky dough.
- Add Chocolate Chips: If you're using them, fold in the dark chocolate chips until they are evenly spread throughout the mixture.
- Adjust Consistency: Check the texture of the mixture. It should be slightly sticky but hold its shape when you squeeze a piece in your hand. If it feels too dry and crumbly, add the milk one tablespoon at a time, mixing well after each addition, until it holds together easily. I find that different protein powders can absorb liquid differently, so you might need more or less milk.
- Roll the Balls: Take about a tablespoon of the mixture and roll it firmly between your palms to form a ball about 1-inch in diameter. What works best for me is to have slightly damp hands, as this stops the mixture from sticking. Place the rolled ball onto a baking tray lined with parchment paper.
- Repeat and Chill: Continue rolling until you have used all the mixture. You should get between 18 and 20 balls. Place the baking tray in the refrigerator and chill for at least 30 minutes. This step is essential as it helps the balls to firm up and hold their shape perfectly.
Notes
I really hope you give these Chocolate Almond Protein Balls a go. They are such a staple in my kitchen for keeping healthy snacks on hand that still feel like a proper indulgence. They come together so quickly and are a brilliant way to stay energised throughout the day. If you try them, I’d love to know what you think. Please leave a comment below and let me know how they turned out!
All the best,
Adam Henderson


